
In this tutorial, we will be able to master the shortcut for Excel autofit column width. This feature is invaluable for organizing data clearly and concisely.
Knowing the shortcuts in Excel allows us to work quickly and efficiently, saving us time and increasing our productivity. If you are a beginner in Excel, you may visit our website to learn a lot about Excel shortcuts and functions. In summary, you will be able to learn everything you need to know about Excel there.
Anyway, manually adjusting the width of our columns can be time-consuming, especially when we have a large quantity of data. Fortunately, Excel has the autofit column width tool, which can help us work quickly and efficiently.
What is the Autofit Column Width in Excel?
The Autofit Column Width feature in Excel is an essential tool. It allows us to efficiently and rapidly adjust the width of a column to fit its content. It indicates that this tool automatically adjusts the width of a column based on the length of its text.
In addition to that, this tool is valuable to those who are working with Excel. It also helps us ensure that our data is presented clearly and is reader-friendly.
On the other hand, to avoid getting off-topic here’s a simple tutorial on the shortcut for autofit column width.
Excel shortcut to Autofit Column Width (Tutorial)
Time needed: 1 minute
The following is the keyboard shortcut for the autofit column width in Excel.
- Select your data.
The first thing to do is select the data to which you want to apply the autofit column width feature.
Note: You can also select any cell containing your data, then press CTRL + A to select all your data.
- Hold the Alt key, then press the H, O, and I keys.
The next and last thing we should do is hold the alt key, then press the keys H, O, and I.
- Result.


Summary: The shortcut keys for Autofit Column Width in Excel are Alt + H + O + I.
Ribbon Method
In this guide, we’ll learn the ribbon method for autofitting the width of our columns. Here’s how:
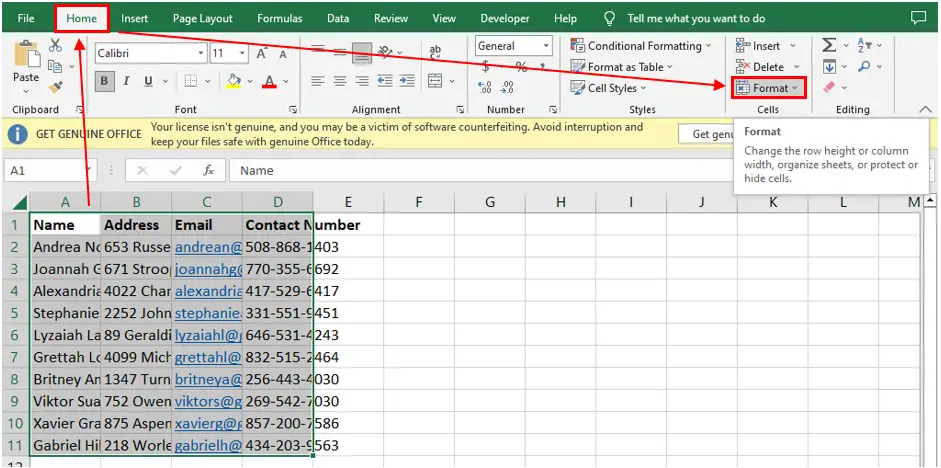
Step 1: Select a column or the Ctrl + A keys to select all your data.
Step 2: Go to the Home tab, then to the Cells group, and click the Format button.
After clicking the format button, select the autofit column width.
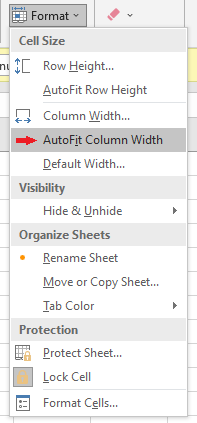
Summary: Select a column or click Ctrl + A, go to Home > Cells, then click Format > AutoFit Column Width.Autofit Column Width Shortcut using the Mouse
Almost all of us know how to adjust the width of a column using a mouse by dragging the column header. However, we’ll still provide a guide on how to do it. So, here’s how we adjust the width of a column using a mouse:
- In this guide, there won’t be a lot of steps, not even three or two. We’ll only have a single step, and it’s as simple as 1, 2, 3. The only thing we have to do is drag the right border of the column heading to resize the column width.

Note: You can do the same for other columns.Conclusion
In conclusion, an autofit column width in Excel is a time-saving tool for adjusting a column width. It is essential for making Excel work simple and more productive.
Whether you’re a beginner or an advanced user of Excel, this tool is a must-have. It allows us to work quickly and efficiently.
I believe that we have accomplished this tutorial. I hope you’ve learned something from this. Do not forget to share this with your friends. If you have any questions or suggestions, please leave a comment below, and for more educational content, visit our website.
Thank you for reading!

Elijah Galero
Programmer & Technical Writer at PIES IT Solution
Elijah Galero is a programmer and writer at PIES IT Solution, author of 175+ tutorials at itsourcecode.com. Specializes in Python error debugging (AttributeError, TypeError, ModuleNotFoundError), Python programming tutorials, and Microsoft Excel how-to guides for BSIT students and productivity learners.
Expertise: Python · Python Errors · Python AttributeError · Python TypeError · ModuleNotFoundError · MS Excel · MS PowerPoint · View all posts by Elijah Galero →