
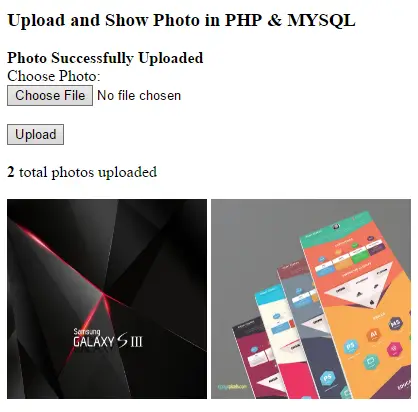
In this tutorial about Upload and Show Image Using PHP/MYSQL, you will learn on how to upload an image in the database and show it in a page after uploading the image.
First, create a database and name it as any name you desire. Then create a table, name it as “photos“.
[sql]CREATE TABLE `photos` ( `photo_id` int(11) NOT NULL, `photo_link` text NOT NULL ) ENGINE=MyISAM DEFAULT CHARSET=latin1;[/sql]On the index page, put the following codes.
[php]<?php include 'connection.php'; ?>
<!DOCTYPE html>
<html>
<head>
<meta charset="UTF-8">
<title>Upload Photo in PHP & MYSQL</title>
</head>
<body>
<h3>Upload and Show Photo in PHP & MYSQL</h3>
<?php
if (isset($_GET['upload_action'])) {
if ($_GET['upload_action'] == "success") { ?>
<b>Photo Successfully Uploaded</b>
<?php }
}
?>
<form method="post" action="upload.php" enctype="multipart/form-data">
<label>Choose Photo:</label><br>
<input type="file" name="photo" /><br><br>
<input type="submit" value="Upload" />
</form><br>
<?php
$photos = $mysqli->query("SELECT * FROM photos");
?>
<b><?php echo $photos->num_rows ?></b> total photos uploaded<br><br>
<?php
while ($photo_data = $photos->fetch_assoc()) { ?>
<img src="<?php echo $photo_data['photo_link']; ?>" width="200px" height="200px" />
<?php }
?>
</body>
</html>[/php]
Create an “upload.php” file then put the following codes.
[php]<?php
include 'connection.php';
if ($_FILES['photo']['name'] != null) {
move_uploaded_file($_FILES['photo']['tmp_name'], "images/" . $_FILES['photo']['name']);
$img_link = "images/" . $_FILES['photo']['name'];

$upload = $mysqli->query("INSERT INTO photos (photo_link) VALUES ('$img_link')") or die($mysqli->error);
if ($upload) {
header("Location: index.php?upload_action=success");
} else if (!$upload) {
echo $mysqli->error;
}
} else if ($_FILES['photo']['name'] == null) {
echo 'Please choose a photo.';
}
?>[/php]
Screenshot:
If you have any questions or suggestion about Upload and Show Image Using PHP/MYSQL, please feel free to contact us at our contact page.
Technology stack and requirements
To run this PHP project, you need these tools on your development machine:
- XAMPP or WAMP server. Bundles Apache, MySQL, and PHP so you can run PHP on Windows without individual installs. Free from apachefriends.org.
- PHP 8.0 or higher. Included with XAMPP. Older versions (5.x, 7.x) may work but modern PHP features improve security and performance.
- MySQL or MariaDB. Comes with XAMPP. phpMyAdmin manages the database through a browser UI.
- VS Code or PhpStorm. Free code editor with PHP syntax highlighting, IntelliSense, and debugging support.
- Web browser. Chrome, Firefox, or Edge for testing the running app.
Installing the source code
- Download the archive. Get the ZIP file from the download link on this page and extract it.
- Move to htdocs. Place the extracted folder inside C:\xampp\htdocs\ so Apache can serve it.
- Import the database. Open http://localhost/phpmyadmin, click Import, and select the .sql file included in the archive.
- Update database credentials. Open the config.php or connection.php file and set the correct database name, username, and password (default XAMPP: root / empty password).
- Run the project. Start Apache + MySQL in XAMPP, then visit http://localhost/your-project-folder/ in a browser.
Using this project for your BSIT capstone
This PHP project maps cleanly to standard BSIT capstone documentation. Suggested chapter alignment:
- Chapter 1 (Introduction). Discuss the problem the system solves in real-world context. Cite Philippine business or academic use cases where a manual process could be replaced.
- Chapter 2 (Review of Related Literature). Compare this system’s features against 5-10 similar published projects. Cite journals like IJERT or IEEE Access for academic-standard sources.
- Chapter 3 (Methodology). Include Use Case Diagram, Data Flow Diagram, Entity Relationship Diagram, and Activity Diagram covering all major workflows.
- Chapter 4 (Results and Discussion). Screenshot each module of the running system with a caption explaining what data it processes and which user role interacts with it.
- Chapter 5 (Conclusion and Recommendations). Identify features that could be added in a Version 2, such as mobile app, REST API export, or AI-powered analytics.
Modules typical of Upload and Show Image Using PHP/MYSQL
- Master data. CRUD forms for the primary entities with search and filter.
- Transaction processing. Data entry forms for day-to-day operations the system automates.
- Reports. Formatted printable output summarizing activity per day, user, or category.
- User management. Login with role-based permissions (Admin, Encoder, Viewer).
- Backup and restore. Export database to a .sql file and restore when needed.
Common enhancements for capstone review
- Modernize the UI. Add Bootstrap 5 or Tailwind CSS for a polished appearance.
- Add printable receipts. Use TCPDF or FPDF to generate PDF reports.
- Multi-user concurrency. Ensure database handles simultaneous writes without lost-update errors.
- Rewrite in Laravel. Migrate to Laravel for maintainability and modern development patterns.
Project timeline for BSIT capstone
Typical BSIT capstone teams complete a PHP project of this scope in one full academic semester. Suggested timeline:
- Weeks 1-2. Requirements gathering, interview with target user, initial Chapter 1 documentation.
- Weeks 3-4. Design phase: use case, DFD, ER diagram, mockup screens.
- Weeks 5-8. Core development: database in MySQL, main pages in PHP, CRUD operations.
- Weeks 9-11. Reports, printing, user roles. Test with sample data.
- Weeks 12-13. Documentation: Chapter 3 methodology, Chapter 4 screenshots, Chapter 5 conclusion.
- Week 14. Mock defense with adviser, corrections, final panel.
Panel questions this project typically gets
- What existing systems are similar and how is yours different? Prepare a comparison table showing 3-5 alternatives and the specific gaps your project addresses.
- How do you validate data entry? Walk through validation on 2-3 key forms with regex, range, and required-field enforcement.
- How does the system handle concurrent access? Explain your MySQL transaction strategy and locking approach.
- What is your backup and disaster recovery plan? Document a backup schedule and demonstrate a restore.
- How would you deploy this in production? Explain shared-hosting setup or migration to a Laravel-based cloud deployment.
Deployment options after the defense
- Shared hosting. Upload to cPanel-based shared hosting (Hostinger, GoDaddy) for immediate live access with a custom domain.
- VPS or cloud. Move to DigitalOcean, Vultr, or AWS Lightsail for scalable performance.
- Local LAN install. Host XAMPP on one PC and let 3-5 clients access via the office network.
- Laravel migration. Rewrite with Laravel for cleaner architecture, better security, and modern development workflow.
Common defense pitfalls to avoid
- Empty database. Pre-populate 20-50 realistic sample records so demos are meaningful.
- Missing error handling. Wrap SQL queries in try/catch and show user-friendly errors instead of raw exception dumps.
- No printable output. Panel expects at least one printable report (TCPDF or FPDF).
- Untested login. Prepare demo Admin + User accounts and test both before the panel.
- SQL injection vulnerability. Use prepared statements everywhere; panels do check for this.
Where to get help while building
- itsourcecode.com free downloads. Browse other PHP projects for similar patterns.
- PHP official manual. The canonical reference for language syntax and standard functions.
- Stack Overflow PHP tag. Fastest place to get unstuck on a specific error.
- YouTube capstone walkthroughs. Search for demos of similar systems to see defense structure.
- Your adviser. Regular check-ins keep the project on track.
Official documentation
Frequently Asked Questions
How does PHP file upload work in this example?
Form with enctype=’multipart/form-data’, PHP move_uploaded_file() for filesystem storage. Validate via $_FILES[‘file’][‘type’] + filesize check. Track filename + path in MySQL. Display via standard or .
What PHP and MySQL versions does this project require?
Most projects in this batch run on PHP 7.4 to PHP 8.2 with MySQL 5.7+ or MariaDB 10+. A few older projects need PHP 5.6 (deprecated, use XAMPP 7.x). To run: install XAMPP / WAMP / Laragon, extract project to htdocs, import the included .sql file via phpMyAdmin, edit the connection file (usually config.php or db_connect.php) with your DB credentials, browse to the project URL in your browser.
How do I set up the database for this PHP project?
Open phpMyAdmin (http://localhost/phpmyadmin/ on XAMPP), create a new empty database with the name specified in the project’s config.php. Click the Import tab, choose the included .sql file, click Go. Then edit config.php (or includes/connection.php) with: ‘localhost’, your MySQL username (usually ‘root’), your MySQL password (usually blank for XAMPP), and the database name.
Can I use this PHP project for a BSIT capstone or thesis?
Yes, but extend it. A bare CRUD app is too narrow for full capstone scope. Add: user roles via session checks, reports/dashboards (Chart.js + AJAX), PDF exports (TCPDF library), email notifications (PHPMailer), real domain extension (analytics, audit log, multi-branch support). Pair with Chapter 1-5 documentation matching your panel’s rubric.
Why am I getting ‘connection error’ or ‘undefined function mysqli_connect’?
Three common PHP issues: (1) Connection error: Apache + MySQL services not running in XAMPP control panel, OR database name in config.php does not match what you created in phpMyAdmin. (2) ‘undefined function mysqli_connect’: MySQL extension not enabled, in php.ini uncomment extension=mysqli (then restart Apache). (3) ‘No such file or directory’: MySQL socket path wrong, use 127.0.0.1 instead of localhost in the connection string.
Where can I find more PHP projects with source code?
Browse the PHP Projects hub for the full library (300+ vanilla PHP systems). For modern PHP MVC alternatives see Laravel Projects (74 systems) or CodeIgniter Projects (32 systems). For BSIT-focused capstone idea lists see 150 Best Capstone Project Ideas.