How to Used a Module in AutoSuggest and AutoAppend in VB.Net
This tutorial is all about How to Used a Module in AutoSuggest and AutoAppend in VB.Net and MySQL Database.
On my first tutorial, I teach you how to How to Create an AutoComplete in a TextBox in VB.Net. Now, in this Tutorial I will teach you how to use Module in AutoAppend and Suggest in a TextBox in VB.Net and MySQL Database. With this, the record will suggest and append instantly in the Textbox.
What is Visual Basic’s purpose?
The third-generation programming language was created to aid developers in the creation of Windows applications. It has a programming environment that allows programmers to write code in.exe or executable files. They can also utilize it to create in-house front-end solutions for interacting with huge databases. Because the language allows for continuing changes, you can keep coding and revising your work as needed.
However, there are some limits to the Microsoft Visual Basic download. If you want to make applications that take a long time to process, this software isn’t for you. That implies you won’t be able to use VB to create games or large apps because the system’s graphic interface requires a lot of memory and space. Furthermore, the language is limited to Microsoft and does not support other operating systems.
What are the most important characteristics of Visual Basic?
Microsoft Visual Basic for Applications Download, unlike other programming languages, allows for speedier app creation. It has string processing capabilities and is compatible with C++, MFC, and F#. Multi-targeting and the Windows Presentation Framework are also supported by the system, allowing developers to create a variety of Windows apps, desktop tools, metro-style programs, and hardware drivers.
Let’s Begin:
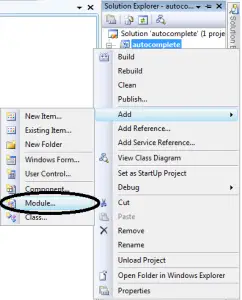
Open the Visual Basic and Create a New Windows Form Application. After that, create a Module and name it “autoappend”.
Set up the connection from MySQL Database to Visual Basic and declare all the classes are needed.
[vbnet]
Public con As MySqlConnection = New MySqlConnection(“server=localhost;user id=root;database=dbemployees”)
Public cmd As New MySqlCommand
Public da As New MySqlDataAdapter
Public dt As New DataTable
[/vbnet]
2. After setting up the connection, create a method of AutoAppend and Autosuggest.
[vbnet]
‘CREATE A SUB ROUTINE OF THE AUTO SUGGEST AND APPEND
Public Sub autocompletetxt(ByVal sql As String, ByVal txt As TextBox)
Try
dt = New DataTable
‘OPENING THE CONNECTION
con.Open()
‘HOLDS THE DATA TO BE EXECUTED
With cmd
.Connection = con
.CommandText = sql
End With
‘FILLING THE DATA IN THE DATATABLE
da.SelectCommand = cmd
da.Fill(dt)
‘SET A VARIABLE AS A ROW OF DATA IN THE DATATABLE
Dim r As DataRow
‘CLEARING THE AUTOCOMPLETE SOURCE OF THE TEXTBOX
txt.AutoCompleteCustomSource.Clear()
‘LOOPING THE ROW OF DATA IN THE DATATABLE
For Each r In dt.Rows
‘ADDING THE DATA IN THE AUTO COMPLETE SOURCE OF THE TEXTBOX
txt.AutoCompleteCustomSource.Add(r.Item(0).ToString)
Next
””””””””””””
Catch ex As Exception
MsgBox(ex.Message)
End Try
‘CLOSING THE CONNECTION
con.Close()
da.Dispose()
End Sub
[/vbnet]
Go back to the Form Design and set up the Form just like this.

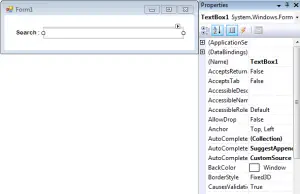
4. Click the TextBox and go to the Properties. In the ”Properties” hit the ”AutoComplete Mode” and select ”SuggestAppend”. After that, hit the ”AutoComplete Source” and select ”Costume Source”.

5. after setting up the properties of the TextBox, double click the Form and call the name of the method that you have created in the first load of the Form.
[vbnet]
Private Sub Form1_Load(ByVal sender As System.Object, ByVal e As System.EventArgs) Handles MyBase.Load
Dim sql As String
sql = “SELECT F_NAME FROM employees”
autocompletetxt(sql, TextBox1)
End Sub
[/vbnet]
The database of this project is in here
Finally, Press F5 on the keyboard of you computer to run your project.
Download the complete source code and run it on your computer.
Readers might read also:


