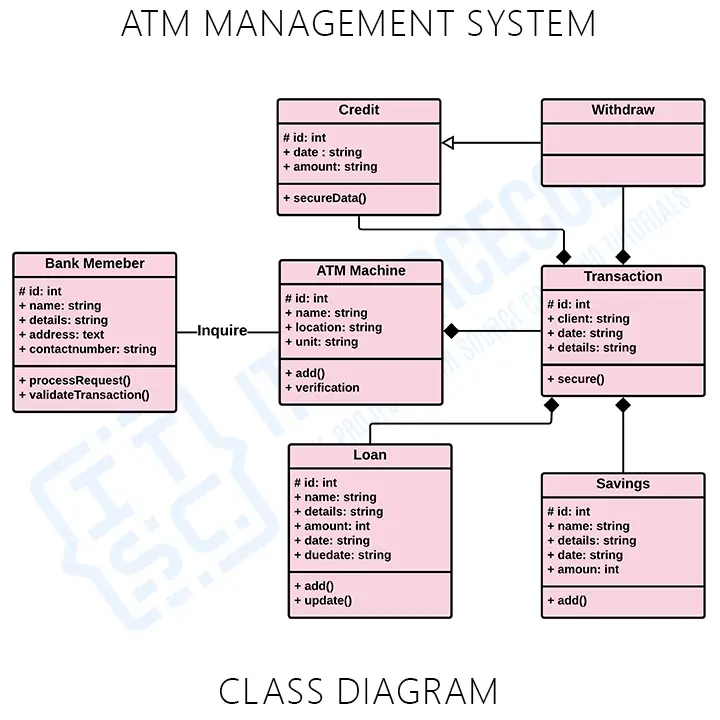
ATM Management System Class Diagram
A class diagram is used to represent, explain, and document the parts (classes) of an ATM machine management system. It can also be a reference or way to create executable software code.
Class diagrams provide an overview of the system’s classes, functions, and relationships.
Project Overview
| Name: | ATM Management System UML Class Diagram |
| UML Diagram: | Class Diagram |
| Users: | Bank Admin, Employee, and Card Holders. |
| Tools Used: | Any Diagram tools that provide use case diagram symbols. |
| Designer: | ITSourceCode.com |
What is an ATM System?
The ATM system is specialized software that aids in managing a bank account or holder’s funds simply. Users can check account balances, make cash withdrawals or deposits, print a record of account activities or transactions, and even purchase stamps via the system.
Customers can utilize the system to conduct self-service transactions such as deposits, cash withdrawals, bill payments, and account transfers. The bank where the account is stored, the ATM operator, or both, frequently levy cash withdrawal fees
What is a Class Diagram?
A UML class diagram for ATM machine system is crucial and useful for system development. This is because the class diagrams are very effective in showing the system’s structure in detail, including the structures of each class. This works best with other ATM Management System UML Diagrams.
Additionally, the class diagram blueprints show how things in the system work and are related. It also offers the system’s activities and the services it provides. Therefore, a class diagram defines the physical components of a system and can directly relate to object-oriented languages.
ATM Management System Class Diagram
This simple class diagram gives you the exact details about the system’s class characteristics and methods. It also clarifies the connections of classes in the system.
Here, I will be showing you the sample constructed class diagram provided with its attributes and methods. This is from the simple idea of the ATM machine system’s common function.

The illustration shows a simple idea of how the class diagram works. It resembles a flowchart in which classes are present in boxes with three rectangles in each. The top rectangle has the class’s name; the middle holds the class’s properties, and the bottom contains the class’s methods.
The classes identified for ATM Management System were credit, withdrawal, bank member, ATM machine, transaction, loan, and savings. Their roles are in the middle part and called their attributes. The function of each class is in its’ methods.
You can edit this diagram and it is up to you how will you create your class diagram. However, you need to be precise with your information and consider the decisions included.
Downloadable Pdf File
How to Draw a Class Diagram?
Time needed: 1 minute
Steps in creating Class Diagram for ATM Machine System.
- Step 1: Familiarize Class Diagram Components
Class Diagram Components are used to create class diagrams. They should be familiarized before you build the class diagram.
To plot the class diagram you will need the class name, its attributes, methods, and their access (visibility). You will base the diagram on the evaluated information to have the exact Class Diagram. - Step 2: Determine the targeted users
Classes are the main part of the diagram and it is presented in a box with three main partitions. It should be declared properly because it could be converted to codes.
- Step 3: Analyze the activities included
Attributes of a class should be placed in the middle part of a class. They were then assigned visibility symbols. This visibility has something to do with the codes.
The operations will be placed at the bottom of a class and represent the functions of a class within a system. - Step 4: Plot the Class Diagram
To map the relationship between the classes, you also need to know the meaning of the symbols at the end of each line that connects them. The ends represent different meanings and relations between two or more classes.
Related Article:
Inquiries:
If you have inquiries or suggestions about the Class Diagram discussion, leave us your comments below. We would be glad to hear to concerns and be part of your learning.

