What is the TypeScript Switch Statement
The switch statement in TypeScript is a type of control flow statement that can be used to perform different actions based on different conditions.
It’s similar to a series of if statements on the same expression.
Moreover, a TypeScript switch statement allows you to incorporate various conditions at once.
It assesses different types of values like boolean, byte, enum type, int, long, number, string, and other expressions based on their value.
For each possible value, it has a separate piece of code to run.
Key Points to Remember:
- A switch statement can contain any number of case clauses.
- Each case must have a distinct value.
- The values for each case must be constant.
- Typically, a break statement is included at the end of each case to prevent fallthrough to the next case. However, this is not mandatory.
- A switch statement can include a default clause, usually placed at the end. This clause is executed if none of the case values match the switch expression, but it’s optional and not required.
Syntax:
switch(expression) {
    case value1:
        //The statements will execute if the result of expression matches value1
        break;
    case value2:
        //The statements will execute if the result of expression matches value2
        break;
    ...
    default:
        //The statements will be executed if none of the values match the value of the expression.
        break;
}- expression is evaluated once and its value is compared with the values of each case.
- When a match is found, the related block of code runs.
- The ‘break’ keyword stops the switch block from running more execution of code and case testing inside the block. If break is omitted, the program continues execution at the next statement in the switch block.
- The default statement is optional, and can be used for when there is no case match. It must be the last case in a
switchblock.
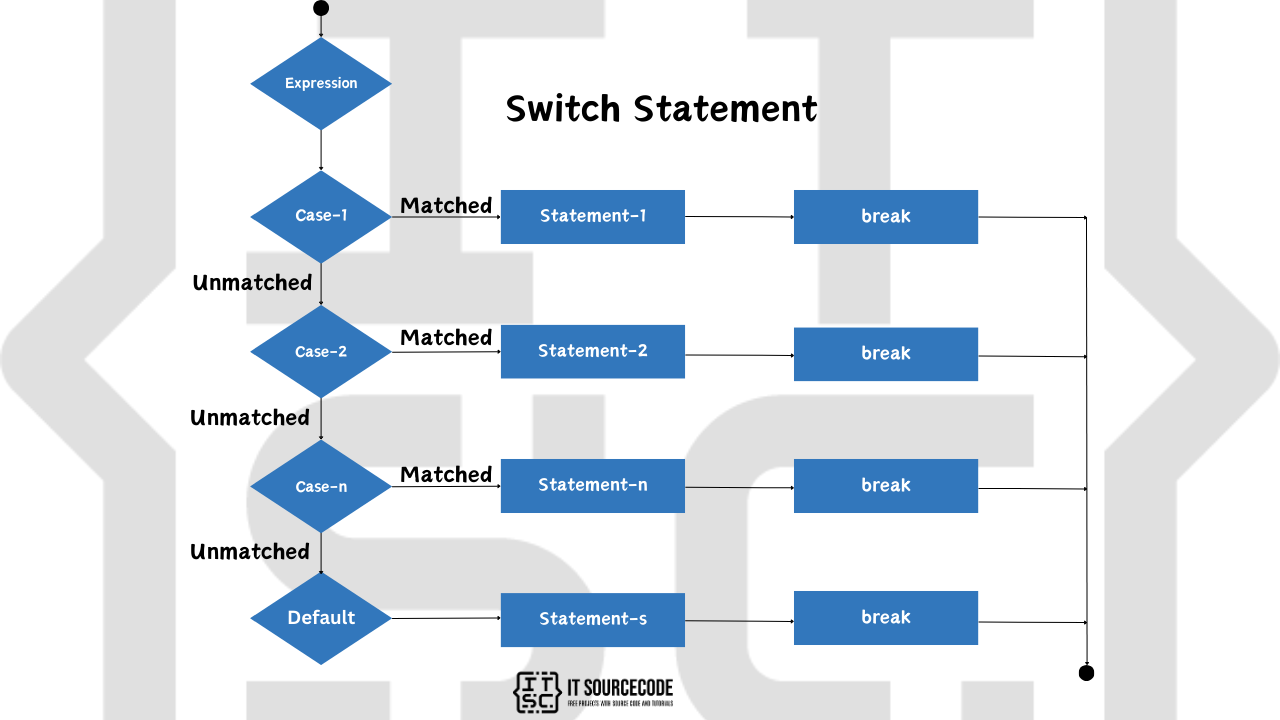
Flowchart:
How Does Switch Statement Work?
The switch statement in TypeScript works by sequentially comparing the value of the expression with the value of each case in the order they are defined.
Here’s a step-by-step explanation:
- The switch…case statement first evaluates the given expression.
- It then looks for the first
casewhose value matches the result of the evaluatedexpression(be itvalue1,value2, orvalueN). - If a match is found, the switch…case statement executes the block of code associated with that
case. - If no
casematches the expression, the switch…case statement checks for an optionaldefaultclause. If present, the code within the default clause is executed. - Each
casein the switch…case statement is usually associated with abreakstatement.
This ensures that once the code for a matchingcaseis executed, control breaks out of the switch…case statement, preventing further execution. - If a break statement is not present in a matching
case, the program continues to execute the next statements in theswitch...casestatement. - While it’s conventional to place the default clause as the last clause in the switch…case statement, it’s not a strict requirement and can be placed anywhere within the statement.
However, it’s generally recommended to place it at the end for readability and understanding.
Example:
Let’s take a look at this simple example.
function getSubject(subjectNumber: number): string {
    let subjectName: string;

    switch (subjectNumber) {
        case 0:
            subjectName = "Mathematics";
            break;
        case 1:
            subjectName = "Programming";
            break;
        case 2:
            subjectName = "Data Structures";
            break;
        case 3:
            subjectName = "	Discrete Mathematic";
            break;
        case 4:
            subjectName = "Networking ";
            break;
        case 5:
            subjectName = "Multimedia Systems	";
            break;
        case 6:
            subjectName = "Information Management	";
            break;
        default:
            subjectName = "Invalid subject number";
    }

    return subjectName;
}

// Example usage:
let subjectNumber = 3;
console.log(getSubject(subjectNumber));
Output:
Discrete MathematicIn our example, the expression is the variable subjectNumber. Since subjectNumber equals 3, the fourth case is a match (since case numbering starts from 0), and “Discrete Mathematic” is logged to the console.
After the console.log statement is executed, the break statement stops the rest of the switch statement from being executed.
If subjectNumber had a value not covered by a case, the default case would be executed, logging “Invalid subject number” to the console.
TypeScript Switch Case Statement Examples
Example 1: Switch Case Statement with String
let grades: number = 96;
let gradeletter: string;

switch (true)
{
    case (grades >= 99 && grades <= 100):
        gradeletter = "A+";
        break;

    case (grades >= 96 && grades <= 98):
        gradeletter = "A";
        break;

    case (grades >= 93 && grades <= 95):
        gradeletter = "A-";
        break;

    case (grades >= 90 && grades <= 92):
        gradeletter = "B+";
        break;

    case (grades >= 87 && grades <= 89):
        gradeletter = "B";
        break;

    default:
        gradeletter = "Invalid grades.";
}

// Example usage:
console.log("Grades: " + grades);
console.log("Grade: " + gradeletter);
Output:
Grades: 96
Grade: A
Example 2: Switch Case Statement with Enum
enum Subject {
    Mathematics,
    English,
    Science,
    History
};
var subject: Subject = Subject.Mathematics;

function getSubject() {
    switch (subject) {
        case Subject.Mathematics: console.log('Mathematics starts at 9:00 AM');
            break;
        case Subject.English: console.log('English starts at 10:00 AM');
            break;
        case Subject.Science: console.log('Science starts at 11:00 AM');
            break;
        case Subject.History: console.log('History starts at 1:00 PM');
            break;
    }
}
getSubject();
Output:
Mathematics starts at 9:00 AMConclusion
In conclusion, the TypeScript switch statement is a powerful control flow tool that allows for cleaner and more readable code when dealing with multiple conditions.
Its ability to evaluate an expression once and match it against multiple cases makes it a more efficient alternative to a series of if statements.
We’ve seen how it can be used in various scenarios, from determining the name of a subject based on a numerical code, to assigning letter grades based on numerical scores, and even scheduling subjects based on an enumeration.
However, it’s important to remember the key points: each case must have a unique, constant value; a break statement is typically used to prevent fallthrough; and a default clause can be included to handle cases when no match is found.
With these points in mind, you’re well-equipped to use the TypeScript switch statement in your future coding endeavors.
I hope this article has given you some insights and helped you understand the TypeScript Utility Types.
If you have any questions or inquiries, please don’t hesitate to leave a comment below.