
A Real Estate Management System project in Django is a full-stack Django web application that offers a clean, descriptive, and interactive user interface for viewing and registering for real estate.
Responsive pages and tabs for home, about us, and featured listings.
Moving on, It has user authentication features for login/registration, as well as a user dashboard for displaying and registering for real estate.
This real estate management system has software development and data analysis.
Anyway, To start creating a Real Estate Management System in Python Django, makes sure that you have PyCharm Professional IDE Installed in your computer.
However, this Real Estate Management System also includes a Download Source Code for free, just find the downloadable source code below and click download now.
Plus, Visit or read the other interesting language used in Real Estate Management System.
- Laravel Real Estate Management System Project with Source Code
- Real Estate Management System Project In PHP Free Download
| About Project | Project Details |
|---|---|
| Project Name | Real Estate Management System Project in Django |
| Python version (Recommended) | 3.8 Version |
| Programming Language Used | Python Django Language |
| Developer Name | itsourcecode.com |
| IDE Tool (Recommended) | Sublime, Visual Studio, PyCharm |
| Project Type | Web Application |
| Database | SQLite |
What is real estate management?
The activity of managing land and buildings, which includes tasks like organizing property rentals and maintaining buildings in excellent condition: An estate management company from California paid $27.8 million for the complex.
What are the benefits of real estate management?
10 Advantages Of Hiring A Professional Rental Property Manager.
- Finding Quality Tenants
- Less legal problems
- Rent collection and eviction procedures that are consistent.
- reliable reporting and accounting each month.
- Marketing expertise.
- Rental pricing that is accurate.
- Higher Occupancy Rates.
- Higher Retention of Tenants.
Admin Features of Real Estate Management System in Django
- Login and Logout – By default the admin need to login first to access the system and also the admin can logout.
- Manage Users – For the users, the admin can view, add, update, and delete information of the users.
- Contacts Management– For the contacts, the admin can view, add, update, and delete information contacts.
- Manage Listings– For the listings, the admin can view, add, update, and delete listings.
Users Features of Real Estate Management System using Django
- Registration – the user need to register first to have an account before he/she can login in the system
- Login – the user need to login first to access the system.
- Search – the user can search a place, state, price and bedrooms available.
How to Create a Real Estate Management System in Django Project?
Time needed: 5 minutes
Here are the steps on how to create a Real Estate Management System in Django
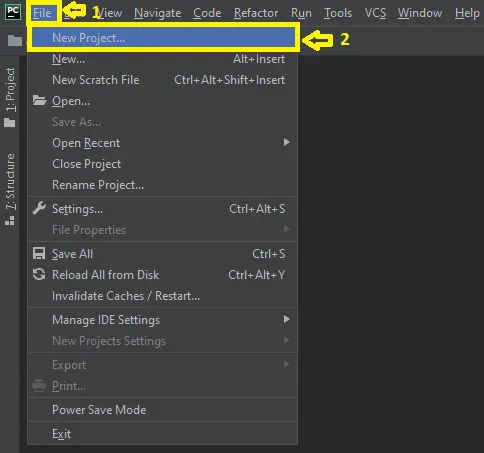
- Step 1: Open file.
First , open “pycharm professional” after that click “file” and click “new project”.

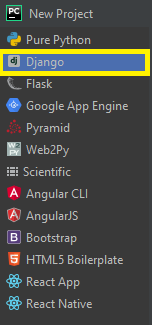
- Step 2: Choose Django
Next, after click “new project“, choose “Django” and click.

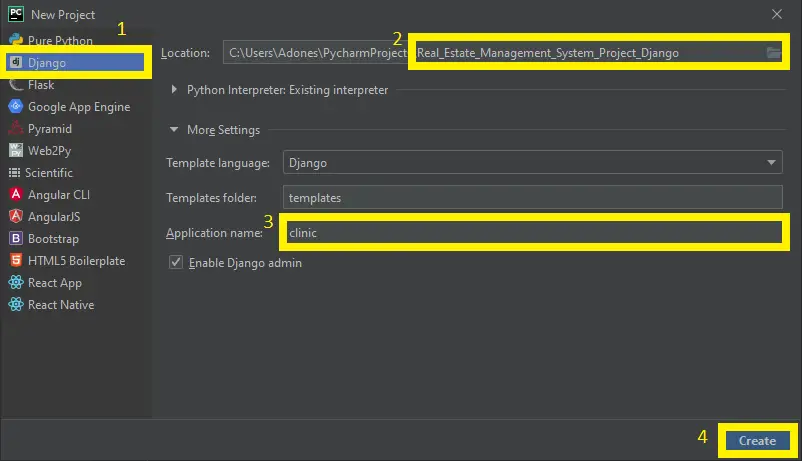
- Step 3: Select file location.
Then, select a file location wherever you want.

- Step 4: Create application name.
After that, name your application.

- Step 5: Click create.
Lastly, finish creating project by clicking “create” button.

- Step 6: Start Coding.
Finally, we will now start adding functionality to our Django Framework by adding some functional codes.
Module and Functionality
- Create template for the homepage
In this section, we will learn on how create a templates for the homepage. To start with, add the following code in your base.html under the folder of templates.
{% load static %}

<!DOCTYPE html>
<html lang="en">
  <head>
    <meta charset="UTF-8" />
    <meta name="viewport" content="width=device-width, initial-scale=1.0" />
    <meta http-equiv="X-UA-Compatible" content="ie=edge" />
    <!-- Font Awesome -->
    <link rel="stylesheet" href="{% static 'css/all.css' %}" />
    <!-- Bootstrap -->
    <link rel="stylesheet" href="{% static 'css/bootstrap.css' %}" />
    <!-- Custom -->
    <link rel="stylesheet" href="{% static 'css/style.css' %}" />
    <!-- Lightbox -->
    <link rel="stylesheet" href="{% static 'css/lightbox.min.css' %}" />

    <title>Real Estate System {% block title %}{% endblock %}</title>
  </head>

  <body>
    <!-- TOP BAR -->
    {% include 'partials/_topbar.html' %}
    <!-- NAVBAR -->
    {% include 'partials/_navbar.html' %}
    <!-- MAIN CONTENT -->
    {% block content %} {% endblock %}
    <!-- FOOTER -->
    {% include 'partials/_footer.html' %}

    <script src="{% static 'js/jquery-3.3.1.min.js' %}"></script>
    <script src="{% static 'js/bootstrap.bundle.min.js' %}"></script>
    <script src="{% static 'js/lightbox.min.js' %}"></script>
    <script src="{% static 'js/main.js' %}"></script>
  </body>
</html>
Download the Source Code Below.
Anyway, if you want to level up your programming knowledge, especially python, try this new article I’ve made for you Best Python Projects with source code for Beginners.
But If you’re going to focus on web development using Django, you can download here from our list of Best Django Projects with source code based on real-world projects.
How To Run The Real Estate Management System in Django with Source Code?
- Step 1: Extract/unzip the file
- Step 2: Go inside the project folder, open cmd and type the following commands to install Django Framework and run the webserver:
- pip install -r requirements.txt
- python manage.py migrate
- python manage.py runserver
- Step 3: Finally, open the browser and go to http://127.0.0.1:8000/
Admin Login
Username: myrel
Password: admin12345
Summary
In summary, this Real Estate Management System project in Django with Source Code can be useful to students or professional who wants to learn python programming language.
This project can also be modified to fit your personal requirements. Hope this project will help you to improve your skills. Happy Coding!
Inquiries
If you have any questions or suggestions about Real Estate Management System in Django with Source Code, please feel free to leave a comment below.
Do you have the report for the real estate django project please.Can you please forward it to my email.I will really appreciate.
If you got the report please repost it
Hi, this is an amazing project. Thank you
But why am I getting an error when I try to run the code on localhost
It’s giving this error: django.core.exceptions.ImproperlyConfigured: Error loading MySQLdb module.
Did you install mysqlclient?
And yet I have installed MySQL client
Just type this command: pip install mysqclient
The admin login info seems incorrect, I couldn’t try to verify
You need to create a superuser to login in the admin.
Type this command to create a superuser: python manage.py createsuperuser
Thank you Dev but after creating superuser I made migrations and it was showing already satisfied, but the migrations and even the homepage isn’t loading. I got this error while trying to load listing.html
Page not found (404)
Request Method: GET
Request URL: http://127.0.0.1:8000/listings.html
Using the URLconf defined in Real_Estate_Management_System_Project_Django.urls, Django tried these URL patterns, in this order:
admin/
The current path, listings.html, didn’t match any of these.
You’re seeing this error because you have DEBUG = True in your Django settings file. Change that to False, and Django will display a standard 404 page.
What do you think caused this?
Could I have your database? I think it is hard to find a matched dataset to your amazing project.
Follow this steps and it is include for creating the admin in real estate.
Step 1: pip install virtualenv
Step 2: virtualenv env
Step 3: cd env/Scripts
Step 4: activate
Step 5: cd ../..
Step 6: pip install django
Step 7: python manage.py makemigrations
Step 8: python manage.py migrate –run-syncdb
Step 9: python manage.py createsuperuser
Step 10: python manage.py runserver
Step 11: Type this in your browser or chrome: http://127.0.0.1:8000/