
Upload File CodeIgniter Ajax is the process of sending a file from one computer system to another, usually a larger computer system.
From the point of view of a network user, uploading a file means sending it to a computer that is set up to receive it.
About the Project
Upload File was developed using CodeIgniter, Ajax, and MySQL Database as Back-End. Most web applications require file management.
If you’re creating a content management system, you’ll need to be able to upload photos, word documents, and PDF reports, among other things.
If you’re creating a membership site, you may need to include a feature that allows users to upload their profile pictures. All of the following is made simple with CodeIgniter’s File Uploading class.
In File Upload With CodeIgniter, there are two stages to file uploading. There are two parts to a website: the frontend and the backend.
The HTML form that employs the form input type file handles the frontend.
The File Upload In CodeIgniter With Example processes the form’s submitted data and saves it to the upload directory on the backend.
Project Information
| Project Name: | File Upload Using CodeIgniter With Source Code |
| Language/s Used: | PHP with CodeIgniter Web Framework |
| PHP version (Recommended): | 5.6.3 |
| Database: | MySQL |
| Type: | Web Application |
| Developer: | IT SOURCECODE |
| Updates: | 0 |
What is CodeIgniter?
CodeIgniter is an Application Development Framework – a toolset – for PHP website developers.
Its purpose is to let you construct projects much faster than if you were programming code from the start by providing a rich set of libraries for common activities, as well as a simple interface and logical structure to access these libraries.
By reducing the amount of code required for a given operation, CodeIgniter allows you to focus more creatively on your project.
In this CodeIgniter Project also includes a downloadable CodeIgniter File Upload Code for free, just find the downloadable source code below and click to start downloading.
To start executing this File Upload With Source Code, make sure that you have sublime or any platform of PHP and MySQL installed on your computer.
How to Run the File Upload in CodeIgniter? A Step-by-step guide with Source Code
Time needed: 5 minutes
These are the steps on how to run File Upload CodeIgniter With Source Code.
- Download Source Code
First, find the downloadable source code below and click to start downloading the source code file.

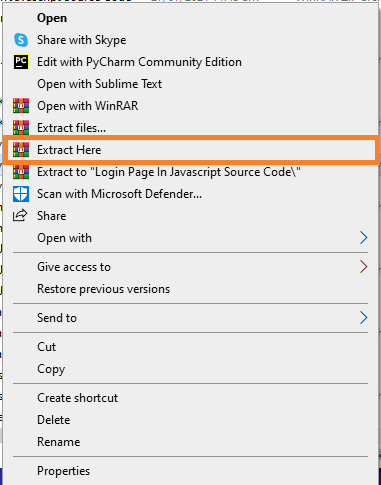
- Extract File
Next, after finishing downloading the file, go to the file location, right-click the file, and click extract.

- Copy Project Folder
Next, copy the project folder and paste it to C:\xampp\htdocs.

- Open Xampp
Next, open xampp and start the Apache and mysql.

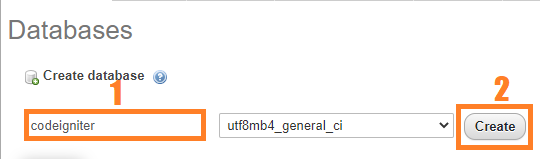
- Create Database
Next, click any browser, type the URL localhost/phpmyadmin, and create a database.

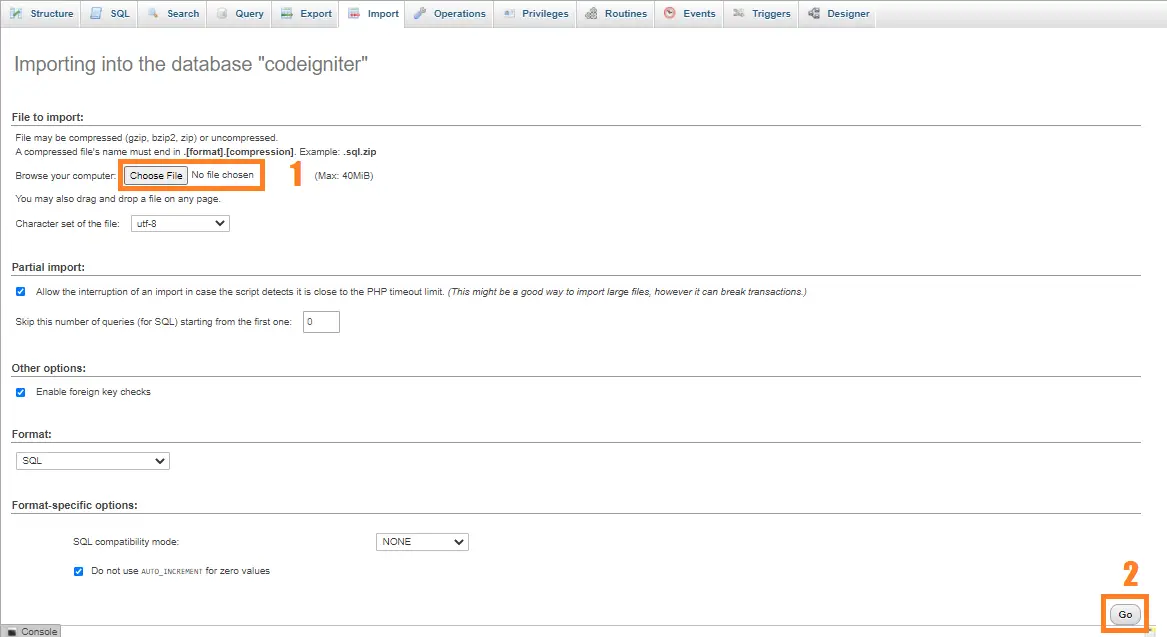
- Import Database
Next, click the created database, click import to the right tab, click Choose file, and import the sql file inside the download folder.

- Execute Project
Finally, type to the URL localhost/codeigniter_fileupload.


How to Create a File Upload in CodeIgniter?
Here’s the complete source code on how to create a file upload:
<!DOCTYPE html>
<html>
<head>
<meta charset="utf-8">
<title>CodeIgniter File Upload (IT SOURCECODE)</title>
<link rel="stylesheet" type="text/css" href="<?php echo base_url(); ?>bootstrap/css/bootstrap.min.css">
<script src="<?php echo base_url(); ?>jquery/jquery.min.js"></script>
</head>
<body class="bg-info">
<div class="container">
<h1 class="page-header text-center">CodeIgniter File Upload (IT SOURCECODE)</h1>
<div class="row">
<div class="col-sm-4">
<h3>File Upload Form</h3>
<form id="uploadForm">
<div class="form-group">
<label>File:</label>
<input type="file" name="upload" id="file">
</div>
<button type="submit" class="btn btn-primary">Save</button>
</form>
<div id="responseDiv" class="alert text-center" style="margin-top:20px; display:none;">
<button type="button" class="close" id="clearMsg"><span aria-hidden="true">×</span></button>
<span id="message"></span>
</div>
</div>
<div class="col-sm-8">
<table class="table table-bordered table-striped">
<thead>
<tr>
<th>ID</th>
<th>Filename</th>
<th>Preview</th>
</tr>
</thead>
<tbody id="tbody">
</tbody>
</table>
</div>
</div>
</div>
<script type="text/javascript">
$(document).ready(function(){
fetchTable();
$('#uploadForm').submit(function(e){
e.preventDefault();
var url = '<?php echo base_url(); ?>';
var reader = new FileReader();
reader.readAsDataURL(document.getElementById('file').files[0]);
var formdata = new FormData();
formdata.append('file', document.getElementById('file').files[0]);
$.ajax({
method: 'POST',
contentType: false,
cache: false,
processData: false,
data: formdata,
dataType: 'json',
url: url + 'index.php/upload/insert',
success: function(response){
console.log(response);
if(response.error){
$('#responseDiv').removeClass('alert-success').addClass('alert-danger').show();
$('#message').html(response.message);
}
else{
$('#responseDiv').removeClass('alert-danger').addClass('alert-success').show();
$('#message').html(response.message);
fetchTable();
$('#uploadForm')[0].reset();
}
}
});
});
$('#clearMsg').click(function(){
$('#responseDiv').hide();
});
});
function fetchTable(){
var url = '<?php echo base_url(); ?>';
$.ajax({
method: 'POST',
url: url + 'index.php/upload/fetch',
success: function(response){
$('#tbody').html(response);
}
});
}
</script>
</body>
</html>Project Output:

Download the Source Code below
Anyway, if you want to level up your programming knowledge, especially PHP, try this new article I’ve made for you Best PHP Projects With Source Code Free Download.
Conclusion
This lesson did not cover all that a full-fledged tutorial would, but it did introduce you to the most important modules, developing controllers, and models.
We hope that our CodeIgniter instructional File Upload offered you some insight into some of CodeIgniter’s basic design patterns, which you may build on.
Inquiries
If you have any questions or suggestions about File Upload CodeIgniter With Source Code, please feel free to leave a comment below.
zip password?
zip password?
Zip file password: itsourcecode.com or itsourcecode