
Have you come across situations where you need a copy Python dictionary to perform operations without modifying the original data?
In this article, we will explore various methods to copy a dictionary in Python, including shallow copy and deep copy techniques.
What is a Dictionary?
A dictionary in Python is an unordered collection of key-value pairs.
It is created using curly braces {} and allows for fast access to values based on their associated keys.
Why Copy a Dictionary?
Copying a dictionary is essential when you want to perform operations on the data without modifying the original dictionary.
By creating a copy, you can manipulate the copied version and keep the original dictionary intact.
This is particularly useful when dealing with complex data structures or when you need to compare different versions of the same dictionary.
Can you copy a dictionary in Python?
It is possible to copy a dictionary in Python. In this tutorial, we are going to use different methods to show how you can copy a dictionary.
We can copy a dictionary using a copy() function.
Copy() Syntax
dict.copy()Copy() Arguments
There are no arguments for the copy() method.
Copy() Return Value
This method makes a shallow copy of the dictionary and returns it. The original dictionary is not changed.
For example:
original_dict = {1:"a", 2:"b", 3:"c"}
new_dict = original_dict.copy()

print("The new copy:",new_dict)
print("The original:",original_dict)
Output:
The new copy: {1: 'a', 2: 'b', 3: 'c'}
The original: {1: 'a', 2: 'b', 3: 'c'}
How to copy a dictionary in Python
In Python, a copy of an object is created with the = operator.
You could think that this produces a new object, but it does not.
It just creates a new variable that shares the old object’s reference.
The following are examples of how to copy dictionaries in Python.
Using the copy() to copy Dictionaries
original_dict = {1:"a", 2:"b", 3:"c", 4:"d", 5:"e"}
new_dict = original_dict.copy()

# clear the new copy object
new_dict.clear()

print("The new copy:",new_dict)
print("The original:",original_dict)
Output:
The new copy: {}
The original: {1: 'a', 2: 'b', 3: 'c', 4: 'd', 5: 'e'}
Using the = operator to copy Dictionaries
original_dict = {1:"a", 2:"b", 3:"c", 4:"d", 5:"e"}
new_dict = original_dict

# clear the new copy object
new_dict.clear()

print("The new copy:",new_dict)
print("The original:",original_dict)
Output:
The new copy: {}
The original: {}
The difference between shallow copy and deep copy in Python
When the deepcopy() method is used, it indicates that any changes made to a copy of the object will not affect the original object.
While in the copy() method, any modifications to a copy of an object will reflect the original object.
Additionally, according to the official documentation of Python, the difference between shallow and deep copying is only relevant for compound objects (objects that contain other objects, like lists or class instances).
Below is the difference between shallow copy and deep copy in Python.
How to Shallow Copy in Dictionary in Python?
A shallow copy creates a new dictionary object, but it still references the original values.
If the values are mutable objects (such as lists or dictionaries), changes made to the original values will be reflected in the shallow copy and vice versa.
original_dict = {1:"Prince", 2:"Grace", 3:["Gboi","Jei","Von"]}  # the original copy
new = original_dict.copy()  # this is the declaration of the copy

print("The original:",original_dict)
print("The new copy:",new)

# let's modify the value of key 3 of the copy object
new[3][2] = "PnG"
print("\nAfter modification")
print("The original:",original_dict)  # this prints the original object
print("The new copy:",new)  # this prints the copy object
Output:
The original: {1: 'Prince', 2: 'Grace', 3: ['Gboi', 'Jei', 'Von']}
The new copy: {1: 'Prince', 2: 'Grace', 3: ['Gboi', 'Jei', 'Von']}

After modification
The original: {1: 'Prince', 2: 'Grace', 3: ['Gboi', 'Jei', 'PnG']}
The new copy: {1: 'Prince', 2: 'Grace', 3: ['Gboi', 'Jei', 'PnG']}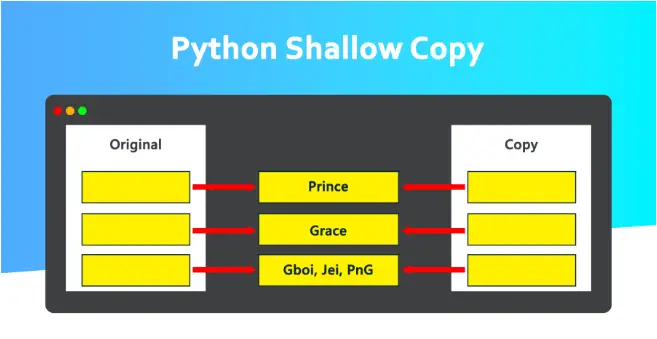
How to Deep Copy in Dictionary in Python?
A deep copy creates a completely independent copy of the dictionary and all its nested objects.
Changes made to the original dictionary or its values will not affect the deep copy, and vice versa.
import copy

original_dict = {1:"Prince", 2:"Grace", 3:["Gboi","Jei","Von"]}  # the original copy
new = copy.deepcopy(original_dict)  # this is the declaration of the deep copy

print("The original:",original_dict)
print("The new copy:",new)

# let's modify the value of key 3 of the copy object
new[3][2] = "PnG"
print("\nAfter modification of new object")
print("The original:",original_dict)  # this prints the original object
print("The new copy:",new)  # this prints the copy object
Output:
The original: {1: 'Prince', 2: 'Grace', 3: ['Gboi', 'Jei', 'Von']}
The new copy: {1: 'Prince', 2: 'Grace', 3: ['Gboi', 'Jei', 'Von']}

After modification of new object
The original: {1: 'Prince', 2: 'Grace', 3: ['Gboi', 'Jei', 'Von']}
The new copy: {1: 'Prince', 2: 'Grace', 3: ['Gboi', 'Jei', 'PnG']}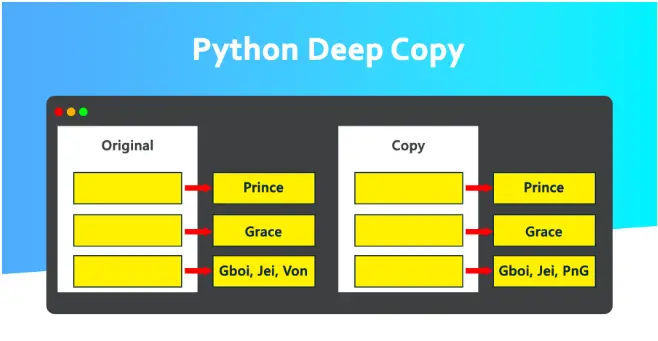
Both shallow copy and deep copy have their own use cases, and the choice depends on your specific requirements.
Summary
In summary, we explored various techniques to copy a dictionary in Python.
We discussed shallow copy and deep copy methods, including using the copy() method, dict() constructor, deepcopy() function, and dictionary comprehension.
Related Python Tutorials
- Python Print Dictionary With Examples
- How To Add To A Dictionary In Python
- Python Copy List Method With Examples
- Python Sort Dictionary By Key And Value With Example
- Is Dictionary Mutable In Python
- Difference Between List And Dictionary In Python
Common use cases for Python Copy A Dictionary | Shallow Copy & Deep Copy Techniques
- Data pipelines. Python is the standard for ETL, data analysis, and ML workflows.
- Web development. Django and FastAPI power modern web backends and APIs.
- Automation and scripting. System administration, file processing, web scraping, and cron jobs.
- Machine learning. scikit-learn, PyTorch, TensorFlow, Hugging Face for AI/ML projects.
- Educational tools. Python’s readability makes it the go-to teaching language.
Working code example
from typing import Optional

def process_data(items: list[dict]) -> Optional[dict]:
    """Process a list of items and return summary stats."""
    if not items:
        return None
    return {
        "count": len(items),
        "total": sum(item.get("value", 0) for item in items),
        "avg": sum(item.get("value", 0) for item in items) / len(items),
    }

# Usage
data = [{"value": 10}, {"value": 20}, {"value": 30}]
summary = process_data(data)
print(summary)  # {'count': 3, 'total': 60, 'avg': 20.0}
Best practices
- Use type hints. list[dict], Optional[str], and TypedDict make code self-documenting and enable static analysis.
- Follow PEP 8. Consistent style improves readability. Use black or ruff to auto-format.
- Prefer f-strings. f”{value}” is cleaner than str.format() or % formatting.
- Write tests with pytest. Aim for 70%+ coverage on business-critical modules.
- Use ruff or pylint. Static analysis catches many bugs before code runs.
Common pitfalls
- Mutable default arguments. def f(x=[]) reuses the same list across calls. Use x=None then check.
- Integer division. 5/2 gives 2.5 in Python 3. Use // for floor division.
- Missing self on methods. Class methods need self as first parameter.
- Late binding closures. Loops that create lambdas can capture variables late.
Official documentation
Frequently Asked Questions
What Python version does this tutorial target?
How do I install Python for this tutorial?
Do I need pip and virtual environments?
Can I use this in a Jupyter notebook or Google Colab?
Where can I find more Python practice projects?

Elijah Galero
Programmer & Technical Writer at PIES IT Solution
Elijah Galero is a programmer and writer at PIES IT Solution, author of 175+ tutorials at itsourcecode.com. Specializes in Python error debugging (AttributeError, TypeError, ModuleNotFoundError), Python programming tutorials, and Microsoft Excel how-to guides for BSIT students and productivity learners.
Expertise: Python · Python Errors · Python AttributeError · Python TypeError · ModuleNotFoundError · MS Excel · MS PowerPoint
· View all posts by Elijah Galero →