![Modulenotfounderror: no module named psycopg2 [SOLVED]](https://itsourcecode.com/wp-content/uploads/2023/03/modulenotfounderror-no-module-named-psycopg2.png)
Finding it difficult to resolve the Python problem modulenotfounderror: no module named psycopg2?
Don’t worry; we’ll show you how to fix this mistake in this article.
The modulenotfounderror: no module named psycopg2 is a Python error that is usually encountered by developers when they attempt to use PostgreSQL in their applications.
It not being installed in your system or Python environment is the most frequent cause of this problem.
What is Python?
Python is one of the most popular programming languages.
It is used for developing a wide range of applications.
In addition, Python is a high-level programming language that is used by most developers due to its flexibility.
Returning to our issue, we must take a few actions to fix this error.
So, without further ado, let’s move on to our “how to fix this error” tutorial.
How to solve “no module named psycopg2” in Python
Time needed: 2 minutes
Here’s how to resolve the error message stating modulenotfounderror: no module named psycopg2 in Python.
- Verify whether you have pip installed.
Resolving the error modulenotfounderror: no module named psycopg2 is an easy task.
All you have to do is install the psycopg2-binary module.
But before that, verify if you have pip installed on your system; if not, install it.
To verify, input the command pip –version.
The command pip –version will display the version of pip installed in your system, including its location. - Install the psycopg2-binary module.
Once it is confirmed that you have pip installed, the next thing you do is install the psycopg2-binary module.
To install this module, open your cmd or command prompt, then input the command:
pip install psycopg2-binary
Example:
The command pip install psycopg2-binary will download and install the latest version of the psycopg2-binary module.
Note: If you’re using Python 3, use the command pip3 install psycopg2-binary. - Verify whether it is successfully installed.
Verify whether the psycopg2-binary module was successfully installed by entering the command:
import psycopg2
If you don’t receive an error, it means that it was successfully installed.
Note: You can also verify it using the command pip show psycopg2-binary.
This command will display information about the psycopg2-binary module, including its location.![pip show psycopg2-binary - Modulenotfounderror: no module named psycopg2 [SOLVED]](data:image/svg+xml;base64,PHN2ZyB4bWxucz0iaHR0cDovL3d3dy53My5vcmcvMjAwMC9zdmciIHdpZHRoPSIzNzYiIGhlaWdodD0iNDQiIHZpZXdCb3g9IjAgMCAzNzYgNDQiPjxyZWN0IHdpZHRoPSIxMDAlIiBoZWlnaHQ9IjEwMCUiIHN0eWxlPSJmaWxsOiNjZmQ0ZGI7ZmlsbC1vcGFjaXR5OiAwLjE7Ii8+PC9zdmc+)
If the module’s information was displayed and you did not receive an error that stated “WARNING: Package(s) not found: psycopg2-binary,” it signifies that it was successfully installed.
Installing the psycopg2-binary module on different platforms
✅ Jupyter Notebook
→ If you’re using Jupyter notebook, use the command:
!pip install psycopg2-binary✅ Anaconda
→ If you’re using Anaconda, use the command:
conda install -c conda-forge psycopg2-binary✅ Py Alias
→ If you’re using Py Alias, use the command:
py -m pip install psycopg2-binaryHow to install psycopg2-binary on macOS or Linux
The following are the steps on how to install psycopg2-binary on macOS or Linux:
→ Search for Terminal and open it.
→ Next, input the command pip install psycopg2-binary, then click the enter key.
Alternative command for macOS:
brew install postgresqlIf you get an error saying “pip” isn’t found, use the command python -m.
It will look like this: python -m pip install psycopg2-binary.
However, if you get a permissions error, use the command sudo pip install psycopg2-binary.
Alternative Solution: Reinstall the module
If the error still exists, try this alternative solution:
Reinstall the psycopg2-binary module.
To do so, follow the steps below.
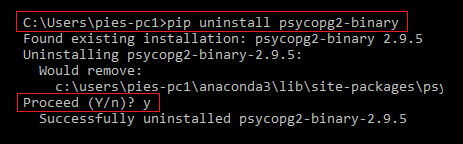
- Uninstall the installed psycopg2-binary module.
To uninstall the psycopg2-binary module, input the pip uninstall psycopg2-binary command, then press the Enter key.
After inputting the pip uninstall psycopg2-binary command, results will come out, and this question will also appear (Proceed (Y/n)?).
Once that appears, just type Y, then click the Enter key.
Tips:
If you’re using Python 3, use the command pip3 uninstall psycopg2-binary.
If you’re using Jupyter notebook, use the command !pip uninstall psycopg2-binary –yes.
If you’re using Anaconda, use the command conda remove psycopg2-binary.
- Install the psycopg2-binary module.
After uninstalling the psycopg2-binary module, install it again.
To do so, enter the pip install psycopg2-binary command.
Kindly check the above commands if you’re using Python 3, Jupyter Notebook, or Anaconda.
Commands you might need
- pip list
This command will display all the packages installed on your system, including their versions.
If you’re using Jupyter Notebook, use the !pip list command.
However, if you’re using Anaconda, use the command conda list.
- python -m
Include this command in your pip install psycopg2-binary command if you get an error message stating that “pip” cannot be found.
Example: python -m pip install psycopg2-binary
However, if you’re using Python 3, use the command python3 -m pip install psycopg2-binary.
- pip install –upgrade pip
Use this command to upgrade the pip package manager to its newest version.
If your pip is already in the latest version, this will come out: “Requirement already satisfied.”
- python –version
Use this command if you want to check what version of Python you have.
- pip install –upgrade psycopg2-binary
Use this command to upgrade your psycopg2-binary module to its latest version.
If it is already the latest version, this will come out: “Requirement already satisfied.”
If you’re using Jupyter Notebook, use the command !pip install -U psycopg2-binary.
Official documentation
Frequently Asked Questions
What is Python ModuleNotFoundError and what causes it?
ModuleNotFoundError (a subclass of ImportError) is raised when Python cannot find the module you tried to import. Common causes: the package isn’t installed (pip install missing), wrong virtual environment activated, typo in module name, or Python can’t find your local module on the import path. The error message names exactly which module is missing.
How do I fix ‘ModuleNotFoundError: No module named X’?
Run pip install X first. If that succeeds but you still get the error, check which Python you’re using (which python OR python –version) vs which pip (which pip OR pip –version), they must match. Common gotcha: pip points to system Python 3.9 but you’re running python3.11 in a venv. Inside the venv, use python -m pip install X to be sure pip matches the active Python.
Why does my code work in one environment but not another?
Different Python versions or different installed packages. To diagnose: pip freeze > requirements.txt on the working environment, then pip install -r requirements.txt on the broken one. Use virtualenv (python -m venv venv) or conda for every project to avoid system-wide package collisions.
Is ModuleNotFoundError the same as ImportError?
ModuleNotFoundError is a subclass of ImportError added in Python 3.6. It specifically means ‘no such module exists.’ Plain ImportError covers a wider set: module exists but a name inside it can’t be imported (e.g. ‘cannot import name X from Y’). except ImportError catches both; except ModuleNotFoundError catches only the missing-module case.
Where can I find more ModuleNotFoundError fixes?
Browse the ModuleNotFoundError reference hub for 198+ specific module fixes (TensorFlow, Flask, Django, pandas, numpy, etc.). For related issues see ImportError. For broader Python setup see Python Tutorial hub.
Conclusion
In conclusion, the modulenotfounderror: no module named psycopg2 can be easily solved by installing the psycopg2-binary module in your system.
By following the guide above, there’s no doubt that you’ll be able to resolve this error quickly.
We hope you’ve learned a lot from this.
Thank you for reading!

Elijah Galero
Programmer & Technical Writer at PIES IT Solution
Elijah Galero is a programmer and writer at PIES IT Solution, author of 175+ tutorials at itsourcecode.com. Specializes in Python error debugging (AttributeError, TypeError, ModuleNotFoundError), Python programming tutorials, and Microsoft Excel how-to guides for BSIT students and productivity learners.
Expertise: Python · Python Errors · Python AttributeError · Python TypeError · ModuleNotFoundError · MS Excel · MS PowerPoint · View all posts by Elijah Galero →