In this article, we’re going to explore the process of creating a simple game minesweeper in JavaScript.
The game will be built from scratch, without relying on any frameworks or libraries.
We’ll utilize the core web technologies of HTML, CSS, and JavaScript to bring our game to life.
What is Minesweeper in JavaScript?
Minesweeper is a classic puzzle game that originated in the early 1960s and gained popularity with the release of Microsoft Windows in the 1990s.
The objective of the game is to clear a rectangular grid containing hidden mines without detonating any of them.
The grid is divided into cells, and each cell can either be empty or contain a mine.
In JavaScript, you can create a Minesweeper game using HTML, CSS, and JavaScript.
Anyway, if you looking for more about Javascript Projects we also have don’t hesitate to check them out or contact us.
Basic rules and Mechanics of Minesweeper
When playing the Minesweeper game, there are certain rules that govern how it works:
- Starting the Game
To begin, the player needs to click on a random square on the game board.
At this point, it’s purely a matter of luck whether the chosen square contains a bomb or not.
- Safe Squares and Numbers:
If the player selects a safe area without a bomb, the square will either reveal a blank space or a number from 1 to 8.
These numbers indicate the count of bombs present in the adjacent squares surrounding the selected square.
For example, if a square shows the number 3, it means there are three bombs in the neighboring squares.
- Calculating Probabilities
To progress in the game, the player must use logical reasoning and calculations to determine which squares might contain bombs.
By considering multiple squares and their numbers, the player can assess the probability of a particular square being a bomb.
- Game Over
If the player clicks on an unsafe square that contains a bomb, the game immediately ends.
This signifies that the player has lost the game and will need to start over.
Now let’s begin to create the Minesweeper JavaScript game.
Development Process of Minesweeper in JavaScript with Sample Code
To create Minesweeper in JavaScript, we will break down the development process into several key steps.
Let’s explore each method in detail:
1. Setting Up the HTML Structure
To begin, we’ll start by creating an HTML file called “index.html” and including the necessary static files, i.e. style.css and script.js. This can be done by adding the following links within the head section of the HTML file.
Then, we will define the content of the body section in the HTML file.
Here is the full HTML file code:
<!DOCTYPE html>
<html>
<head>
<title>Minesweeper</title>
<meta charset="UTF-8">
<link rel="stylesheet" href="style.css" type="text/css">
<script type="text/javascript" src="script.js"></script>
</head>
<body>
<div id="box">
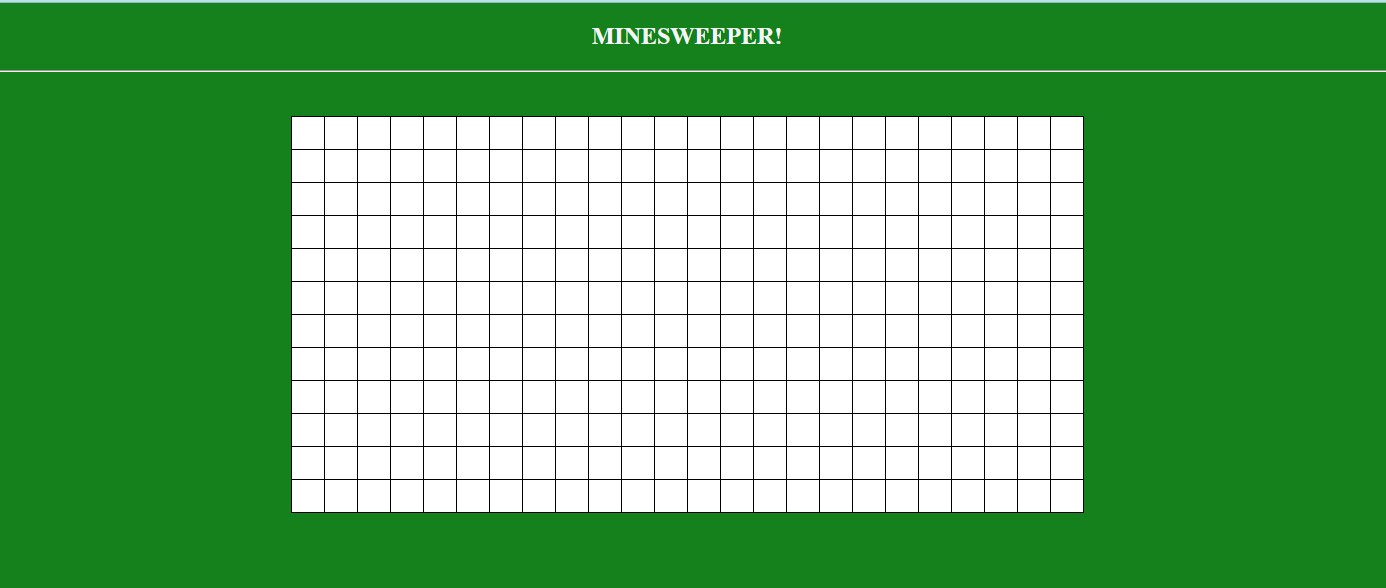
<h2>MINESWEEPER!</h2><hr><br><br>
<div id="field"></div>
<br>
<div id="lost" style="display: none;">
<h3>You got bombed!</h3>
<button id="new-game-button" type="button" onclick="reload()">Start Again</button>
</div>
</div>
</body>
</html>
In the code provided, we can see that the heading “MINESWEEPER” is set using the HTML h2 tag. It serves as a title for the game.
To display the game field, a div element with the id “field” has been created. This div will contain the table that shows the mines and numbers.
In addition, there is another div section created specifically for displaying a message when the user loses the game.
This section will be used to show a notification or any relevant information when the user fails to clear the minefield successfully.
To allow the user to restart the game, a button with the id “new-game-button” is created. When the user clicks on this button, the game will be reset, and a new game will start from the beginning.
2. Styling with CSS
Now, let’s set up some CSS for our HTML structure.
body{
    background-color: green;
}

h2, h3{
    color: whitesmoke;
}

#box {
    text-align: center;
}

#field table {
    border-collapse: collapse;
    font-size: 150%;
    font-family: san-serif;
    font-weight: bold;
    display: inline-block;
}

#field table td {
    background-color: white;
    width: 30px;
    min-width: 30px;
    height: 30px;
    min-height: 30px;
    border: 1px solid black;
}

button {
    width: 100px;
    height: 30px;
    background-color:blue;
    color: white;
    font-weight: bolder;
    border-radius: 20px 20px 20px 20px;
}
In the provided code, you can observe that the background color of the page has been set to green using the “background-color” property. This gives the entire page a green color as the background.
The heading tags, which typically represent titles or headings in HTML, have been styled with a white color. This means that the text inside the heading tags will appear in white color.
To ensure that the minesweeper table is centered on the page, the “text-align” property has been used.
This property aligns the content within its container, in this case, the table, to the center of the page. This creates a visually balanced and centered appearance for the minesweeper table.
Moving on to styling the button, it has a consistent color according to the theme, which means that the color of the button remains the same to maintain a cohesive visual style.
Additionally, the button has been given a width of 100 pixels and a height of 30 pixels using the “width” and “height” properties, respectively.
To give the button rounded corners, the “border-radius” property has been used with a value of 20 pixels.
This creates a rounded shape for all four corners of the button, giving it a softer and more visually appealing appearance.
3. Creating the Javascript Minesweeper Logic
Now, we will proceed to establish the logic and functionality of the game using JavaScript.
To begin with, we will assign the various components with standard values in the form of a dictionary. These components will be utilized repeatedly within the code.
var components = {
    num_of_rows : 12,
    num_of_cols : 24,
    num_of_bombs : 55,
    bomb : '💣',
    alive : true,
    colors : {1: 'blue', 2: 'green', 3: 'red', 4: 'purple', 5: 'maroon', 6: 'yellow', 7: 'black', 8: 'pink'}
}
The table in the game is set to have 12 rows and 24 columns. Additionally, the number of bombs in the game is initially set to 55.
It’s worth noting that these numbers can be modified to adjust the difficulty of the game.
To represent the bomb visually, a special character ‘💣’ has been assigned to the variable ‘bomb’ within the dictionary. This character will be used to indicate the presence of a bomb within the game.
A flag variable has been initialized with the value of ‘true‘, indicating that the game is currently active or alive.
This variable will be used to track the state of the game.
Furthermore, different colors have been assigned to different numbers that will be displayed in the table.
This ensures that each number is visually distinct and enhances the readability of the game.
window.addEventListener('load', function() {
    document.getElementById('lost').style.display="none";
    startGame();
});
The objective of the provided code is to automatically trigger the execution of the “startGame()” function whenever the page finishes loading.
This is achieved by utilizing the “addEventListener()” method of the window Document Object Model (DOM) and specifying the event parameter as ‘load‘.
By doing so, the “startGame()” function will be called as soon as the page finishes loading, ensuring that the game is initialized and ready to be played.
In addition, the code also sets the message section, which is intended to be displayed when the game is lost, as hidden.
This means that initially, the message section will not be visible to the user until it is triggered by a certain event or condition in the game.
function startGame() {
    components.bombs = placeBombs();
    document.getElementById('field').appendChild(createTable());
}
In the code, the functions “placeBombs()” and “createTable()” are utilized to create the table and initialize the bombs within the game.
To create the table, the “createTable()” function is called. This function generates the necessary HTML elements for the table and prepares them to be displayed on the page.
The resulting table is then added to the ‘field‘ division in the Document Object Model (DOM) using the “appendChild()” method.
This ensures that the table is properly inserted into the designated section of the page.
Now, let’s focus on the “createTable()” function to examine its implementation and purpose.
function cellID(i, j) {
    return 'cell-' + i + '-' + j;
}

function createTable() {
    var table, row, td, i, j;
    table = document.createElement('table');

    for (i=0; i<components.num_of_rows; i++) {
        row = document.createElement('tr');
        for (j=0; j<components.num_of_cols; j++) {
            td = document.createElement('td');
            td.id = cellID(i, j);
            row.appendChild(td);
            addCellListeners(td, i, j);
        }
        table.appendChild(row);
    }
    return table;
}
In the provided code, a ‘table‘ element is created and stored in the ‘table‘ variable.
To populate the table with rows and columns, a loop is executed based on the number of rows and columns specified earlier in the dictionary.
Within this loop, each iteration generates a new row element and appends it to the table. The creation of individual cells within each row is handled by a separate function called ‘cellID()’.
This function returns the current cell ID, which is then added to the corresponding row element.
Now, let’s move on to the process of placing the bombs on the table.
The ‘placeBombs()‘ function is responsible for iterating over each cell in the table, one by one. Within this iteration, the ‘placeSingleBomb()‘ function is called to initialize the bomb in specific cells.
This function is executed for the designated number of bombs as specified earlier.
function placeBombs() {
    var i, rows = [];

    for (i=0; i<components.num_of_bombs; i++) {
        placeSingleBomb(rows);
    }
    return rows;
}
Within the ‘placeSingleBomb‘ function, the initial step involves randomly selecting the probability of having a bomb in a specific row and column number.
This randomness is achieved by utilizing the ‘Math.random()‘ function, which generates a random value between 0 and 1.
Next, a series of conditions are checked for the particular cell. If the cell has not been clicked before, is not already a mine, and is not already a bomb, the function recursively calls itself again.
This recursive call allows for repeated attempts to place the bomb until the specific condition for probability is met.
Once the desired condition is met, and the probability allows for it, the cell is set as a bomb, indicating the presence of a mine at that location within the game.
This process ensures that bombs are placed in the game randomly, following the probability condition, while avoiding duplication or interference with previously clicked cells or existing bombs.
function placeSingleBomb(bombs) {

    var nrow, ncol, row, col;
    nrow = Math.floor(Math.random() * components.num_of_rows);
    ncol = Math.floor(Math.random() * components.num_of_cols);
    row = bombs[nrow];

    if (!row) {
        row = [];
        bombs[nrow] = row;
    }

    col = row[ncol];

    if (!col) {
        row[ncol] = true;
        return
    }
    else {
        placeSingleBomb(bombs);
    }
}
Now, let’s explore the code that handles the mouse click event on the cells and observe the effects on the neighboring cells.
The code includes the functions ‘adjacentBombs()’ and ‘adjacentFlags()’.These functions determine the state of the adjacent cells based on the mouse click event.
Specifically, ‘adjacentBombs()‘ returns the number of bombs in the neighboring cells, while ‘adjacentFlags()‘ returns the number of flagged cells in the adjacent cells.
These functions provide crucial information about the surrounding cells, enabling the game to calculate and display the appropriate numbers or flags based on the clicked cell.
function adjacentBombs(row, col) {
    var i, j, num_of_bombs;
    num_of_bombs = 0;

    for (i=-1; i<2; i++) {
        for (j=-1; j<2; j++) {
            if (components.bombs[row + i] && components.bombs[row + i][col + j]) {
                num_of_bombs++;
            }
        }
    }
    return num_of_bombs;
}

function adjacentFlags(row, col) {
    var i, j, num_flags;
    num_flags = 0;

    for (i=-1; i<2; i++) {
        for (j=-1; j<2; j++) {
            cell = document.getElementById(cellID(row + i, col + j));
            if (!!cell && cell.flagged) {
                num_flags++;
            }
        }
Let’s now examine the function responsible for handling click events in cells that have not been clicked before.
function handleCellClick(cell, i, j) {
    if (!components.alive) {
        return;
    }

    if (cell.flagged) {
        return;
    }

    cell.clicked = true;

    if (components.bombs[i][j]) {
        cell.style.color = 'red';
        cell.textContent = components.bomb;
        gameOver();

    }
    else {
        cell.style.backgroundColor = 'lightGrey';
        num_of_bombs = adjacentBombs(i, j);
        if (num_of_bombs) {
            cell.style.color = components.colors[num_of_bombs];
            cell.textContent = num_of_bombs;
        }
        else {
            clickAdjacentBombs(i, j);
        }
    }
}
The function in the code checks if the game is over or if the cell has already been clicked. This is determined by examining the values of ‘components.alive‘ and ‘cell.flagged‘.
If the condition for the cell to be bombed is met, meaning that the ‘bomb’ array has reached the threshold probability for that particular cell, a bomb is placed in the cell and the ‘gameOver()‘ function is called to handle the end of the game.
On the other hand, if the bombing condition is not met, the cell’s background color is set to ‘lightgrey‘. The ‘adjacentBombs()’ function is then invoked to determine the number of bombs surrounding the cell.
If this count is non-zero, flags are set accordingly, with numbers ranging from 1 to the number of bombs adjacent to the cell.
However, if the count of adjacent bombs is zero, the ‘clickAdjacentBombs()‘ function is called to handle the revealing of neighboring cells recursively.
function clickAdjacentBombs(row, col) {
    var i, j, cell;

    for (i=-1; i<2; i++) {
        for (j=-1; j<2; j++) {
            if (i === 0 && j === 0) {
                continue;
            }
            cell = document.getElementById(cellID(row + i, col + j));
            if (!!cell && !cell.clicked && !cell.flagged) {
                handleCellClick(cell, row + i, col + j);
            }
        }
    }
}

function performMassClick(cell, row, col) {
    if (adjacentFlags(row, col) === adjacentBombs(row, col)) {
        clickAdjacentBombs(row, col);
    }
}
In certain situations, when a flag is set to the maximum value, it triggers an automatic assignment of flag values to the adjacent cells based on their positions.
This behavior is implemented using the ‘performMassClick()‘ function.
If the number of adjacent flags matches the number of adjacent bombs, the ‘clickAdjacentBombs()‘ function is called.
This function handles the task of revealing the neighboring cells recursively, ensuring that the appropriate cells are clicked in response to this condition.
Lastly, the code also includes the necessary functions to handle the scenario of losing the game and restarting it, ensuring that the game can be reset and played again.
function gameOver() {
    components.alive = false;
    document.getElementById('lost').style.display="block";

}

function reload(){
    window.location.reload();
}
As observed in the code, the ‘alive‘ flag of the components is set to false, indicating the end of the game.
Consequently, the message section is displayed to inform the user about the game’s outcome.
To restart the game, the ‘reload()‘ function utilizes the ‘window.location.reload()‘ method.
This method is called to refresh or reload the current page, effectively resetting the game and allowing the user to start a new game.
Here’s the full JavaScript code:
Here is an example demo of Minesweeper in JavaScript:
Conclusion
In this article, we explored the process of building a basic minesweeper game using HTML, CSS, and JavaScript.
By following the steps outlined above, you can create an interactive and enjoyable game that challenges players to uncover the mines while avoiding explosions.
Feel free to experiment and enhance the game further with additional features and customization options.
That concludes our discussion on this topic. We hope that you have gained valuable insights from this article.
Stay tuned for more & Happy coding!😊
Official documentation
Quick step-by-step summary (click to expand)
- What is Minesweeper in JavaScript. Read the ‘What is Minesweeper in JavaScript?’ section for the details and code.
- Basic rules and Mechanics of Minesweeper. Read the ‘Basic rules and Mechanics of Minesweeper’ section for the details and code.
- 1. Setting Up the HTML Structure. Read the ‘1. Setting Up the HTML Structure’ section for the details and code.
- 2. Styling with CSS. Read the ‘2. Styling with CSS’ section for the details and code.
- 3. Creating the Javascript Minesweeper Logic. Read the ‘3. Creating the Javascript Minesweeper Logic’ section for the details and code.
Frequently Asked Questions
Is JavaScript still worth learning in 2026?
What is the difference between var, let, and const?
Which JavaScript version should I target in 2026?
What is the best free editor for JavaScript?
How do I run JavaScript locally vs in the browser?
What can I build with JavaScript for my BSIT capstone?

Glay Eliver
Programmer & Technical Writer at PIES IT Solution
Glay Eliver is a programmer and writer at PIES IT Solution, author of over 600 tutorials at itsourcecode.com. Specializes in JavaScript tutorials, Microsoft Office how-tos (Excel, Word, PowerPoint), and Python error debugging covering ImportError, TypeError, AttributeError, ModuleNotFoundError, and JavaScript ReferenceError. Authored several of the site’s highest-traffic Excel and MS Office reference articles.
Expertise: JavaScript · MS Excel · MS Word · MS PowerPoint · Python · Python ImportError · Python TypeError · Python AttributeError · ModuleNotFoundError · JavaScript ReferenceError · Pygame
· View all posts by Glay Eliver →