
Discover how to create a simple and interactive grocery list using HTML, CSS, and JavaScript.
This step-by-step tutorial will guide you through the whole process of building a functional grocery list that allows you to add and cross out items.
So, without further ado, let’s get started!
How to create a simple Grocery List in JavaScript?
To create a simple Grocery List in JavaScript, here’s a step-by-step guide using HTML, CSS, and JavaScript:
1. HTML
To start, create an HTML file with a basic structure. Include a form element that consists of an input field and a button, allowing users to add items to their grocery list.
Furthermore, incorporate a bulleted list (ul) element to display the list of items.
<!DOCTYPE html>
<html lang="en">
<head>
  <meta charset="UTF-8">
  <meta http-equiv="X-UA-Compatible" content="IE=edge">
  <meta name="viewport" content="width=device-width, initial-scale=1.0">
  <link rel="stylesheet" href="src/style.css">
  <title>Grocery List</title>
</head>
<body>
  <h1 style="text-align: center;">Grocery List</h1>


  <form id="form">
    <input type="text" id="item" placeholder="Add an item">
    <button type="submit"style="margin-right:160px">Add</button>
  </form>
  <ul id="list"></ul>

  <script src="src/script.js"></script>
</body>
</html>
2. CSS
Afterwards, proceed to customize the page’s appearance by incorporating CSS styling.
Enhance the visual appeal by applying styles to the input field, button, and ul element, giving the page a more polished and professional look.
header {
  text-align: center;
  padding: 20px;
  background-color: #f1f1f1;
}

#grocery-list-form {
  background-color: #f9f9f9;
  padding: 20px;
  margin-top: 20px;
}

form {
  display: flex;
  align-items: center;
  justify-content: space-between;
  margin-bottom: 10px;
}

input[type="text"] {
  width: 70%;
  padding: 10px;
  border: 1px solid #ccc;
}

button {
  background-color: #4CAF50;
  color: white;
  padding: 10px 20px;
  border: none;
  cursor: pointer;
}

ul {
  list-style-type: none;
  padding: 0;
  background-color: #fff;
}

li {
  padding: 10px;
  border-bottom: 1px solid #ccc;
}

li:last-child {
  border-bottom: none;
}
form {
    display: flex;
}
3. Script.js
Now, let’s make the grocery list interactive by adding some JavaScript code.
First, use the querySelector method to select the form, ul, and input elements.
Then, we’ll attach an event listener to the form element, allowing it to listen for the submission event and respond accordingly.
This way, the grocery list becomes dynamic and user-friendly.
const form = document.querySelector('#form');
const list = document.querySelector('#list');
const item = document.querySelector('#item');

form.addEventListener('submit', (e) => {
    e.preventDefault();

    if (item.value.trim() !== '') {
        const li = document.createElement('li');
        li.textContent = item.value;
        list.appendChild(li);
        item.value = '';
        li.addEventListener('click', () => {
            li.style.textDecoration = 'line-through';
        });
    }
});
Inside the event listener, take control of the form submission behavior by using the preventDefault method.
Then, verify if the input field has a value that is not empty.
When it’s not empty, create a fresh li element with the text from the input field, attach it to the ul element, and reset the input field to ensure a seamless user experience.
This way, the grocery list remains organized and user-friendly.
Here’s the final output of simple grocery list in JavaScript:
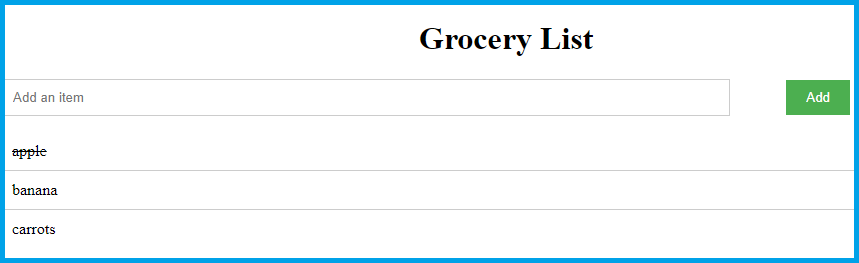
As you can see in the image above, after you add items to the simple grocery list, they are displayed below.
Once the items are bought, you can click on them to indicate that they have been purchased.
For example, in the image above, an apple has been crossed out, indicating that it has already been bought.
Conclusion
In conclusion, this article provides a step-by-step guide on how to create a simple and interactive grocery list using HTML, CSS, and JavaScript.
The tutorial covers the creation of an HTML structure with a form element for adding items and a bulleted list (ul) element for displaying the list.
CSS styling is incorporated to enhance the visual appeal of the page, and JavaScript code is added to make the grocery list dynamic and user-friendly.
The JavaScript code listens for form submissions, creates list items with the inputted values, and allows users to cross out items by clicking on them.
By following this tutorial, you can create your own functional simple JavaScript grocery list.
We are hoping that this article provides you with enough information that helps you understand the grocery list JavaScript.
You can also check out the following article:
Thank you for reading itsourcecoders 😊.
Official documentation
Quick step-by-step summary (click to expand)
- Understand the goal. Read the article intro to know what create a grocery list looks like and when to use it in your JavaScript code.
- Set up your JavaScript file. Create a new .js file or open the browser console. Have Node.js installed if the example runs server-side.
- Write the core logic. Follow the code block below. It shows the minimal working syntax to create a grocery list.
- Test the result. Run the code in Node or your browser. Confirm the expected output prints or the DOM updates as described.
- Handle edge cases. Wrap risky code in try/catch. Check for undefined, null, and empty-array inputs before applying the fix in production.
Frequently Asked Questions
Is JavaScript still worth learning in 2026?
What is the difference between var, let, and const?
Which JavaScript version should I target in 2026?
What is the best free editor for JavaScript?
How do I run JavaScript locally vs in the browser?
What can I build with JavaScript for my BSIT capstone?

Caren Bautista
Technical Writer at PIES IT Solution
Responsible for crafting clear, well-structured, and beginner-friendly content across the platform. Handles the writing, proofreading, and editorial review of tutorials, guides, and documentation to ensure every article is accurate, readable, and easy to follow.
Expertise: Technical Writing · Content Creation · Documentation · Editorial Writing · JavaScript · TypeScript · Python · Python Errors · HTTP Errors · MS Excel
· View all posts by Caren Bautista →