
Are you wondering how to create or add a dynamic calendar in your JavaScript code?
In this article, we will show you the process of building a calendar with HTML, CSS, and JavaScript.
The calendar will show the present month and year and grant users the ability to move back and forth between preceding and succeeding months.
Aside from that, users will have the option to directly access any desired month and year. Also, the calendar will emphasize the current date.
How to Create Dynamic Calendar in JavaScript
Here’s a simple way to create a dynamic calendar using JavaScript and CSS:
HTML
First, you’ll need to create an HTML file with a div element to hold the calendar.
<!DOCTYPE html>
<html>
<head>
  <title>JavaScript Calendar</title>
  <link rel="stylesheet" href="style.css">
</head>
<body>
  <div class="calendar">
    <div class="header">
      <!-- Previous and Next buttons -->
      <button id="prev">Previous</button>
      <h1 id="month-year"></h1>
      <button id="next">Next</button>
    </div>
    <div class="weekdays">
      <!-- Weekday names -->
      <span>Sun</span>
      <span>Mon</span>
      <span>Tue</span>
      <span>Wed</span>
      <span>Thu</span>
      <span>Fri</span>
      <span>Sat</span>
    </div>
    <div class="days" id="calendar-days"></div>
  </div>
  <div class="event-form" id="event-form" style="display: none;">
    <!-- Event input and Save button -->
    <input type="text" id="event-input" placeholder="Enter your event">
    <button id="save-event">Save</button>
  </div>
  <script src="script.js"></script>
</body>
</html>
Script.js
Next, you’ll need to create a JavaScript file and link it to your HTML file. In this file, you can create a function that generates the calendar.
This function should take in a date as an argument and use it to determine the month and year to display.
// JavaScript
document.addEventListener("DOMContentLoaded", function () {
  const prevBtn = document.getElementById("prev");
  const nextBtn = document.getElementById("next");
  const monthYearElem = document.getElementById("month-year");
  const calendarDaysElem = document.getElementById("calendar-days");
  const eventForm = document.getElementById("event-form");
  const eventInput = document.getElementById("event-input");
  const saveEventBtn = document.getElementById("save-event");

  let currentDate = new Date();
  let selectedDate = null;
  let events = {}; // Object to store events { '2023-08': { '2': ['event1', 'event2'], '7': ['event3'] }, ... }

  function renderCalendar() {
    const firstDayOfMonth = new Date(currentDate.getFullYear(), currentDate.getMonth(), 1);
    const lastDayOfMonth = new Date(currentDate.getFullYear(), currentDate.getMonth() + 1, 0);
    const prevMonthLastDay = new Date(currentDate.getFullYear(), currentDate.getMonth(), 0);

    const firstDayOfWeek = firstDayOfMonth.getDay();
    const lastDayOfWeek = lastDayOfMonth.getDay();

    const days = [];
    for (let i = prevMonthLastDay.getDate() - firstDayOfWeek + 1; i <= prevMonthLastDay.getDate(); i++) {
      days.push(`<span class="prev-month">${i}</span>`);
    }
    for (let i = 1; i <= lastDayOfMonth.getDate(); i++) {
      const isToday = currentDate.toDateString() === new Date(currentDate.getFullYear(), currentDate.getMonth(), i).toDateString();
      const eventsForDate = events[`${currentDate.getFullYear()}-${currentDate.getMonth() + 1}`]?.[i];
      days.push(`<span class="${isToday ? 'today' : ''}" data-date="${i}">${i}${eventsForDate ? '<div class="events">' + eventsForDate.join('<br>') + '</div>' : ''}</span>`);
    }
    for (let i = 1; i <= 6 - lastDayOfWeek; i++) {
      days.push(`<span class="next-month">${i}</span>`);
    }

    calendarDaysElem.innerHTML = days.join("");
    monthYearElem.textContent = `${currentDate.toLocaleString("default", { month: "long" })} ${currentDate.getFullYear()}`;
  }

  function prevMonth() {
    currentDate = new Date(currentDate.getFullYear(), currentDate.getMonth() - 1, 1);
    renderCalendar();
  }

  function nextMonth() {
    currentDate = new Date(currentDate.getFullYear(), currentDate.getMonth() + 1, 1);
    renderCalendar();
  }

  function highlightSelectedDate(event) {
    const selectedDay = event.target;
    const dateAttribute = selectedDay.dataset.date;

    if (dateAttribute) {
      const allDays = document.querySelectorAll('.days span');
      allDays.forEach(day => day.classList.remove('selected'));
      selectedDay.classList.add('selected');
      selectedDate = new Date(currentDate.getFullYear(), currentDate.getMonth(), dateAttribute);

      // Show the event form when a date is selected
      eventForm.style.display = "block";
    }
  }

  function saveEvent() {
    if (selectedDate && eventInput.value.trim() !== "") {
      const dateKey = `${selectedDate.getFullYear()}-${selectedDate.getMonth() + 1}`;
      if (!events[dateKey]) {
        events[dateKey] = {};
      }
      const date = selectedDate.getDate().toString();
      if (!events[dateKey][date]) {
        events[dateKey][date] = [];
      }
      events[dateKey][date].push(eventInput.value.trim());

      eventInput.value = "";
      eventForm.style.display = "none";
      renderCalendar(); // Refresh the calendar to display the updated events
    }
  }

  prevBtn.addEventListener("click", prevMonth);
  nextBtn.addEventListener("click", nextMonth);
  calendarDaysElem.addEventListener("click", highlightSelectedDate);
  saveEventBtn.addEventListener("click", saveEvent);

  renderCalendar();
});
CSS
Lastly, you can use CSS to style your calendar. You can add styles to your HTML file using a style tag or by linking to an external CSS file.
Here’s an example of some simple styles you may use:
/* CSS */
body {
  font-family: Arial, sans-serif;
  text-align: center;
}

.calendar {
  max-width: 400px; /* Adjust the max-width as needed */
  margin: 0 auto;
  border: 1px solid #005799;
  padding: 10px;
}

.header {
  display: flex;
  justify-content: space-between;
  align-items: center;
  margin-bottom: 10px;
}

.weekdays {
  display: grid;
  grid-template-columns: repeat(7, 1fr);
  margin-bottom: 10px;
}

.weekdays span {
  padding: 5px;
  font-weight: bold;
}

.days {
  display: grid;
  grid-template-columns: repeat(7, 1fr);
  grid-template-rows: 1fr; /* Set only 1 row */
}

.days span {
  display: block;
  padding: 5px;
  text-align: center;
  cursor: pointer;
  min-height: 50px; /* Set a minimum height for each day cell */
}

.days span.today {
  background-color: #007bff;
  color: white;
}

.days span.selected {
  background-color: #ff004c;
  color: rgb(236, 135, 135);
}

.days span:not(.today):hover {
  background-color: #f2f2f2;
}

.event-form {
  padding: 10px;
}
.prev-month, .next-month {
  color: #999;
  opacity: 0.5;
}
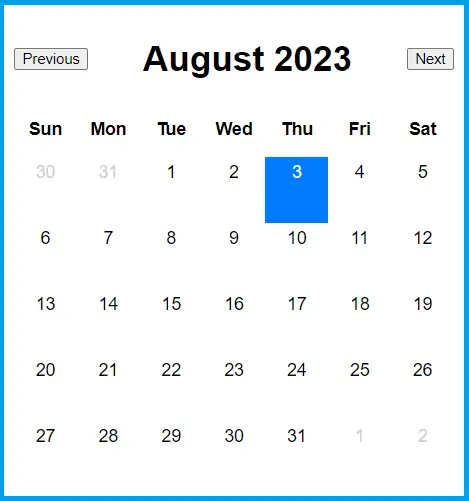
Here’s the final output:
Conclusion
In conclusion, we have demonstrated a straightforward method to create a dynamic calendar using HTML, CSS, and JavaScript.
This calendar displays the current month and year and allows users to navigate back and forth between preceding and succeeding months. Additionally, users can directly access any desired month and year.
The calendar also highlights the current date for easy identification.
By following the steps outlined in this article, you can build a functional and visually appealing calendar that can be integrated into your JavaScript projects.
Customization options are plentiful, allowing you to tailor the calendar’s appearance and functionality to suit your specific needs.
Incorporating a dynamic calendar into web applications can be a great benefit for users in effectively managing their events, schedules, and appointments.
We are hoping that this article provides you with enough information that helps you understand how to create a calendar in JavaScript.
You can also check out the following article:
Thank you for reading itsourcecoders 😊.