The Observer Pattern is a widely used design pattern in the realm of software development, particularly in JavaScript, that fosters better code organization, flexibility, and maintainability.
In this article, we’ll delve into the concepts, benefits, and implementation of the Observer Pattern in JavaScript. So, let’s dive right in!
What is Observer Pattern JavaScript?
At its core, the observer pattern is a behavioral design pattern that facilitates efficient communication between different parts of a software application.
It establishes a relationship between objects— when one object undergoes a change, all its dependent objects are automatically notified and updated.
This ensures a loose coupling between components, enabling flexible and modular code.
Two Actors of Observer Pattern
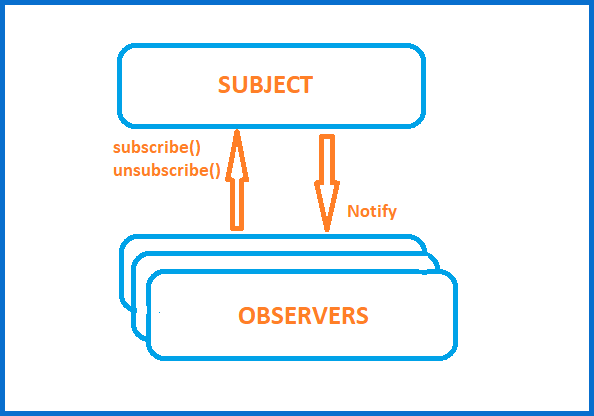
The observer pattern consists of two main actors: the subject and the observers.
The subject is often observable it is the entity that experiences changes. On the other hand, observers are entities that are interested in these changes and wish to be notified when they occur.
Benefits of Using the Observer Pattern
The JavaScript Observers bring a lot of benefits to the table namely:
- Modularity and Reusability — Through decoupling components, we can modify, add, or remove observers without impacting other observers.
- Efficient Communication — Observers are only notified when relevant changes occur, minimizing unnecessary updates.
- Flexibility — It considers dynamic scenarios wherein the number of observers can change during run time.
- Maintainability — The pattern enhances code organization and readability by isolating responsibilities.
Observer Pattern Javascript Step by Step Implementation
Now, here is the step-by-step implementation of the Observer Pattern in JavaScript.
Step 1: Define the Subject
Start by creating the subject, which is the object that experiences changes and notifies its observers.
Then, define the class that represents the subjects and includes methods for managing observers and notifying the changes.
In this case, we create Stock class with methods to set stock price along with notifying the observers when the price changes.
class Stock {
  constructor(symbol, initialPrice) {
    this.symbol = symbol;
    this.price = initialPrice;
    this.observers = [];
  }

  setPrice(newPrice) {
    this.price = newPrice;
    this.notifyObservers();
  }

  registerObserver(observer) {
    this.observers.push(observer);
  }

  unregisterObserver(observer) {
    const index = this.observers.indexOf(observer);
    if (index !== -1) {
      this.observers.splice(index, 1);
    }
  }

  notifyObservers() {
    this.observers.forEach(observer => observer.update(this.price));
  }
}
Step 2: Implement the Observer Interface
Create an observer interface that outlines the methods observers must implement. Typically, this interface includes update() method which is called when the subject’s state changes.
class Observer {
  update(price) {
    throw new Error("This method must be overridden");
  }
}
Step 3: Create Concrete Observer Classes
Develop concrete observer classes that implement the observer interface. Each observer class represents a specific component that is interested in the subject’s changes.
These classes should include logic to react to updates received from the subject.
For instance, develop PriceDisplay and GraphDisplay.
class PriceDisplay extends Observer {
  constructor(stock) {
    super();
    this.stock = stock;
  }

  update(price) {
    console.log(`PriceDisplay: Stock ${this.stock.symbol} has a new price: ${price}`);
  }
}

class GraphDisplay extends Observer {
  constructor(stock) {
    super();
    this.stock = stock;
  }

  update(price) {
    console.log(`GraphDisplay: Updating graph for stock ${this.stock.symbol} with price ${price}`);
  }
}
Step 4: Register Observers with the Subject
In the subject class, provide methods to register and unregister observers. Maintain a collection of observers and ensure that they are notified whenever changes occur.
In the Stock class, maintain a list of registered observers. When a stock’s price changes, notify all registered observers.
const stock = new Stock("XYZ", 100);

const priceDisplay = new PriceDisplay(stock);
const graphDisplay = new GraphDisplay(stock);

stock.registerObserver(priceDisplay);
stock.registerObserver(graphDisplay);

stock.setPrice(110);
Step 5: Notify Observers
When the subject’s state changes, iterate through the list of registered observers and call their update() methods. This allows each observer to react to the change in its own way.
const stock = new Stock("ABC", 200);

const priceDisplay = new PriceDisplay(stock);
const graphDisplay = new GraphDisplay(stock);

stock.registerObserver(priceDisplay);
stock.registerObserver(graphDisplay);

stock.setPrice(220);
Step 6: Client Code
In your application’s client code, instantiate the subject and the observer classes. Register the observers with the subject, and start monitoring changes.
This completes the setup, and your components are now connected through the observer pattern.
For instance, we instantiate the Stock object and the observer instances. Register observers with the subject and watch for updates on different displays.
const stock = new Stock("ABC", 200);

const priceDisplay = new PriceDisplay(stock);
const graphDisplay = new GraphDisplay(stock);

stock.registerObserver(priceDisplay);
stock.registerObserver(graphDisplay);

stock.setPrice(220);
Conclusion
In conclusion, the Observer Pattern shines as a valuable technique for achieving loose coupling, real-time updates, and code maintainability.
By understanding its core concepts, benefits, and best practices, developers can wield this pattern to create more robust and adaptable applications.
Official documentation
Frequently Asked Questions
Is JavaScript still worth learning in 2026?
What is the difference between var, let, and const?
Which JavaScript version should I target in 2026?
What is the best free editor for JavaScript?
How do I run JavaScript locally vs in the browser?
What can I build with JavaScript for my BSIT capstone?

Glay Eliver
Programmer & Technical Writer at PIES IT Solution
Glay Eliver is a programmer and writer at PIES IT Solution, author of over 600 tutorials at itsourcecode.com. Specializes in JavaScript tutorials, Microsoft Office how-tos (Excel, Word, PowerPoint), and Python error debugging covering ImportError, TypeError, AttributeError, ModuleNotFoundError, and JavaScript ReferenceError. Authored several of the site’s highest-traffic Excel and MS Office reference articles.
Expertise: JavaScript · MS Excel · MS Word · MS PowerPoint · Python · Python ImportError · Python TypeError · Python AttributeError · ModuleNotFoundError · JavaScript ReferenceError · Pygame
· View all posts by Glay Eliver →