
One fundamental aspect of web development involves manipulating HTML elements, and in this article, we’ll delve into a crucial task: set textarea values using JavaScript.
Before we dive into the dynamic world of JavaScript, let’s take a moment to understand the basics of HTML textareas.
What is Textarea?
A textarea element is an input field designed to capture large amounts of text from users.
It provides a convenient way for users to input comments, messages, or any other form of textual content.
Importance of Setting Textarea Values
Imagine a scenario where you’re developing a blog platform or a social media website.
Users often need to edit their posts or comments, and pre-filling textareas with the existing content can significantly improve the user experience.
This is where setting textarea values using JavaScript becomes invaluable.
Basic Syntax for Setting Textarea Values
To set the value of a textarea using JavaScript, you’ll need to target the textarea element by its unique ID or class.
Here’s a basic code snippet to get you started:
const textareaElement = document.getElementById('yourTextareaID');
textareaElement.value = 'This is the new textarea value!';
In this example, we select the textarea element using its ID and updating its value property.
How to set textarea value in JavaScript?
So here is how we set textarea value in JavaScript.
Changing Textarea Values Dynamically
Dynamic content updates are a hallmark of modern web applications. You can utilize JavaScript event listeners to capture user actions and dynamically change textarea values accordingly.
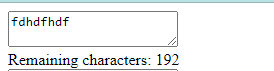
For instance, let’s say you want to provide users with a character countdown as they type within a textarea:
<!DOCTYPE html>
<html lang="en">
<head>
<meta charset="UTF-8">
<meta name="viewport" content="width=device-width, initial-scale=1.0">
<title>Character Count Example</title>
</head>
<body>

<textarea id="userTextarea"></textarea>
<div id="characterCount">Remaining characters: 200</div>

<script>
  const textarea = document.getElementById('userTextarea');
  const characterCount = document.getElementById('characterCount');

  textarea.addEventListener('input', () => {
    const remainingChars = 200 - textarea.value.length;
    characterCount.textContent = `Remaining characters: ${remainingChars}`;
  });
</script>

</body>
</html>
Result:
Enhancing User Experience with Input Validation
Maintaining data integrity is crucial when dealing with user inputs.
JavaScript can help you validate textarea content before submission, ensuring that users provide accurate and valid information.
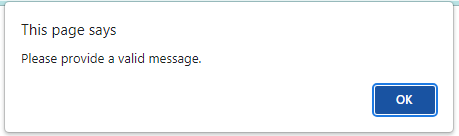
For example, you can prevent users from submitting empty or excessively long textareas:
<!DOCTYPE html>
<html lang="en">
<head>
<meta charset="UTF-8">
<meta name="viewport" content="width=device-width, initial-scale=1.0">
<title>Form Submission Example</title>
</head>
<body>

<form id="yourFormID">
  <textarea id="userTextarea"></textarea>
  <button type="submit">Submit</button>
</form>

<script>
  const form = document.getElementById('yourFormID');
  const textarea = document.getElementById('userTextarea');

  form.addEventListener('submit', (event) => {
    if (textarea.value.trim() === '') {
      event.preventDefault();
      alert('Please provide a valid message.');
    }
  });
</script>

</body>
</html>
Result:
Clearing Textareas with JavaScript
Allowing users to clear textarea content with a single click is a thoughtful feature.
JavaScript can facilitate this by creating a “Clear” button that resets the textarea value to an empty string:
const clearButton = document.getElementById('clearButton');

clearButton.addEventListener('click', () => {
textarea.value = '';
});
Connection Between Textarea Values and Form Submissions
Textareas are often used within HTML forms. When a user submits a form, the textarea content is typically sent to a server for processing.
JavaScript lets you access and manipulate textarea values before the form is submitted, enabling last-minute modifications or validations.
Styling Textareas with CSS Classes via JavaScript
Aesthetics play a vital role in user engagement.
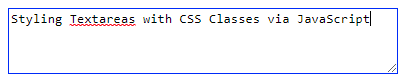
JavaScript can be employed to dynamically apply or remove CSS classes to textareas, allowing you to change their appearance based on user interactions:
  <!DOCTYPE html>
  <html lang="en">
  <head>
      <meta charset="UTF-8">
      <meta name="viewport" content="width=device-width, initial-scale=1.0">
      <title>Textarea Focus Example</title>
      <style>
          /* Define the CSS style for the 'focused' class */
          .focused {
              border-color: blue;
              outline: none;
          }
      </style>
  </head>
  <body>
      <textarea id="myTextarea" rows="4" cols="50"></textarea>

      <script>
          // Get a reference to the textarea element
          const textarea = document.getElementById('myTextarea');

          // Add an event listener for the 'focus' event
          textarea.addEventListener('focus', () => {
              // When the textarea is focused, add the 'focused' class to it
              textarea.classList.add('focused');
          });

          // Add an event listener for the 'blur' event
          textarea.addEventListener('blur', () => {
              // When the textarea loses focus, remove the 'focused' class from it
              textarea.classList.remove('focused');
          });
      </script>
  </body>
  </html>
Result:
I think we already covered everything we need to know about this article trying to convey.
Nevertheless, you can also check these articles to enhance your JavaScript HTML manipulation skills.
- How to Dynamically Add Rows in HTML table using JavaScript?
- How to combine html CSS and JavaScript in one file
- How To Make JavaScript Tabs With CSS And HTML
Conclusion
In conclusion, mastering the manipulation of HTML elements is a fundamental skill in web development, and a key aspect of this is the ability to set textarea values using JavaScript.
Textarea elements offer a user-friendly way to gather substantial amounts of text, such as comments or messages, making them invaluable in platforms like blogs or social media websites.
Official documentation
Frequently Asked Questions
Is JavaScript still worth learning in 2026?
What is the difference between var, let, and const?
Which JavaScript version should I target in 2026?
What is the best free editor for JavaScript?
How do I run JavaScript locally vs in the browser?
What can I build with JavaScript for my BSIT capstone?

Glay Eliver
Programmer & Technical Writer at PIES IT Solution
Glay Eliver is a programmer and writer at PIES IT Solution, author of over 600 tutorials at itsourcecode.com. Specializes in JavaScript tutorials, Microsoft Office how-tos (Excel, Word, PowerPoint), and Python error debugging covering ImportError, TypeError, AttributeError, ModuleNotFoundError, and JavaScript ReferenceError. Authored several of the site’s highest-traffic Excel and MS Office reference articles.
Expertise: JavaScript · MS Excel · MS Word · MS PowerPoint · Python · Python ImportError · Python TypeError · Python AttributeError · ModuleNotFoundError · JavaScript ReferenceError · Pygame
· View all posts by Glay Eliver →