
Learn How to Master VB.Net with MySQL Database Tutorial in 30 Minutes
Welcome to our “Learn How to Master VB.Net with MySQL Database Tutorial in 30 Minutes”. This full tutorial will take you at least 30 minutes to master the Visual Basic.Net with MySQL Database.
This tutorial has a version in MS Access database and you can follow it in this tutorial entitled “Complete guide on how to Connect Access Database Access in VB.Net”.
But if you want to start how to code using visual studio 2019, you can start your lesson here on how to connect Mysql to visual Studio 2019.
Training Summary
This VB.NET MySQL Database Tutorial course will teach you a step by step guide on how to master VB.Net and MySQL Database.
This VB.NET with MySQL Database Tutorial covers topics like;
What Should I know?
This VB.Net with MySQL Database Tutorial is made for beginners with no knowledge in programming VB.Net and MySQL Database.
What to Expect After I Complete the Course?
After completing the course, it is expected that you will be able to gain more knowledge on how to manipulate the MySQL Database using VB.net.
What else?
You will become an expert in the field of programming using this VB.Net MySQL Database Tutorial. With knowledge, you can now make any management system for your clients.
I think we are now ready to start with our training on how to master the VB.net and MySQL Database.
Part 1 of VB.Net MySQL Tutorial: How to Connect VB.Net to MySQL Database
Time needed: 30 minutes
Steps How to Connect VB.net with MySQL Database
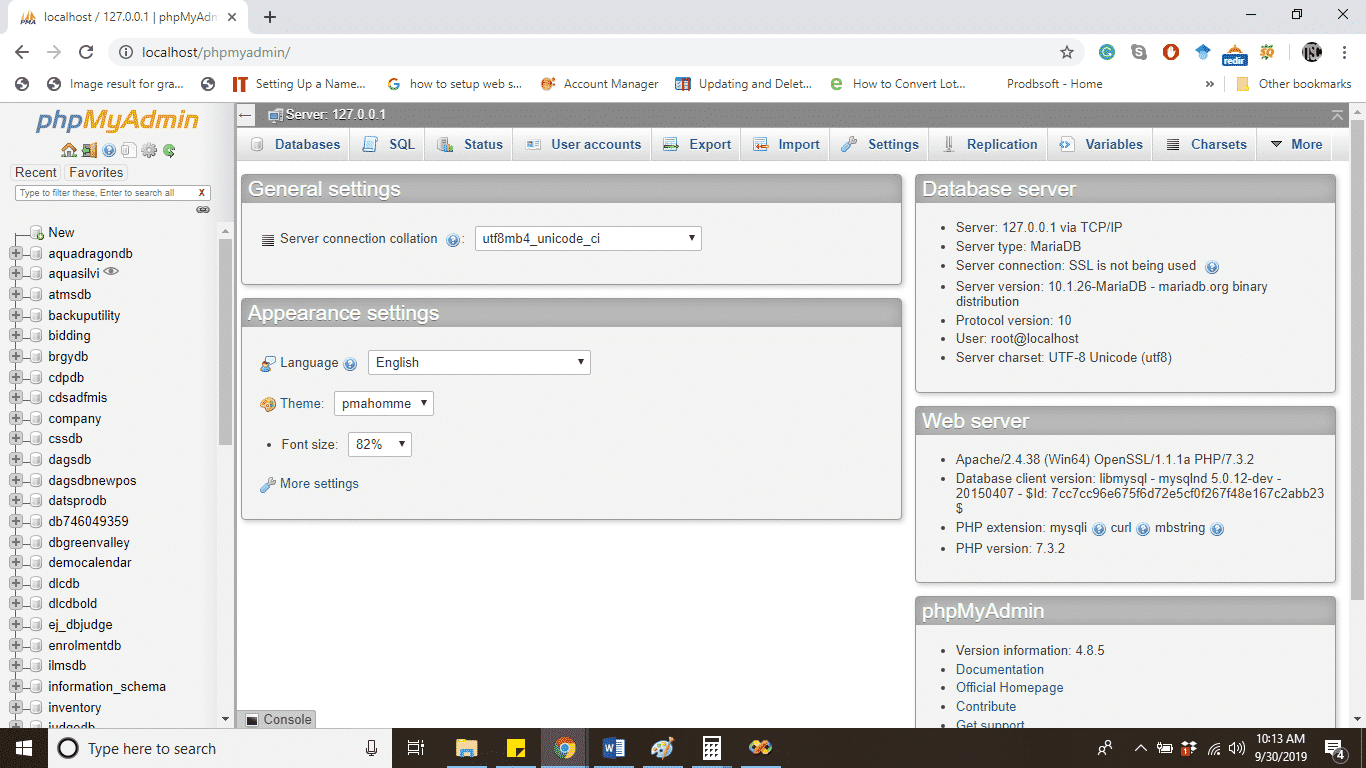
- Step 1: Open PHPMyAdmin
To Create a Database, open your browser and type this “localhost/phpmyadmin” in your address bar and press enter. This should look like as shown in the image below.

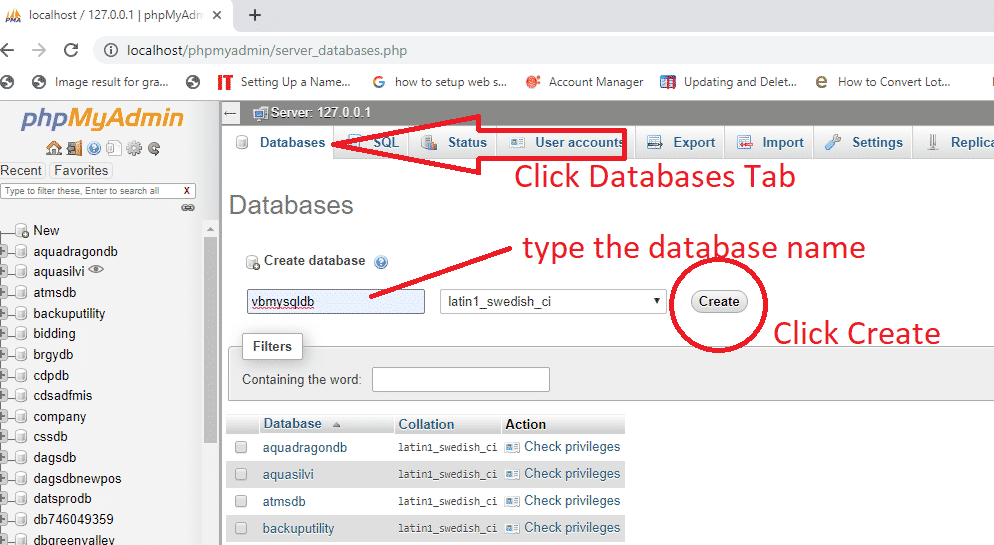
- Step 2: Create a Database
Once you are in the PHPmyadmin window, you have to click the “Databases” tab. then type the database name “vbmysqldb” and Click Create button. Please see the image below.

- Step 3: Create a Table
In this step, we will create a table “tbluseraccounts” with four fields.
This looks like as shown in the image below.
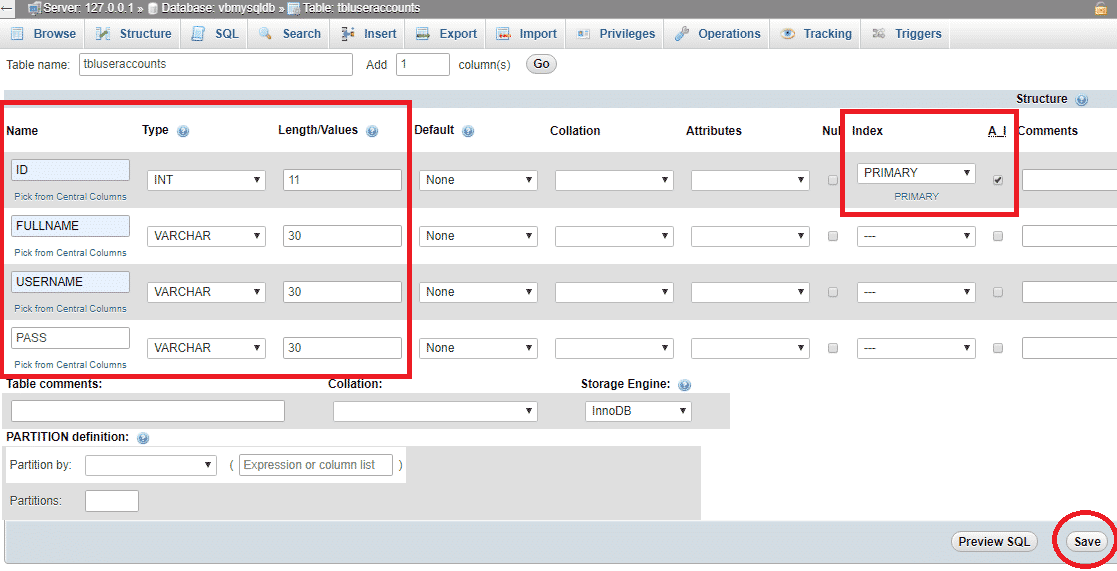
- Step 4. Add Fields to Table
This time we have to add fields(ID, FULLNAME, USERNAME, PASS) in the table. Please see the image below.

In the image above, we set ID as Integer, primary, Autoincrement. For fullname, username, and pass. we set it as VARCHAR with a length of 30.
Note: For detailed instruction of creating a table, you check it here. MySQL Create table - Step 5: Create a Visual Basic Application
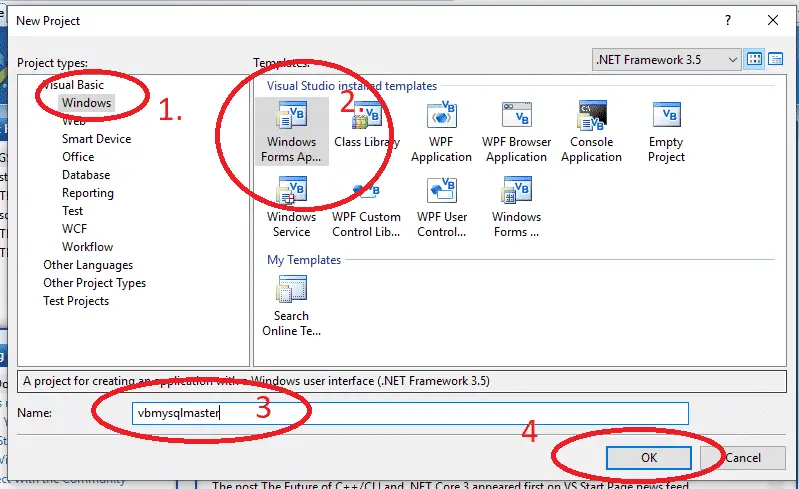
In this step, we will create a visual basic application. To do this, open a visual studio or visual basic program(any version you like from vb2008 – vb2017). Then click File -> New Project.

- Step 6: Create a Project
In this step, we need to create a project. To do this, click Windows then Select Windows Form Application and Type the name of project. Finally, click “OK” button.

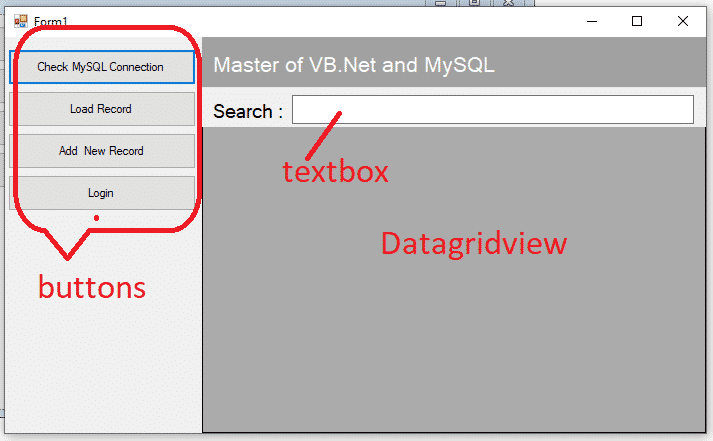
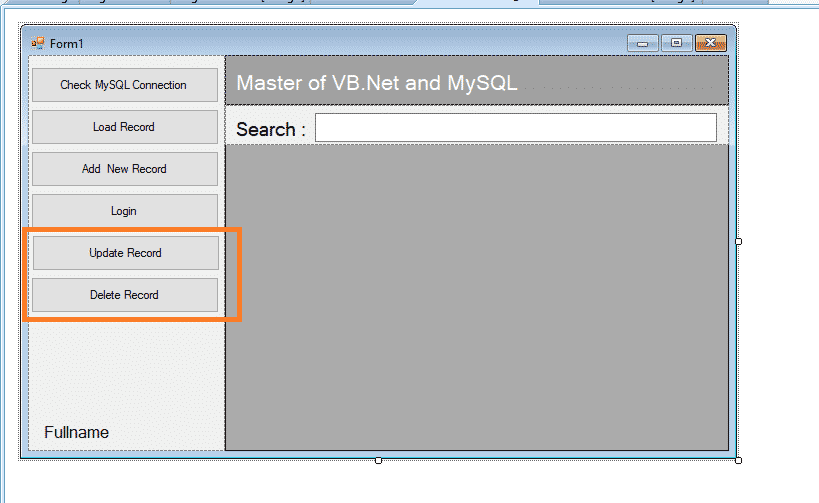
- Step 7: Design a Form
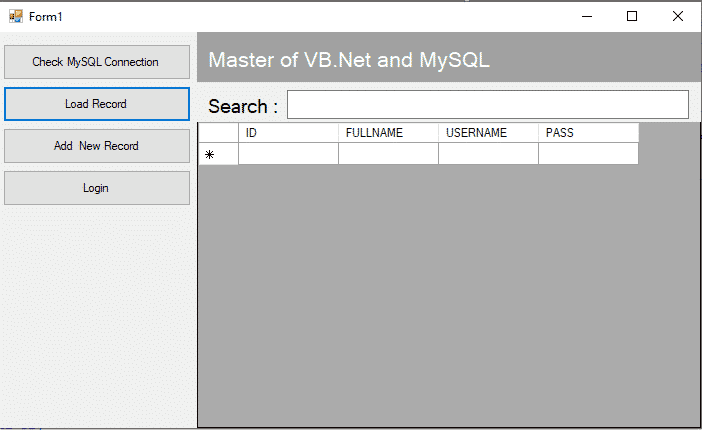
For the design of the form, you need to add 4 buttons, 2 labels, datagridview, and textbox. Then arrange everything based on the image below.

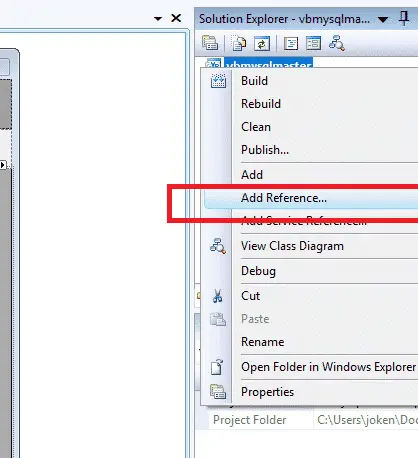
- Step 8: Add Mysql.data.dll reference
To add the Mysql.data.dll, go-to solution explorer then right-clicks the project and click “add reference”.

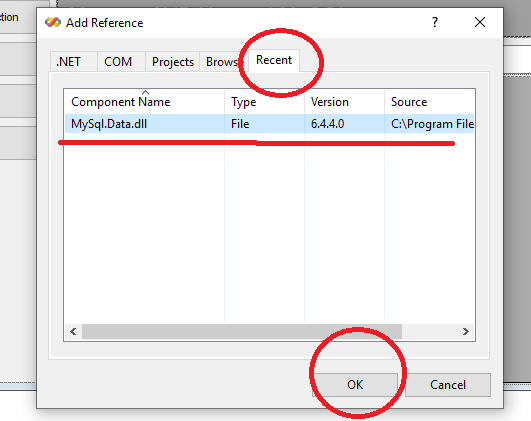
- Step 9: Add Mysql.data.dll to your project.
Under Add Reference window, click the Browse tab to browse on your computer where you install the mysql.data.dll.
In my case, I previously use this reference so I simply click the Recent Tab. Just select MySql.data.dll and click ok.
Note: For detailed instructions on how to add mysql.data.dll, you can click it here. How To Add Mysql.data.dll To Your Visual Basic Application. Anyway if you don’t have MySQL Connector installed On your computer, you can download it here. - Step 10: Start Coding
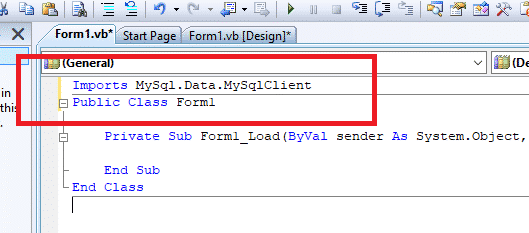
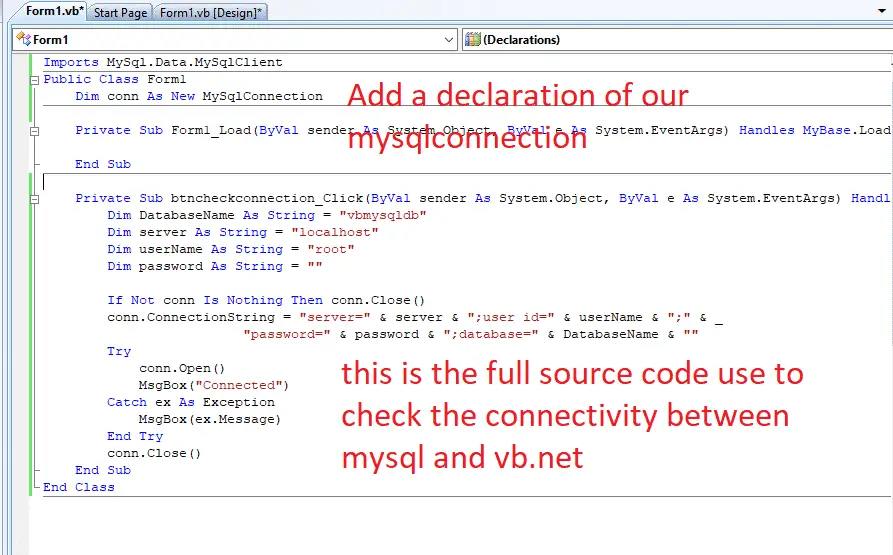
This time, we will add code to our form. To do this, double click the form to view the code window. Above “Public Class Form1” add the following code. “Imports MySql.Data.MySqlClient”

- Step 11: Add VB.Net MySQL Connection String Code to “MySQL Check Connection” Button
In this step, we have to add VB.Net MySQL Connection String Code to check if we are connected to MySQL Database. To do this, double click the Check MySQL Connection Button and add the following code look like as shown in the image below.

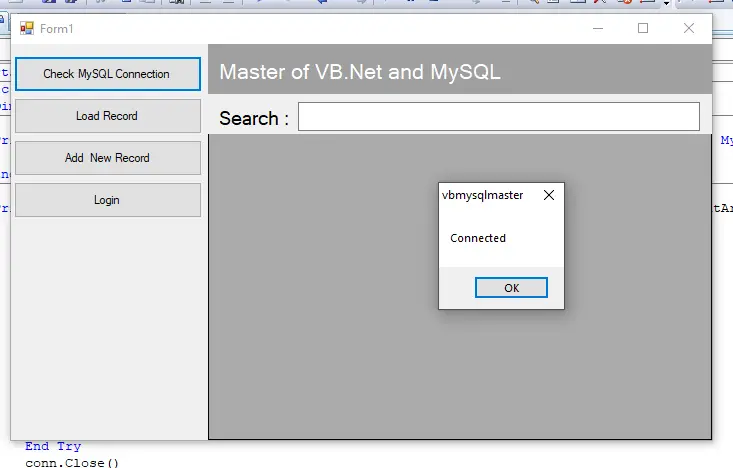
- Step 12: Test the VB.Net MySQL Connection String code in Check MySQL Connection
To do this, press “F5” or play button to run the project. When the project run, click the “Check MySQL Connection” button. The expected output should look like as shown in the image below.

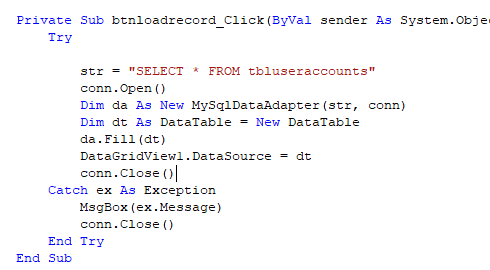
- Step 13: Add Functionality to Load record Button
In this step, we are going to add a code to the “Load record” button. To do this, double click the “Load Record” button and add the following code. See the image below.

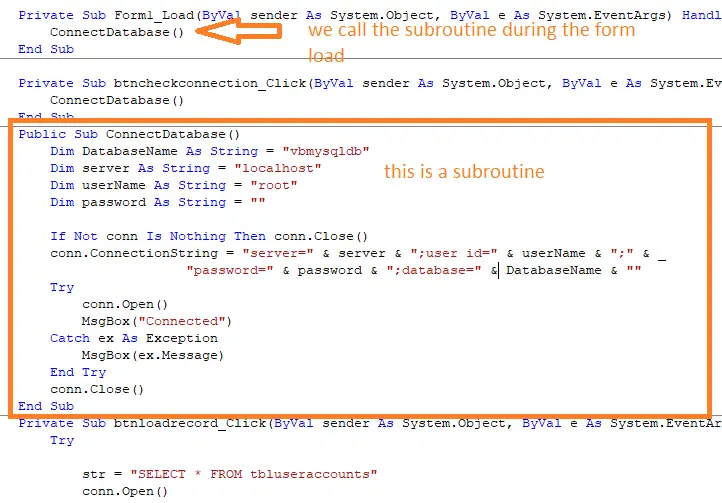
- Step 14: Create a subroutine for the VB.Net MySQL Database connection.
We need to create a subroutine for our VB.Net MySQL database connection so that when we click the “Load Record” button, we don’t need to click first the “Check MySQL Connection” button to create a VB.Net MySQL Database connection.
Here’s the subroutine looks like.
- Step 15: Test the Load Record button functionality
Press F5 or the play button to run the project. Then Clik the “Load Record” Button. The result will look like as shown below.


Here’s the video on how to Connect VB.Net to MySQL Database.
Watch the video here on how to Load MySQL Data to Datagridview using VB.NET.
Part 2 VB.Net MySQL Tutorial: VB.Net MySQL INSERT
Welcome to Part 2 of mastering the VB.NET MySQL Tutorial. This time we will focus more on the VB.Net MySQL INSERT for adding of records to the MySQL database using vb.net. Let’s start.
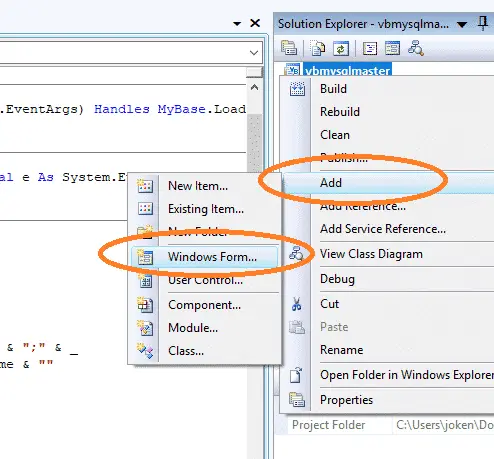
- Add New windows form.
Go to Solution Explorer, Right-click project and add new windows form. See the image below
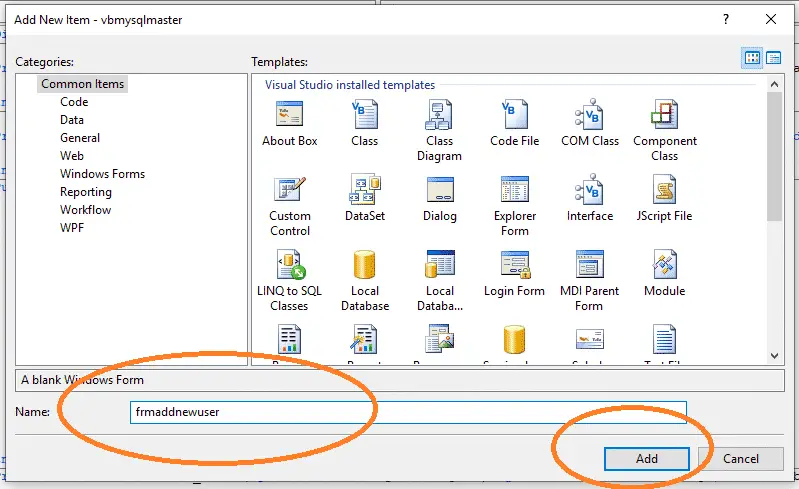
2. Write “frmnewuser” to the Name of Form. Then click the “Add” button.
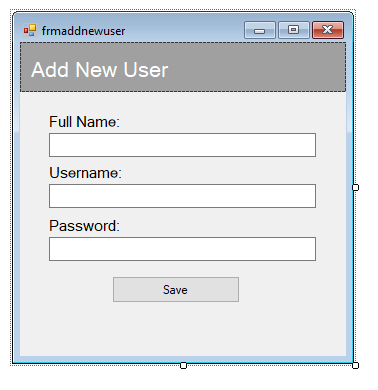
3. Design the form looks like as shown below.
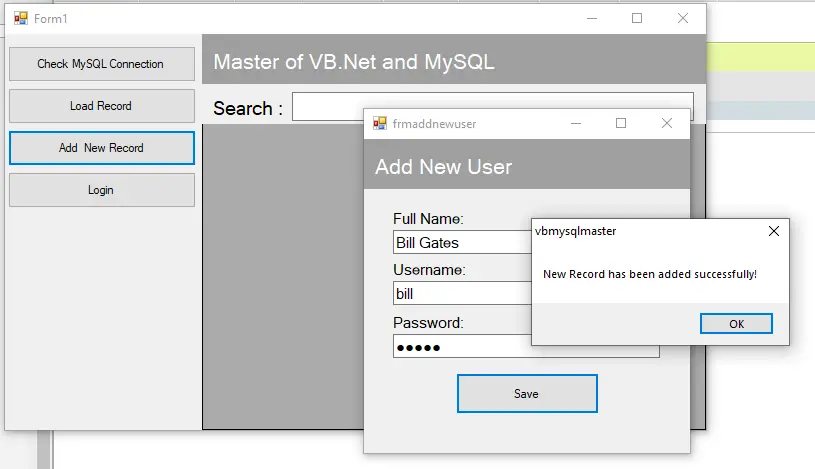
4. Go back to Form1 and double click the “Add New Record” button and add the following code. This code will call the “frmnewuser” form.
frmaddnewuser.Show()5. Go back to the frmnewuser and we will perform the VB.Net MySQL INSERT by adding functionality to the “Save” button. Double click the button and add the following code.
 Dim cmd As New MySqlCommand
        Dim result As Integer
        Try
            conn.Open()
            With cmd

                .Connection = conn
                .CommandText = "INSERT INTO `tbluseraccounts` (`ID`, `FULLNAME`, `USERNAME`, `PASS`)" & _
                " VALUES (NULL, '" & txtfullname.Text & "', '" & txtusername.Text & "', '" & txtpassword.Text & "');"
                result = .ExecuteNonQuery()
                If result > 0 Then
                    MsgBox("New Record has been added successfully!")
                Else
                    MsgBox("No Record has been added successfully!")
                End If
                Me.Close()

            End With
        Catch ex As Exception
            MsgBox(ex.Message)
        Finally
            conn.Close()

        End Try
6. Test the VB.Net MySQL INSERT code by pressing “F5” or Play button. Then click the Add New Record Button.
The Frmnewuser will show, Then you can type the Fullname, Username, and Password. Finally, click the “Save” button.
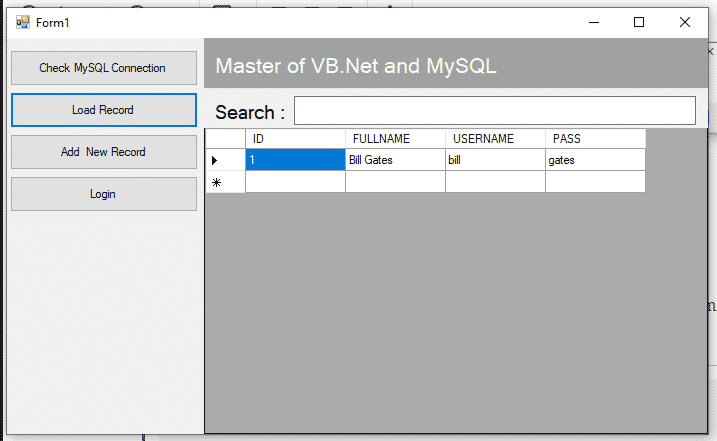
7. Click the Load record button. By default, it will load all the record from the database like as shown below.
Congratulations! Now you are ready to move to the next part of our lesson which is the login code in vb.net.
Part 3 of VB.Net MySQL Tutorial: VB.Net Login Code with MySQL Database
Welcome to Part 3 of VB.Net MySQL Tutorial: VB.Net Login Code with MySQL Database. This time, we are going to focus on the VB.Net Login Code with MySQL Database.
Before you start coding the login code in vb.net, watch the video here to get the full idea on how to create a login code in vb.net with MySQL database.
Let’s begin:
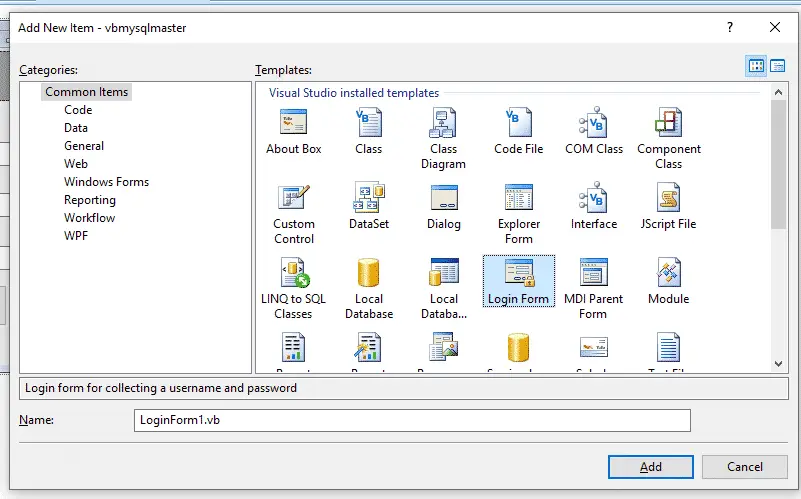
- Go to Solution Explorer, right-click the project and Click add then, Select new Item.
- On the Add New item Window, Select login Form then, Click Add button. See the image below.
3. next go to Form1 and double click the “Login” button. And add the VB.Net Login Code with MySQL Database. This will simply call the login form.
   If btnlogin.Text = "Login" Then
     LoginForm1.Show()
  Else
     btnlogin.Text = "Login"
     lblfullname.Text = "Guest"
  End If
4. Go to LoginForm1 and Double click the “Form” and add the following code below Public Class. This code is only a declaration of Global variables.
    Dim conn As New MySqlConnection
    Dim cmd As New MySqlCommand
    Dim da As New MySqlDataAdapter
    Dim dReader As MySqlDataReader
    Dim sql As String
5. Next, Double click the “OK” button and add the following code.
  sql = "SELECT count(*) as Numresult,FULLNAME, `USERNAME`, `PASS` FROM `tbluseraccounts` " & _
        " WHERE `USERNAME` ='" & UsernameTextBox.Text & "' and `PASS` = '" & PasswordTextBox.Text & "'"
        Try
            conn.Open()
            With cmd
                .Connection = conn
                .CommandText = Sql
            End With
            dReader = cmd.ExecuteReader()
            Do While dReader.Read = True
                If dReader("Numresult") = 1 Then

                    Form1.lblfullname.Text = dReader("FULLNAME")
                    Form1.btnlogin.Text = "Logout"

                End If

            Loop
        Catch ex As Exception
            MsgBox(ex.Message, MsgBoxStyle.Exclamation)
        Finally
            conn.Close()
            da.Dispose()
        End Try


        Me.Close()
6. Don’t run yet the project, you need to go back in Form 1 and add another Lable under Login Button and Name it as “lblfullname“.
This label will display the Fullname of the user who successfully login.
7. You can now test the vb code for login. Just simply press F5 or the Play button.
When you successfully log in, the result should look like as shown below.
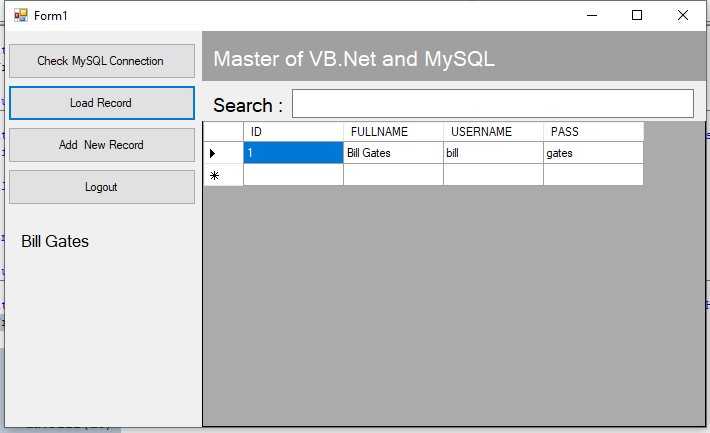
What you notice under the “Logout” button it displays there the Fullname of Bill Gates. Because I use the login username and password of bill gates.
Note: Don’t forget to add the subroutine and call it inside the loginform1 Load.
Congratulations! another milestone has been achieved.
Part 4 of VB.Net MySQL Tutorial: Search in VB.Net
Welcome to part 4 of Mastering VB.Net and MySQL Database. This time we are going to focus on how to add a Quick Search in VB.Net in our in Form1.
Let’s Begin:
Open the Form1 and Double click the Textbox. Then add the following Code.
Try

  str = "SELECT * FROM tbluseraccounts where fullname like '%" & TextBox1.Text & "%'"
  conn.Open()
  Dim da As New MySqlDataAdapter(str, conn)
  Dim dt As DataTable = New DataTable
  da.Fill(dt)
  DataGridView1.DataSource = dt
  conn.Close()
Catch ex As Exception
  MsgBox(ex.Message)
  conn.Close()
End Try
If you observe, the code in a Quick Search in VB.Net is still the same as the code in the “Load record” button.
str = "SELECT * FROM tbluseraccounts where fullname like '%" & TextBox1.Text & "%'"The difference is in the SQL Query, I use Like function in SQL statement to filter the result to be displayed in the datagridview.
Hurray! You are almost a Master of using VB.net and MySQL Database.
Part 5 of VB.Net MySQL Tutorial: VB.Net MySQL Update and Delete Records
In this Part 5 of VB.Net MySQL Tutorial: VB.Net MySQL Update and Delete Records, we will focus this topic on Updating and Deleting of Records.
Let’s Jump in:
First, go to Form1 and Add 2 Buttons. and arrange it like as shown below.
Next, we will functionality to these buttons. To do this, we need to understand first the process of updating the record.
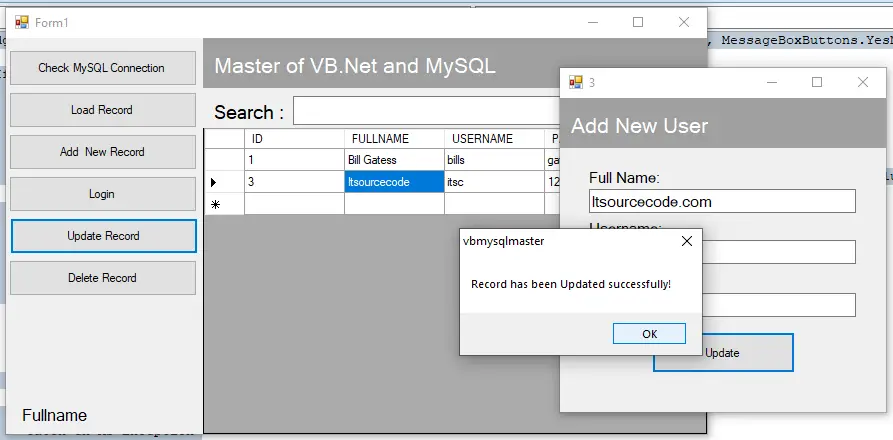
Process 1: When updating the record, the user must select the record from the datagridview before clicking the “Update Record” button.
Process 2: When the user clicks the “Update Record” button, the “frmaddnewuser” Form will show with the details of the record that have been selected from Process 1.
After we understand the process, Double click the Update Record button and add the following code.
 With frmaddnewuser
     .Text = DataGridView1.CurrentRow.Cells(0).Value
     .txtfullname.Text = DataGridView1.CurrentRow.Cells(1).Value
     .txtusername.Text = DataGridView1.CurrentRow.Cells(2).Value
     .txtpassword.Text = DataGridView1.CurrentRow.Cells(3).Value
     .btnsave.Text = "Update"
     .Show()
 End With
Next, go to the “frmaddnewuser” Form and update the code in the Save button. Here’s the Updated Code for the “Save” button.
Dim cmd As New MySqlCommand
Dim result As Integer
Try
conn.Open()
With cmd
If btnsave.Text = "Save" Then
.Connection = conn
.CommandText = "INSERT INTO `tbluseraccounts` (`ID`, `FULLNAME`, `USERNAME`, `PASS`)" & _
" VALUES (NULL, '" & txtfullname.Text & "', '" & txtusername.Text & "', '" & txtpassword.Text & "');"
result = .ExecuteNonQuery()
If result > 0 Then
MsgBox("New Record has been added successfully!")
Else
MsgBox("No Record has been added successfully!")
End If
Else
.Connection = conn
.CommandText = "UPDATE `tbluseraccounts` SET `FULLNAME` ='" & txtfullname.Text & "'," & _
" `USERNAME`= '" & txtusername.Text & "', `PASS`='" & txtpassword.Text & "' WHERE ID=" & Val(Me.Text) & ""
result = .ExecuteNonQuery()
If result > 0 Then
MsgBox("Record has been Updated successfully!")
Else
MsgBox("No Record has been updated successfully!")
End If
End If
Me.Close()
End With
Catch ex As Exception
MsgBox(ex.Message)
Finally
conn.Close()
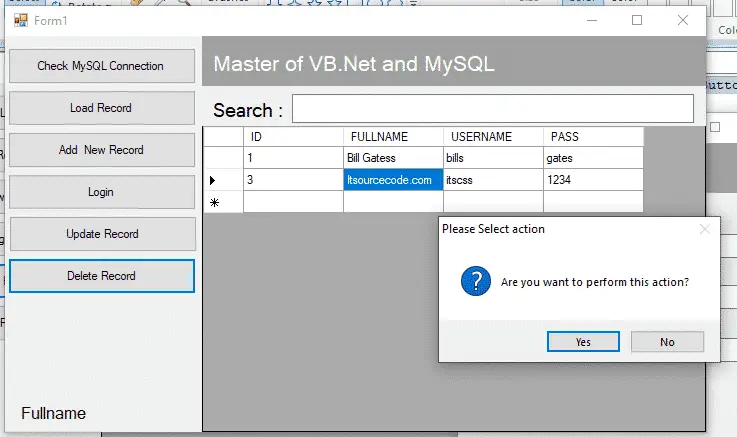
End TryNext, we will add functionality to the “Delete Record” button. Add the following code.
  Dim cmd As New MySqlCommand
        Dim result As Integer
        Dim dgresult As New DialogResult
        dgresult = MessageBox.Show("Are you want to perform this action?", "Please Select action", MessageBoxButtons.YesNo, MessageBoxIcon.Question)

        If dgresult = Windows.Forms.DialogResult.Yes Then
            Try
                conn.Open()
                With cmd

                    .Connection = conn
                    .CommandText = "Delete from `tbluseraccounts` WHERE ID=" & Val(DataGridView1.CurrentRow.Cells(0).Value) & ""

                    result = .ExecuteNonQuery()
                    If result > 0 Then
                        MsgBox("Record has been Deleted successfully!")
                    Else
                        MsgBox("No Record has been deleted successfully!")
                    End If
                    Me.Close()

                End With
            Catch ex As Exception
                MsgBox(ex.Message)
            Finally
                conn.Close()

            End Try
        End If
Finally, press F5 or the play button to run the program. This will look like as shown below.
Congratulations! You are now a certified master of VB.Net and MySQL Database.
Summary
In this course, we have discussed how to master vb.net and MySQL database in 30 minutes. We tackle topics about how to create MySQL Database using xampp in PHPmyadmin.
We learned also how to create a connection between VB.net and MySQL Database. Next, we tackle how to load a record from the database to datagridview.
Then, we discuss how to Add New record to MySQL Database using vb.net. After this, we apply vb code for login form as well as add functionality to our login/ logout system.
Finally, we have included in this discussion on how to implement VB.Net MySQL Update and Delete record from MySQL Database.
Freebies!
This is good news for you because I will not only give you 1 Freebie but 2. Yes, 2 Freebies.
Here’s your Freebies No. 1: You can download this VB.NET Projects with Source code here.
Here’s your Freebies No. 2: You can WATCH HERE the full video of this course to get very detailed instructions for this entire discussion.
Note: If you have any questions or suggestions, please feel to contact us or simply a comment below.
Official documentation
Frequently Asked Questions
How does this VB.NET project work?
Built with VB.NET WinForms (.NET Framework 4.5+) and SQL Server backend. Standard structure: Form designer to code-behind event handlers to ADO.NET data access layer to SQL Server. Login form for auth. Ready to extend for BSIT capstone scope.
What Visual Studio and SQL Server versions does this VB.NET project require?
Most projects use VB.NET WinForms on .NET Framework 4.5+ with SQL Server 2012 Express or higher. To run: install Visual Studio 2019 / 2022 (Community is free) with the ‘Desktop development with .NET’ workload, install SQL Server Express + SSMS, open the .sln file, build, run.
How do I set up the database for this VB.NET project?
Open SQL Server Management Studio (SSMS) and connect to your SQL Server (e.g. localhost\SQLEXPRESS). Right-click Databases, choose Restore Database OR New Database then import the included .sql script. Update the connection string in App.config (or in code-behind Module) with your server name + credentials. Rebuild and run.
Can I use this VB.NET project for a BSIT capstone or thesis?
Yes, VB.NET is one of the most accepted languages by Philippine BSIT panels. Extend it: add role-based access (admin/staff/customer login redirect), Crystal Reports or RDLC reports, dashboards with Chart control, audit log, multi-branch support. Pair with Chapter 1-5 documentation matching your panel’s rubric.
Why am I getting ‘connection error’ or ‘cannot find SQL Server’?
Three common VB.NET issues: (1) Connection error: SQL Server isn’t running. Open SQL Server Configuration Manager and verify SQL Server (SQLEXPRESS) service is started. (2) Wrong server name in connection string. Try .\SQLEXPRESS, (local)\SQLEXPRESS, or your machine name. (3) Login failed: SQL Server is set to ‘Windows-only’ authentication. Switch to Mixed Mode in SSMS Server Properties, Security.
Where can I find more VB.NET projects with source code?
Browse the VB.NET Projects hub for the full library. For C# WinForms alternatives see C# Projects. For ASP.NET web alternatives see ASP.NET Projects. For BSIT capstone idea lists see 150 Best Capstone Project Ideas.

Joken E. Villanueva
Founder & Lead Developer at PIES IT Solution
Founder of PIES Information Technology Solutions, a software company building production-grade applications for institutions across the Philippines. Over 8 years of hands-on full-stack development experience, currently leading the development of ClinicAI, an AI-powered clinic management platform.
Expertise: PHP · MySQL · JavaScript · AI Integration · SaaS Architecture · VB.NET · Database Design · Capstone Documentation · Java · View all posts by Joken E. Villanueva →
BEST TUTORIAL !!!! BIG THANKS BRO!
you explain it so clearly in proper steps , Thanks alot
Your welcome.
sir how about price and numbers error sa updating