How to make an Installer/Setup from your VB.Net Project
In this tutorial, you will learn how to make an installer or setup application from your VB.Net project.
This tutorial also applies from different programming languages catered by Microsoft Visual Studio templates. Ex.(C#, C++, F#).
Making an installer is essential for the deployment of your created system especially when you need to install your project from the source to another computer.
What is Visual Basic’s purpose?
The third-generation programming language was created to aid developers in the creation of Windows applications. It has a programming environment that allows programmers to write code in.exe or executable files.
They can also utilize it to create in-house front-end solutions for interacting with huge databases. Because the language allows for continuing changes, you can keep coding and revising your work as needed.
However, there are some limits to the Microsoft Visual Basic download. If you want to make applications that take a long time to process, this software isn’t for you.
That implies you won’t be able to use VB to create games or large apps because the system’s graphic interface requires a lot of memory and space.
Furthermore, the language is limited to Microsoft and does not support other operating systems.
What are the most important characteristics of Visual Basic?
Microsoft Visual Basic for Applications Download, unlike other programming languages, allows for speedier app creation.
It has string processing capabilities and is compatible with C++, MFC, and F#. Multi-targeting and the Windows Presentation Framework are also supported by the system, allowing developers to create a variety of Windows apps, desktop tools, metro-style programs, and hardware drivers.
First of all, the following applications I used during this tutorial of How to make an Installer/Setup from your VB.Net Project are the following:
- Microsoft Visual Studio 2013.
- Microsoft Visual Installer from Microsoft Visual Studio Marketplace. (Its free to download the add-on don’t worry).
Note: There are some cases that the installed Microsoft Visual Studio 2013 has already a built-in template for making an installer. Mine has no built-in so, I downloaded the add-on and installed it to my Microsoft Visual Studio.
Here’s the procedure in making an installer from your project, just carefully follow these steps and you can create one in no time!
- Open your Microsoft Visual Studio 2013 and click “New Project” from their dashboard.
- Let’s assumed we have created a project from clicking the “New Project“. I named my project “Sample Installer“.
- Then, click the link from above the Microsoft Visual Installer. After downloading, you will receive a .exe file(see Figure 1). Click it and let it finish its installation.

Figure 1. Downloaded executable file from Microsoft Visual Studio Marketplace.
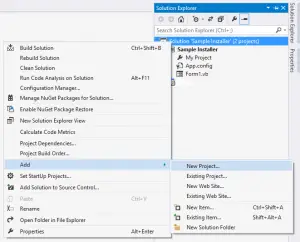
4. When the installation is complete, proceed by going to your project’s Solution Explorer. Right click Solution “Name of your project” (mine is Solution ‘Sample Installer’), go to Add and choose “New Project…“(see Figure 2).

Figure 2. How to go to New Project for creating the installer or setup file.
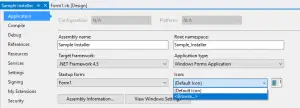
Note: If you want to have an icon for your installer and your system, just simply go to Solution Explorer, right click the name of your project, go to Properties and at the Application Tab you can see the “Icon:” combo box and click “Browse” (see Figure 3).

Figure 3. How to add an Icon for your setup or installer application.
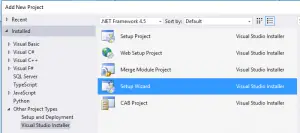
5. Then, select from Templates -> Other Project Types -> Setup and Development -> Visual Studio Installer -> Setup Wizard. (see Figure 4 to see Setup Wizard). You can rename the setup name as you like.

Figure 4. Setup Wizard.
6. After clicking Setup Wizard, you will be prompted to a windows form where you can customized your setup file. Mine, I just clicked Next -> Finish.
7. After the Visual Studio directs you to File System(name of your setup), right click on the Application Folder at the left side of the screen, then go to Add -> Project Output(see Figure 5) then click OK.

Figure 5. Locating Project Output.
8. After clicking the Project Output, drag the Primary Output from “name of the project” at the right side of the screen to the User’s Desktop at the left side of the screen.
Click User’s Desktop and then right click the Primary Output from “name of the project” and click Create Shortcut to “name of the project” active. You can rename that file as you like.
This procedure lets your setup application to create a desktop shortcut icon for your VB.Net project. After doing so, drag back your Primary Output from “name of the project” to the Application Folder and just leave the shortcut file on the User’s Desktop. (see Figure 6).

Figure 6. Creating a shortcut for your VB.Net project to the User’s Desktop.
9. After creating a shortcut, you can customize your Setup Property Pages from the Solution Explorer by right clicking the Setup Project then go to Properties.
This procedure lets you configure and see the details or files that your installer will install to a computer. Also, this procedure lets you decide on which specific computer you want to install your VB.Net project.
This is for you to be familiarize in creating a more compact installer rather than creating a non-solid installer. As of now, we will just leave this step and proceed to step 10.
10. After doing step 8, we will now build our Setup Project but based on my experience in creating an installer, you should first rebuild your main project after you build your Setup Project.
This is to ensure that your main project doesn’t have any errors. To build your Setup Project, right click on it then choose build.
Wait for the Visual Studio to finish packaging your project and congratulations! You can locate your setup application by going to your project’s folder.
You can see that there’s a new folder, (mine is Setup because we renamed our Setup Wizard to Setup) then go to Debug and you can see the Setup Windows Installer Package(see Figure 7).

Figure 7. Location of our Setup file.
You can use this Setup Windows Installer Package to install your VB.Net project to a certain computer you desire.
Note: In conclusion, the installed application bases its run time on your computer through its target .Net framework. Visual Basic projects depend on what target .Net framework was built for it.
RAR Extraction Password of How to make an Installer/Setup from your VB.Net Project:
luffypirates
For inquires, questions or any other concerns, you can contact me through the following:
E-Mail: [email protected]
Facebook: facebook.com/kirk.lavapiez
Contact No.: +639263339008
Download here.
Related topic(s) that you may like:
If you have any questions or suggestions in How to make an Installer/Setup from your VB.Net Project, please feel free to leave a comment below.


Im using Visual Studio 2008 and it’s already installed in my computer. Once i installed the Visual Studio Installer Projects Extension i received this message
Set up blocked
Correct the following problem and run the set up again.
* Microsoft visual studio is required, but it is not installed on this computer. Please install it and retry.