This Complaint Management System in Django created based on python, Django, and SQLITE3 Database. Harassment cases can also be investigated by the Grievance Cell.
Anyone with a legitimate complaint can register and submit it, which will be addressed by department members in person or in collaboration with the officer in charge of the Students Grievance Cell.
The website was created for a college that had previously operated an informal Grievance Redressal System under the direct supervision of the principal and managing director.
A Complaint Management System in Django is an easy project for beginners to learn how to build a web-based python Django project.
We will provide you with the complete source code and database for the python project so that you can easily install it on your machine and learn how to program in Python Django.
To start creating a Complaint Management System Project in Python Django, makes sure that you have PyCharm Professional IDE Installed in your computer.
This Complaint Management System in Django Framework, also includes a Download Source Code for free, just find the downloadable source code below and click download.
| About Project | Project Details |
|---|---|
| Project Name | Complaint Management System Project in Django |
| Python version (Recommended) | 3.8 Version |
| Programming Language Used | Python Django Language |
| Developer Name | itsourcecode.com |
| IDE Tool (Recommended) | Sublime, Visual Studio, PyCharm |
| Project Type | Web Application |
| Database | SQLite |
Admin Features
- Login Page – The page where the system administrator enters their system credentials in order to gain access to the system’s administrative side.
- New Complaints Page-This is the page where an administrator can add a new complaints.
- Complaints List– The page with a list of complaints that can be navigated to change or delete a complaints.
- New User Page – The page where a new admin credentials are created by an admin.
- Users list – This is the page that lists and manages the added users.
User Features
- Register Page– The page where new user created their login credentials for the website.
- Login Page – The page where the system user enters their system credentials in order to gain access to the system’s user side.
- Profile Page – This is the page where the user can update their profile information
- Password Reset Page – The page where the user can change their own password for better security of their account.
- Add Complaints Page – This is the page where the user can add their complaints.
Complaint Management System in Django Steps on How to Create a Project
Time needed: 5 minutes
Here are the steps on how to create a Complaint Management System Project in Django with Source Code.
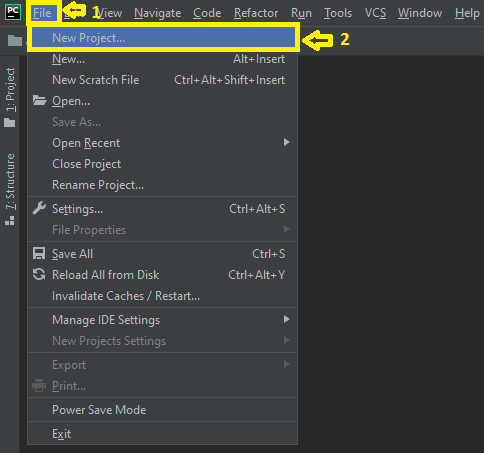
- Step 1: Open file.
First , open “pycharm professional” after that click “file” and click “new project“.

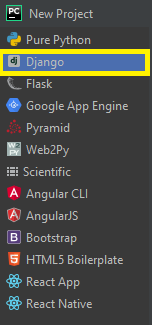
- Step 2: Choose Django.
Next, after click “new project“, choose “Django” and click.

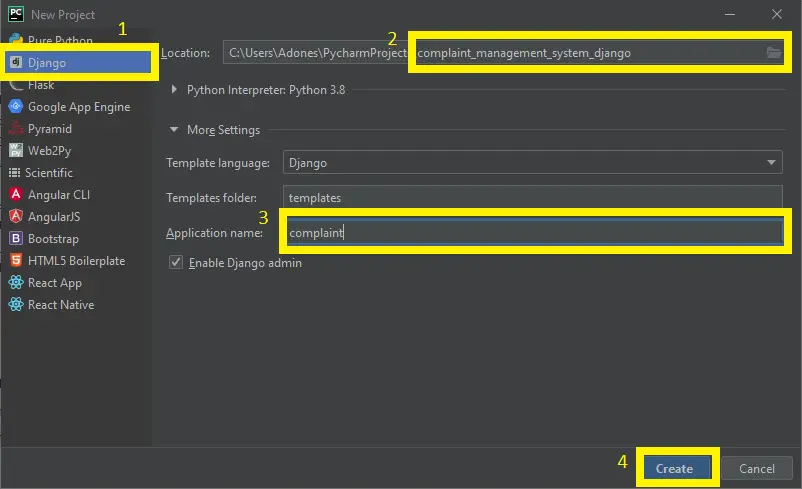
- Step 3: Select file location.
Then, select a file location wherever you want.

- Step 4: Create application name.
After that, name your application.

- Step 5: Click create.
Lastly, finish creating project by clicking “create” button.

- Step 6: Start Coding.
Finally, we will now start adding functionality to our Django Framework by adding some functional codes.
Functionality and Codes of the Complaint Management System Project in Django with Source Code
- Create template for the change password form in Complaint Management System in Django.
In this section, we will learn on how create a templates for the change password form. To start with, add the following code in your change_password.html under the folder of /templates/.
{% extends "GRsystem/index.html" %}
{% load crispy_forms_tags %}
{% load static %}
{% block content %}
<head>
<meta charset="utf-8">
<meta name="viewport" content="width=device-width, initial-scale=1, shrink-to-fit=no">
<meta name="description" content="">
<meta name="author" content="">
<title>All Complaints</title>
<!-- Bootstrap core CSS -->
<link href= "{% static "GRsystem/extra/bootstrap/css/bootstrap.min.css" %}" rel="stylesheet">
<!-- Custom styles for this template -->
<link href="{% static "GRsystem/css/simple-sidebar.css" %}" rel="stylesheet">
</head>
<body style="background: #8E2DE2; /* fallback for old browsers */
background: -webkit-linear-gradient(to right, #4A00E0, #8E2DE2); /* Chrome 10-25, Safari 5.1-6 */
background: linear-gradient(to right, #4A00E0, #4A00E0); /* W3C, IE 10+/ Edge, Firefox 16+, Chrome 26+, Opera 12+, Safari 7+ */
"
>
<div class="d-flex" id="wrapper">
<!-- Sidebar -->
<div class="bg-light border-right" id="sidebar-wrapper">
<div class="sidebar-heading"> GRSystem </div>
<div class="list-group list-group-flush">
{% if user.is_authenticated %}
<a href="" class="list-group-item list-group-item-action active"> Welcome : {{user.first_name}} </a>
<a href='/dashboard/' class="list-group-item list-group-item-action">Profile</a>
<a href='/password/' class="list-group-item list-group-item-action">Password Reset</a>
<a href="/complaints/" class="list-group-item list-group-item-action">Add Complaints</a>
<a href="/list/" class="list-group-item list-group-item-action">UnSolved Complaints</a>
<a href="/slist/" class="list-group-item list-group-item-action">Solved Complaints</a>
{% endif %}
</div>
</div>
<!-- /#sidebar-wrapper -->
<!-- Page Content -->
<div id="page-content-wrapper">
<nav class="navbar navbar-expand-lg navbar-light bg-light border-bottom">
<button class="btn btn-primary" id="menu-toggle">DashBoard</button>
</nav>
<br>
<br>
<div class="col-md-12">
<div class="card">
<div class="card-body">
<div class="row">
<div class="col-md-12">
<h4 class="text-primary"><b>Password Reset</b></h4>
<hr>
</div>
</div>
{% if messages %}
<ul>
{% for message in messages %}
<div{% if message.tags %} class="alert alert-{{ message.tags }}"{% endif %}>
<a class="close" data-dismiss="alert" href="#">×</a>
{{ message }}
</div>
{% endfor %}
</ul>
{% endif%}
<form method="post">
{% csrf_token %}
{{ form |crispy }}
<button class="btn btn-outline-info" type="submit">Save changes</button>
</form>
</div>
</div>
</div>
</div>
</div>
</div>
</div>
<!-- Menu Toggle Script -->
<script>
$("#menu-toggle").click(function(e) {
e.preventDefault();
$("#wrapper").toggleClass("toggled");
});
</script>
{% endblock content %}
Downloadable Source Code Below.
Anyway, if you want to level up your programming knowledge, especially python, try this new article I’ve made for you Best Python Projects with source code for Beginners.
But If you’re going to focus on web development using Django, you can download here from our list of Best Django Projects with source code based on real-world projects.
How To Run The Complaint Management System Project in Django?
- Step 1: Extract/unzip the file
- Step 2: Go inside the project folder, open cmd and type the following commands to install Django Framework and run the webserver:
- pip install -r requirements.txt
- python manage.py migrate
- python manage.py runserver
- Step 3: Finally, open the browser and go to http://127.0.0.1:8000/
Summary
In summary, this Complaint Management System Project in Django with Source Code can be useful to students or professional who wants to learn python programming language.
This project can also be modified to fit your personal requirements. Hope this project will help you to improve your skills. Happy Coding!
Related Articles
- Complaint Management System Project In C++ with Source Code
- Complaint Management System Project in Python Source Code
- Complaint Management System Source Code In PHP
- Club Management System In C++ With Source Code
- College Management System In C++ With Source Code
Inquiries
If you have any questions or suggestions about Complaint Management System Project in Django with Source Code, please feel free to leave a comment below.


Access denied ,root password