
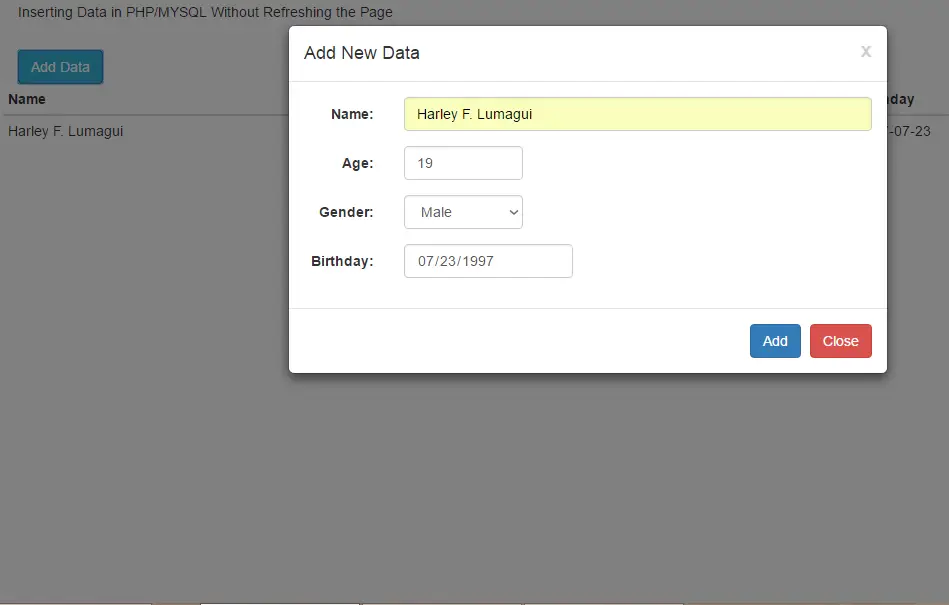
This tutorial is all about Insert and Display Data in PHP & MYSQL Without Refreshening Page. In this tutorial you will learn Insert and Display Data in PHP & MYSQL Without Refreshening Page.
Good Day! Everyone! Today I’m going to teach you my inserting and displaying data in your database.
Unlike with my previous tutorial which is about a very simple way in inserting and showing data in database. Here, you don’t need to refresh your page in order to display the inserted data and we add some styles now.
So before you go with this tutorial, for the beginners, I suggest to start with my previous tutorial regarding simple way of inserting and displaying data in PHP. >> click here << to go my previous article.
So now, we will going to start our tutorial.
Make sure you already have the following. You can download it below:
Now, if you are already done downloading all the files below. Just go now to your browser then go to PHPMYADMIN to create a database.
Create a database then name it as any name you desire. In my case, I use “itsourcecode” as the name of the database.
Then create a table. Put “mydata” as the table name then put the following attributes.
CREATE TABLE `mydata` (`id` int(11) NOT NULL,
`name` text NOT NULL, `age` int(11) NOT NULL,
`gender` text NOT NULL, `birthday` date NOT NULL)
 ENGINE=MyISAM DEFAULT CHARSET=latin1;
Now for the connection to the database. Create a “connection.php” file then put the following codes.
<?php
 date_default_timezone_set('Asia/Manila');
 $servername = 'localhost';
 $username = 'root';
 $password = '';
 $dbname = 'itsourcecode';

try {
 $conn = new PDO("mysql:host=$servername;dbname=$dbname", $username, $password);
 $conn->setAttribute(PDO::ATTR_ERRMODE, PDO::ERRMODE_EXCEPTION);
 } catch (Exception $ex) {
 echo "Connection Failed: ". $ex->getMessage();
 }
 ?>
As you can see, we now upgraded our coding structure in managing our database using PDO. This is now the updated version in MYSQL.
Now, create a “index.php” file then put the following codes.
<!DOCTYPE html>
<html>
<head>
<meta charset="UTF-8">
<meta name="viewport" content="width=device-width, initial-scale=1">
<title>Inserting Data Without Refreshing the Page</title>
<link href="assets/css/bootstrap.min.css" rel="stylesheet" type="text/css"/>
http://assets/js/jquery-3.2.1.min.js
http://assets/js/bootstrap.min.js
</head>
<body>
<div class="container">
<h5>Inserting Data in PHP/MYSQL Without Refreshing the Page</h5>
<div class="row">
<div class="col-sm-3"><button class="btn btn-info btn-md" type="button">Add Data</button></div>
<p></div></p>
<div class="row">
<table id="itemtable" class="table table-condensed">
<thead>
<tr>
<th>Name</th>
<th>Age</th>
<th>Gender</th>
<th>Birthday</th>
</tr>
</thead>
<tbody id="dataBody"></tbody>
</table>
</div>
<p></div></p>
<p><!-- Start Add Data Modal --></p>
<div id="addDataModal" class="modal fade" role="dialog">
<div class="modal-dialog">
<div class="modal-content">
<div class="modal-header"><button class="close" type="button">x</button><p></p>
<h4 class="modal-title">Add New Data</h4>
</div>
<p><form class="form-horizontal" id="add-form"></p>
<div class="modal-body">
<div class="form-group"><label class="control-label col-sm-2" for="name">Name:</label><p></p>
<div class="col-sm-10"></div>
<p></div></p>
<div class="form-group"><label class="control-label col-sm-2" for="age">Age:</label><p></p>
<div class="col-sm-3"></div>
<p></div></p>
<div class="form-group"><label class="control-label col-sm-2" for="gender">Gender:</label><p></p>
<div class="col-sm-3">
<p>-- Gender --<br>
Male<br>
Female</p>
</div>
<p></div></p>
<div class="form-group"><label class="control-label col-sm-2" for="bday">Birthday:</label><p></p>
<div class="col-sm-4"></div>
<p></div><br>
<input type="hidden" name="action" value="addData"><br>
</div></p>
<div class="modal-footer"><button class="btn btn-primary" type="submit">Add</button><br>
<button class="btn btn-danger" type="button">Close</button></div>
<p></form><br>
</div><br>
</div><br>
</div><br>
<!-- End Add Data Modal --></p>
<p>// When the HTML or documents loads, Load datas in table.<br>
$(document).ready(function(){<br>
function showData() {<br>
$.ajax({<br>
url: 'dataFunctions.php',<br>
type: 'POST',<br>
data: {action : 'showData'},<br>
dataType: 'html',<br>
success: function(result)<br>
{<br>
$('#dataBody').html(result);<br>
},<br>
error: function()<br>
{<br>
alert('Failed!');<br>
}<br>
})<br>
}<br>
showData();<br>
});</p>
<p>//Add form submit handler<br>
$('#add-form').submit(function(e){<br>
e.preventDefault();<br>
$.ajax({<br>
url: 'dataFunctions.php',<br>
type: 'POST',<br>
data: $(this).serialize(),<br>
dataType: 'html',<br>
success: function(result)<br>
{<br>
$('#dataBody').html(result);<br>
$('#addDataModal').modal('toggle');<br>
},<br>
error: function()<br>
{<br>
alert('Failed!');<br>
}<br>
})<br>
});</p>
<p></body><br>
</html></p>
<p>Then create a “<strong>dataFunctions.php</strong>” file then put the following codes. These are the functions in manipulating data in our database.</p>
<p><?php<br>
if (isset($_POST['action']) && !empty($_POST['action'])) {<br>
$action = $_POST['action'];<br>
switch($action) {<br>
case 'addData':<br>
addData();<br>
break;<br>
case 'showData':<br>
displayData();<br>
break;<br>
default:<br>
# code...<br>
break;<br>
}<br>
}</p>
<p>function addData() {<br>
include 'connection.php';</p>
<p>$stmt = $conn->prepare("INSERT INTO mydata (name, age, gender, birthday) VALUES (:name, :age, :gender, :birthday)");</p>
<p>$name = $_POST['name'];<br>
$age = $_POST['age'];<br>
$gender = $_POST['gender'];<br>
$birthday = $_POST['bday'];</p>
<p>$stmt->bindParam(':name', $name);<br>
$stmt->bindParam(':age', $age);<br>
$stmt->bindParam(':gender', $gender);<br>
$stmt->bindParam(':birthday', $birthday);<br>
$stmt->execute();</p>
<p>displayData();<br>
}</p>
<p>function displayData() {<br>
include 'connection.php';</p>
<p>$data = $conn->query("SELECT * FROM mydata");</p>
<p>while ($r = $data->fetch()) {<br>
echo '<tr>';<br>
echo '<td>' . $r['name'] . '</td>';<br>
echo '<td>' . $r['age'] . '</td>';<br>
echo '<td>' . $r['gender'] . '</td>';<br>
echo '<td>' . $r['birthday'] . '</td>';<br>
echo '</tr>';<br>
}<br>
}<br>
?></p>
<p><strong>Screenshots:</strong></p>
<figure><a href="//itsourcecode.com/wp-content/uploads/2017/05/4-1.png"><img class="wp-image-7688 aligncenter" src="//itsourcecode.com/wp-content/uploads/2017/05/4-1-300x135.png" alt="" width="340" height="153"></a></figure><p></p>
<figure><a href="//itsourcecode.com/wp-content/uploads/2017/05/3-1.png"><img class="wp-image-7687 aligncenter" src="//itsourcecode.com/wp-content/uploads/2017/05/3-1-300x132.png" alt="" width="345" height="152"></a></figure><figure><a href="//itsourcecode.com/wp-content/uploads/2017/05/2-1.png"><img class="wp-image-7686 aligncenter" src="//itsourcecode.com/wp-content/uploads/2017/05/2-1-300x134.png" alt="" width="345" height="154"></a></figure><p></p>
<figure><a href="//itsourcecode.com/wp-content/uploads/2017/05/1-1.png"><img class="wp-image-7685 aligncenter" src="//itsourcecode.com/wp-content/uploads/2017/05/1-1-300x134.png" alt="" width="340" height="152"></a></figure><p></p>
<p>If you have questions regarding my tutorial which is entitled as “<strong>INSERT AND DISPLAY DATA IN PHP & MYSQL WITHOUT REFRESHING PAGE</strong>” feel free to ask us by commenting below or by visiting on our contact page. Thank you for supporting me and ITSOURCECODE.COM.</p>
</div>
</div>
</div>
</div>
</div>
</div>
</div>
</div>
</div>
</div>Technology stack and requirements
To run this PHP project, you need these tools on your development machine:
- XAMPP or WAMP server. Bundles Apache, MySQL, and PHP so you can run PHP on Windows without individual installs. Free from apachefriends.org.
- PHP 8.0 or higher. Included with XAMPP. Older versions (5.x, 7.x) may work but modern PHP features improve security and performance.
- MySQL or MariaDB. Comes with XAMPP. phpMyAdmin manages the database through a browser UI.
- VS Code or PhpStorm. Free code editor with PHP syntax highlighting, IntelliSense, and debugging support.
- Web browser. Chrome, Firefox, or Edge for testing the running app.
Installing the source code
- Download the archive. Get the ZIP file from the download link on this page and extract it.
- Move to htdocs. Place the extracted folder inside C:\xampp\htdocs\ so Apache can serve it.
- Import the database. Open http://localhost/phpmyadmin, click Import, and select the .sql file included in the archive.
- Update database credentials. Open the config.php or connection.php file and set the correct database name, username, and password (default XAMPP: root / empty password).
- Run the project. Start Apache + MySQL in XAMPP, then visit http://localhost/your-project-folder/ in a browser.
Using this project for your BSIT capstone
This PHP project maps cleanly to standard BSIT capstone documentation. Suggested chapter alignment:
- Chapter 1 (Introduction). Discuss the problem the system solves in real-world context. Cite Philippine business or academic use cases where a manual process could be replaced.
- Chapter 2 (Review of Related Literature). Compare this system’s features against 5-10 similar published projects. Cite journals like IJERT or IEEE Access for academic-standard sources.
- Chapter 3 (Methodology). Include Use Case Diagram, Data Flow Diagram, Entity Relationship Diagram, and Activity Diagram covering all major workflows.
- Chapter 4 (Results and Discussion). Screenshot each module of the running system with a caption explaining what data it processes and which user role interacts with it.
- Chapter 5 (Conclusion and Recommendations). Identify features that could be added in a Version 2, such as mobile app, REST API export, or AI-powered analytics.
Modules typical of Insert and Display Data
- Master data. CRUD forms for the primary entities with search and filter.
- Transaction processing. Data entry forms for day-to-day operations the system automates.
- Reports. Formatted printable output summarizing activity per day, user, or category.
- User management. Login with role-based permissions (Admin, Encoder, Viewer).
- Backup and restore. Export database to a .sql file and restore when needed.
Common enhancements for capstone review
- Modernize the UI. Add Bootstrap 5 or Tailwind CSS for a polished appearance.
- Add printable receipts. Use TCPDF or FPDF to generate PDF reports.
- Multi-user concurrency. Ensure database handles simultaneous writes without lost-update errors.
- Rewrite in Laravel. Migrate to Laravel for maintainability and modern development patterns.
Official documentation
Frequently Asked Questions
How does this PHP project work?
Built with vanilla PHP (no framework) and MySQL backend. Standard structure: form HTML, PHP script handlers, MySQL via PDO or mysqli, sessions for auth, Bootstrap for responsive layout. Ready to extend for BSIT capstone scope.
What PHP and MySQL versions does this project require?
Most projects in this batch run on PHP 7.4 to PHP 8.2 with MySQL 5.7+ or MariaDB 10+. A few older projects need PHP 5.6 (deprecated, use XAMPP 7.x). To run: install XAMPP / WAMP / Laragon, extract project to htdocs, import the included .sql file via phpMyAdmin, edit the connection file (usually config.php or db_connect.php) with your DB credentials, browse to the project URL in your browser.
How do I set up the database for this PHP project?
Open phpMyAdmin (http://localhost/phpmyadmin/ on XAMPP), create a new empty database with the name specified in the project’s config.php. Click the Import tab, choose the included .sql file, click Go. Then edit config.php (or includes/connection.php) with: ‘localhost’, your MySQL username (usually ‘root’), your MySQL password (usually blank for XAMPP), and the database name.
Can I use this PHP project for a BSIT capstone or thesis?
Yes, but extend it. A bare CRUD app is too narrow for full capstone scope. Add: user roles via session checks, reports/dashboards (Chart.js + AJAX), PDF exports (TCPDF library), email notifications (PHPMailer), real domain extension (analytics, audit log, multi-branch support). Pair with Chapter 1-5 documentation matching your panel’s rubric.
Why am I getting ‘connection error’ or ‘undefined function mysqli_connect’?
Three common PHP issues: (1) Connection error: Apache + MySQL services not running in XAMPP control panel, OR database name in config.php does not match what you created in phpMyAdmin. (2) ‘undefined function mysqli_connect’: MySQL extension not enabled, in php.ini uncomment extension=mysqli (then restart Apache). (3) ‘No such file or directory’: MySQL socket path wrong, use 127.0.0.1 instead of localhost in the connection string.
Where can I find more PHP projects with source code?
Browse the PHP Projects hub for the full library (300+ vanilla PHP systems). For modern PHP MVC alternatives see Laravel Projects (74 systems) or CodeIgniter Projects (32 systems). For BSIT-focused capstone idea lists see 150 Best Capstone Project Ideas.
Sir have you any complete project like this not winrar file complete project every thing clear like this coding