Are you looking for a keyboard shortcut that fills colors in Excel? You are lucky enough because this tutorial will explain and show you how to use the Excel fill color shortcut in a quick and easy way.
In Excel, there is no built-in color filling in the cells; however, there’s a simple and effective way to add visual aids to your worksheet. We have the Excel shortcut for fill color, which is the fastest and easiest way to add color to your cells.
Let’s explore the fill color shortcut in Excel in detail, and we will go over the steps to mastering it to simplify your work. Aside from that, it can help you get the most out of your data.
What is the Excel shortcut for fill color and how does it work?
The Excel fill color shortcut is a quick and easy way to fill cells with color in Excel. Instead of having to manually select cells, navigate to the Fill Color option in the Home tab, and then select a color, you can use a keyboard shortcut to fill cells with color. With this shortcut, you can save time and streamline your work.
Different Ways to Fill Color in Excel
Here are the various techniques for adding color to your Excel sheets in this quick and easy guide on different ways to fill color in Excel shortcuts. Get tips and tricks for coloring efficiently and effectively.
1. Using the Regular Way or Paint Bucket Tool

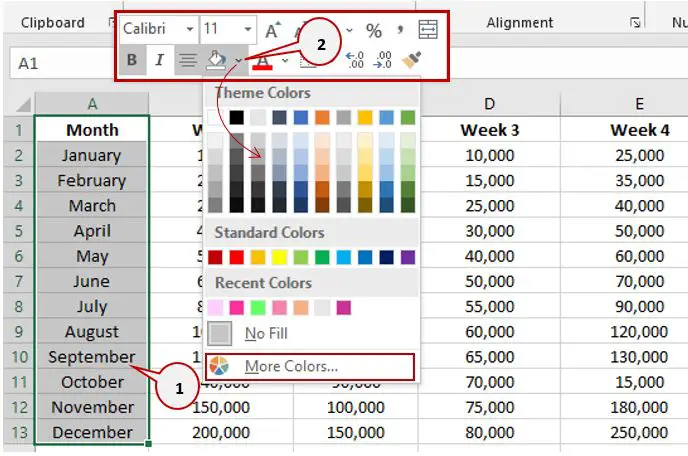
- Select the cells that you want to fill with colors.
- Click the drop-down “Fill Color” besides the bucket icon.
- It will show a different color palette.
- If you want more colors, just click “More Colors…“
- After you click “More colors,” it will show a color dialog box in which you can choose either custom or standard, then choose color and click “OK.”
- If you already chose the color, you just have to click it, and it will automatically appear in your cell. Then, if you want to change the color, the same process will work. Refer to the video below.
2. Using the Right-Click Context Menu
- Select the cells that you want to fill with colors.
- Then, right-click, and it will show the context menu.
- Click the drop-down “Fill Color” besides the bucket icon.
- It will show a different color palette.
- If you want more colors, just click “More Colors…”
- In the “Color” dialog box, you can choose either a custom or standard color, and you can also see the new and current color you have chosen.
- If you already chose the color, you just have to click it, and it will automatically appear in your cell. Then, if you want to change the color, the same process will work. Refer to the video below.
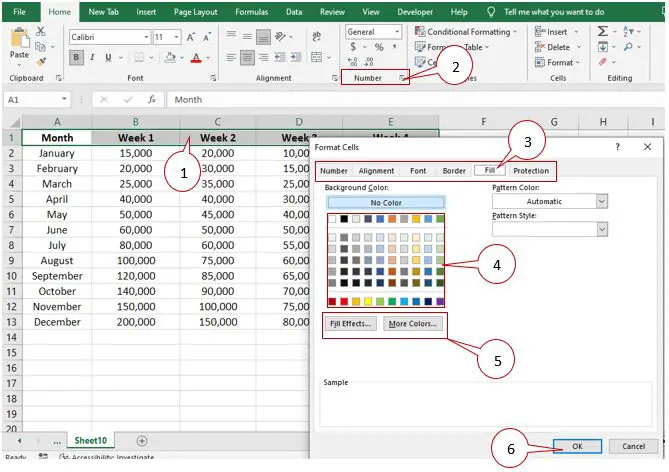
3. Using Format Cells
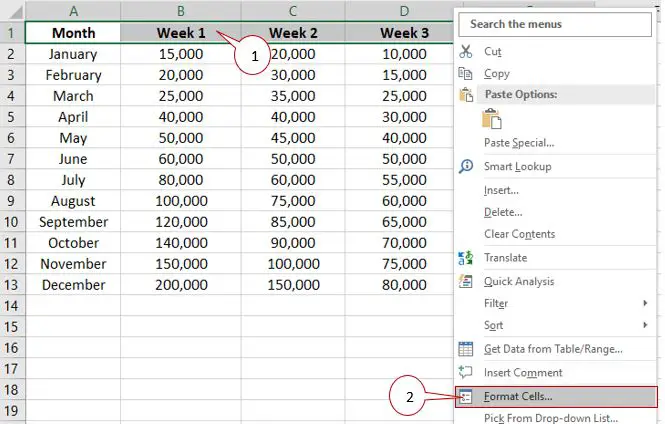
- Select the cell(s) you want to fill with color.
- Right-click, then from the context menu select “Format Cells…“
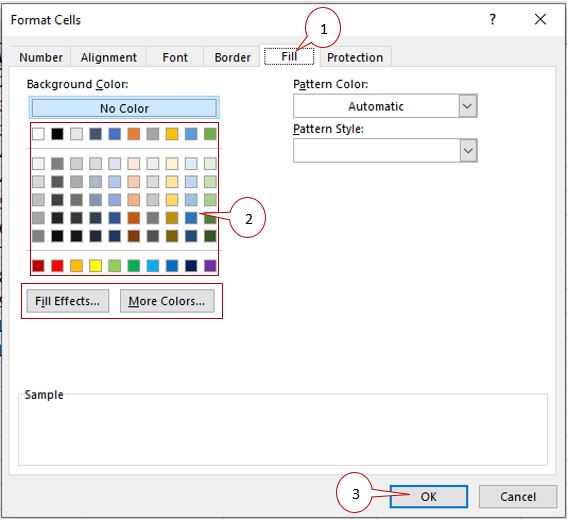
- 3. In the “Format Cells” dialog box, select “Fill” and then choose color from the color palette.
- 4. If you want more colors, click “More Colors.” Also, you can adjust the “Fill Effects.”
- 5. After choosing a color, click “OK.” It will automatically appear in your cells.
Kindly refer to the video below.
4. Using a Number Format
- Select the cells that you want to fill with colors.
- Click the dialog box launcher “Number Format.” It will display the “Format Cells” dialog box.
- In the “Format Cells” dialog box, select “Fill.”
- Choose what color you want. If you have already chosen the color, proceed to step 6.
- You can also add “Fill Effects” and choose “More Colors” if you don’t like the color in the color palette.
- If you’re done, click “OK.”
Kindly refer to the video below.
5. Keyboard Shortcuts for Fill Color in Excel
If you want a keyboard shortcut, here’s a list of Excel shortcuts for filling color.
- Select the cells that you want to fill.
- After you select the cells, press Alt + H + H. It will be in the “Fill Color” menu.
- Use your mouse to choose the color that you want, and it will automatically appear in your selected cells.
- If you want more colors, click “More Colors.” From there, you can choose “custom” or “standard.” Then click “OK.”
Note: If you want to change the color the same process will do.
Tip: If you change your mind and don't want to put any color, just press "Alt + H + H + N," and it will automatically remove the color from your cells.
Tip: Another thing you should know is that there's a shortcut. If you want more colors, press "Alt + H + H + M." The "Colors" dialog box will pop up.
Kindly refer to the video below.
Tip: For the font color, you just have to use the keyboard shortcut "Alt + H + F + C." You can easily choose the color of your font using this shortcut.
6. Add the Fill Color Option to the Quick Access Toolbar (QAT)
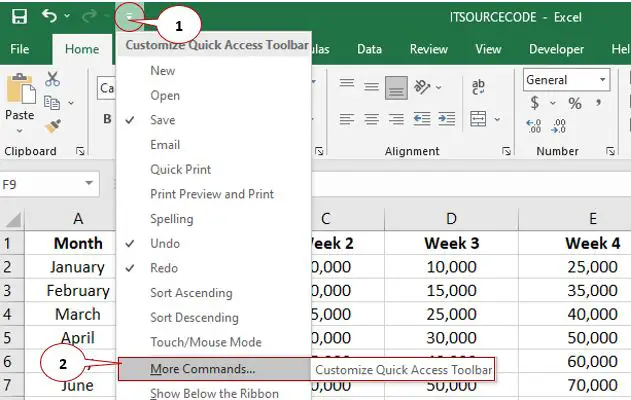
- Click “Custom Quick Access Toolbar.”
- Select “More Commands.”
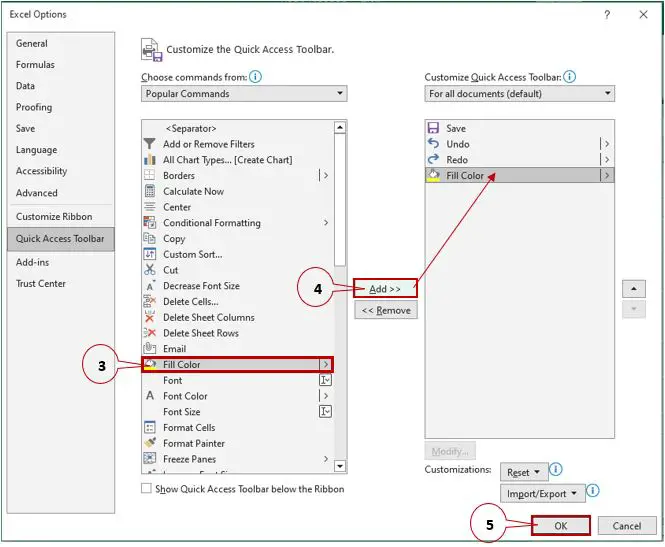
- 3. Click “Fill Color.”
- 4. Then, click the “Add” button. Fill color will automatically be added under “Customize Quick Access Tollbar.”
- 5. Click “Add.” It will add to your QAT.

Note: It's a good thing if you don't like to hit more than one keystroke. You can access this using your mouse. It is the same as using the regular or paint bucket tool above.
Conclusion
In conclusion, this guide on Excel fill color shortcuts is a powerful tool that can help you efficiently fill your wanted cells in a quick and easy way. Incorporating the fill color shortcut excel into your data management strategy can help you save time and ensure consistency in your work.
We hope that you have learned something new from this guide. If you found this guide to be a valuable resource, please leave a comment below.
Thank you very much for continuing to read until the end of this article. In case you have more questions, feel free to comment. You can also visit our website for additional information.