
C++ is a potent language for general-purpose programming. It can be used to create operating systems, web browsers, games, etc.
To explore C++ programming, you will need an environment setup.
This is a tutorial for C++ programmers looking for an easy environment on Windows to write and execute C++ codes.
It applies not only to advanced programmers but also to beginners. For either of these two, this is the best guide for you.
What is C++ Programming Environment?
C++ environments (IDE/s) are software platforms that provide programmers with the command line tools to develop a program.
Programming environments can be installed locally on your operating system or accessed through online IDEs.
To set up a local environment for C++, here’s the complete guide.
How to Setup C++ Environment on Windows?
There are several requirements to create a C++ environment, such as a text editor, code compiler, and debugger.
To complete this setup, this tutorial provides complete installation instructions.
Step 1: Choosing Text Editor
A text editor is the first tool you will need to create your first C++ program.
There are a lot of excellent editors available, and hard to pick among the greatest.
However, I recommend these editors that are proven and tested after years of implementation.
- Sublime Text
- Visual Studio Community
- Code:: Blocks
Sublime Text Editor is a powerful, widely used text editor among developers.
It has various features, such as Syntax Highlighting, Auto Indentation, File Type Recognition, Sidebar, Macros, Plug-ins, and Packages, that make working with code bases easier.
Visual Studio Community is a free, versatile, and feature-rich integrated development environment (IDE) for developing modern applications for Android, iOS, and Windows, as well as online applications and cloud services.
CodeBlocks is a cross-platform IDE that allows developers to write, analyze, and run C++ code to deploy projects.
It offers robust customization possibilities for development environments, including source control integration and graphical representations of memory and CPU utilization.
Each text editor is available for free and is a capable editor with a shorter learning curve than other comparable editors.
Step 2: Installing Compiler
If you choose Microsoft Visual Studio IDE, you won’t need a compiler.
It’s because Visual Studio is a complete package that includes the Visual C++ compiler from Microsoft, so there’s no need for additional procedures.
Microsoft used to distribute their compiler with their Windows C++ SDK, but today the only simple way to obtain it is through installing Visual Studio Code.
However, Microsoft’s compiler differs slightly from the standard GNU Compiler Collection.
The source code in one environment may not compile in the other.
If you need to submit your applications as source code, you may find that a GCC-like compiler is preferable.
If you are using Sublime Text or CodeBlocks, you must download and install a compiler to compile C++ code.
There are various C/C++ compilers and applications for running GCC on Windows, such as Cygwin.
However, it has been discovered that anything based on MinGW is standards-compliant and relatively lightweight.
MinGW-w64 is a branch of MinGW that adds 64-bit compatibility by default and distributes compilers in easy installers.
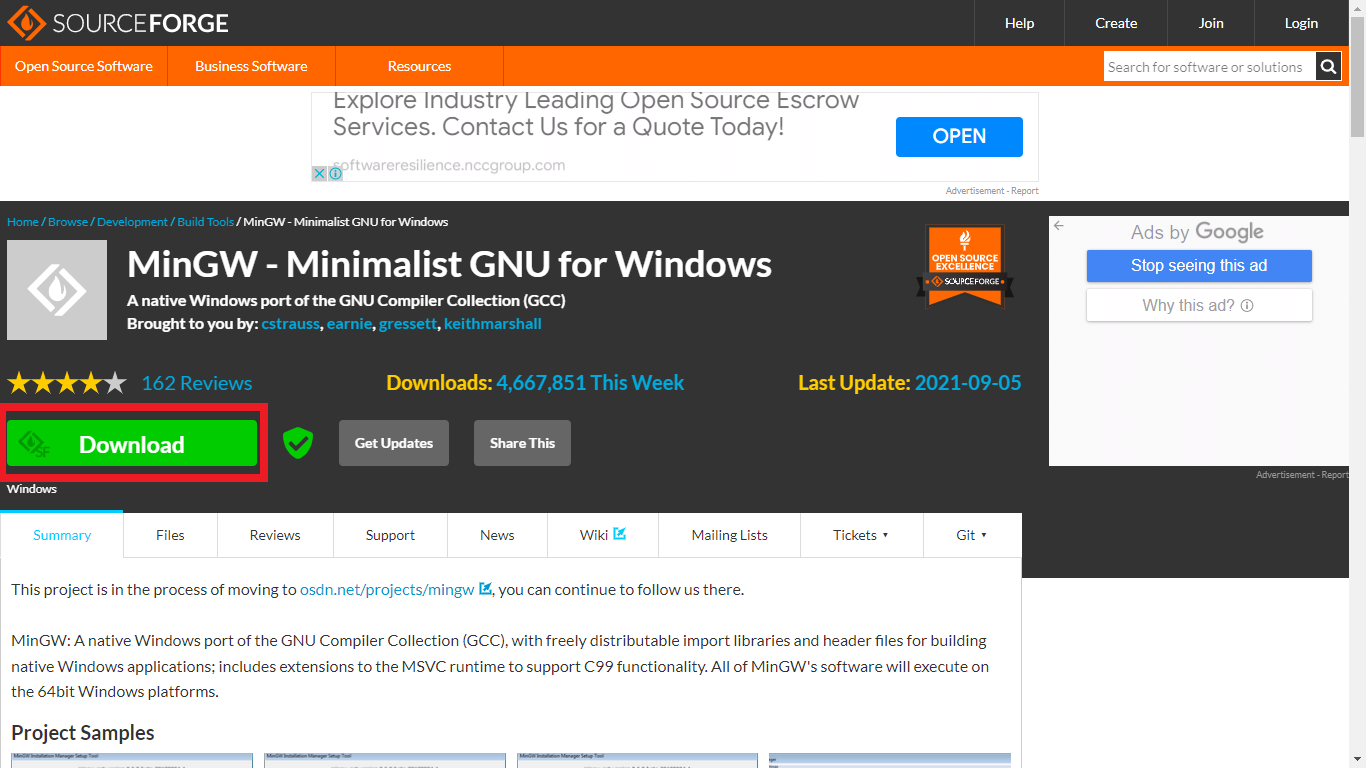
You can download MinGW-w64 Minimalist GNU for Windows from the Sourceforge download page.
Just click the download button and wait until the download is complete.
After downloading, double-click the file to run the installer. Click <install> and <continue> and wait for MinGW Manager Installation.
This process should display these pages:
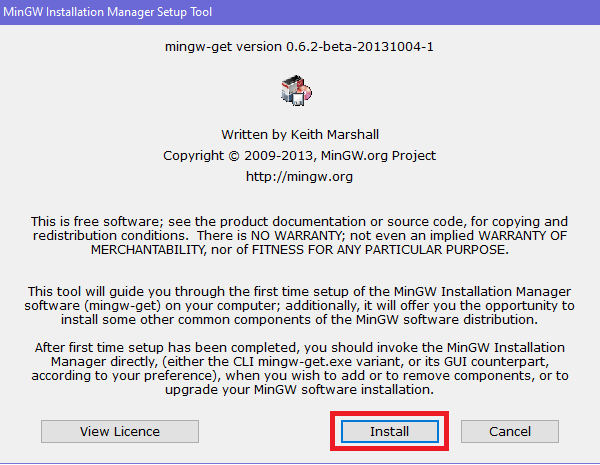
This page will display upon running the installer. You need to click <install> to invoke the installer.
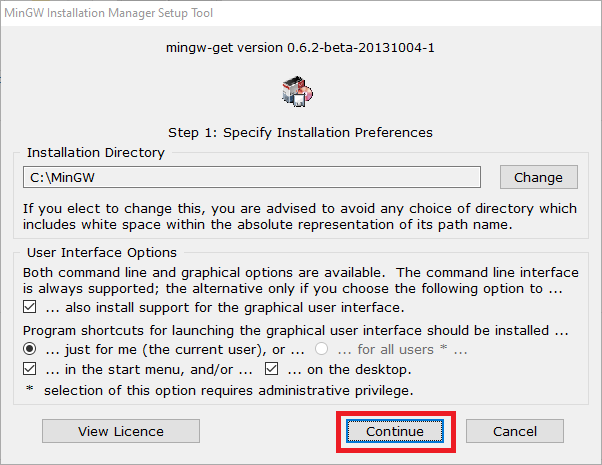
Upon clicking <install>, this page will show. You need to click <continue> to process the MinGW Installation.
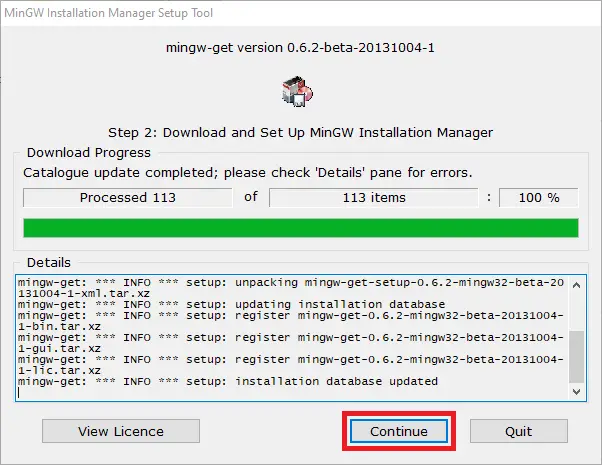
This page displays step 2 of the installation process. You will wait a few seconds to download and set up the MinGW Installation Manager.
When the download is complete, your next move is to click <continue>.
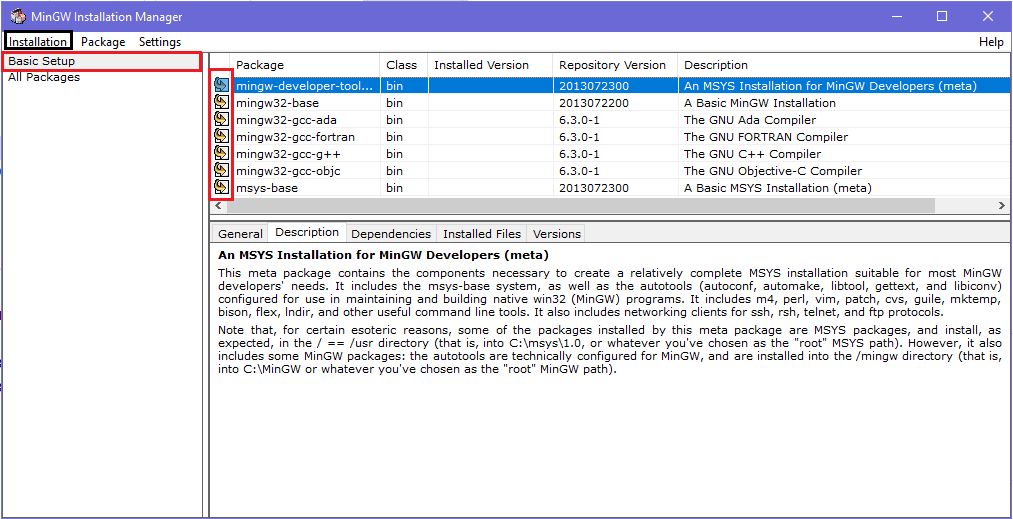
By clicking continue, this page will appear. You will choose the “Basic Setup” and mark all the packages to include in your MinGW Bin for the C++ environment setup.
Next, click <Installation> above the Basic Setup and click <apply>. You will then see the following pages.

This shows the process of downloading all the marked packages.
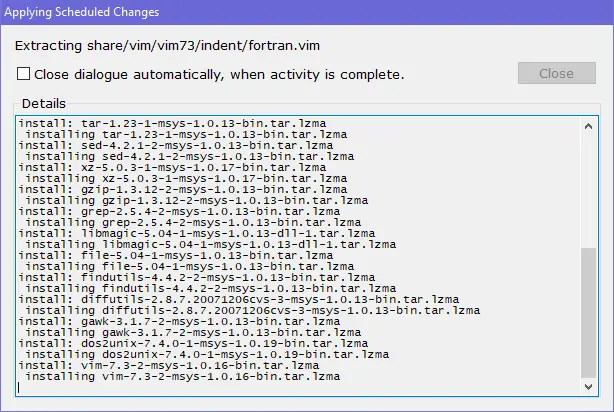
After downloading the marked packages, the installer will apply them to the MinGW Bin.
This process will display this interface. You will wait for a few more until the application is done and then close the installer.
After installation is complete, you should have the G++ compiler compatible with Windows installed and ready to use.
It is also possible to use the compiler straight from the command line.
Keep in mind that the binaries are not automatically added to your PATH. To verify that the compiler is working, you may use the command prompt. If not, we can apply these steps:
First, you must copy the PATH of MinGW Bin and paste it to the “environment variables” or “advanced settings”.
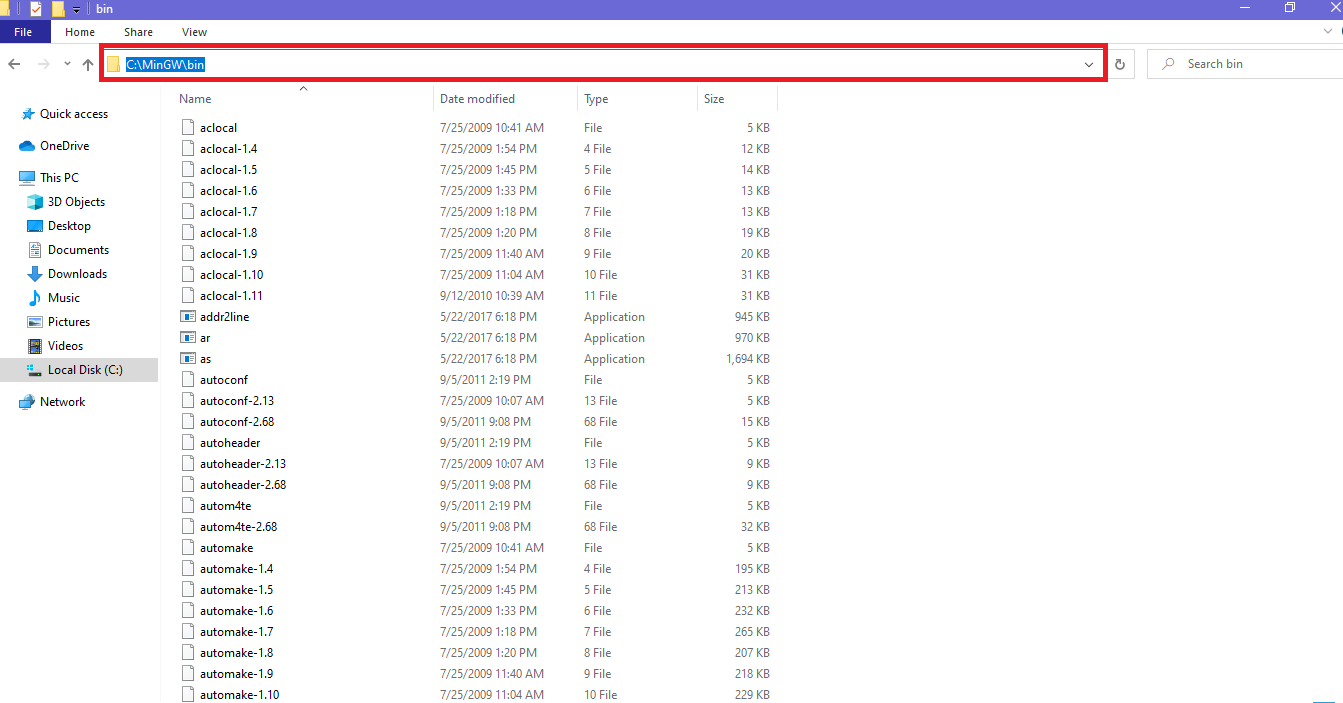
The PATH could be found in your local disc, where your OS is installed. This PATH can vary depending on which folder the MinGW is installed.
After copying the PATH, you will paste it into the environment variables that show like this.
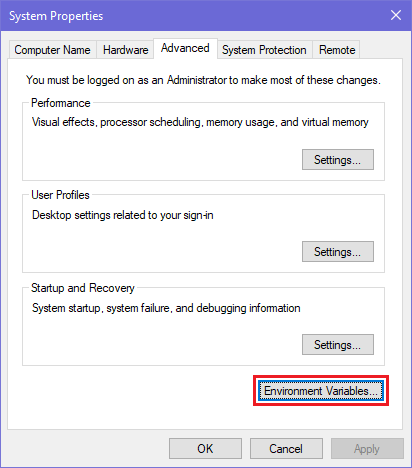
Click the <Environment Variables> to see the problem of why is G++ compiler is not recognized by the command line.
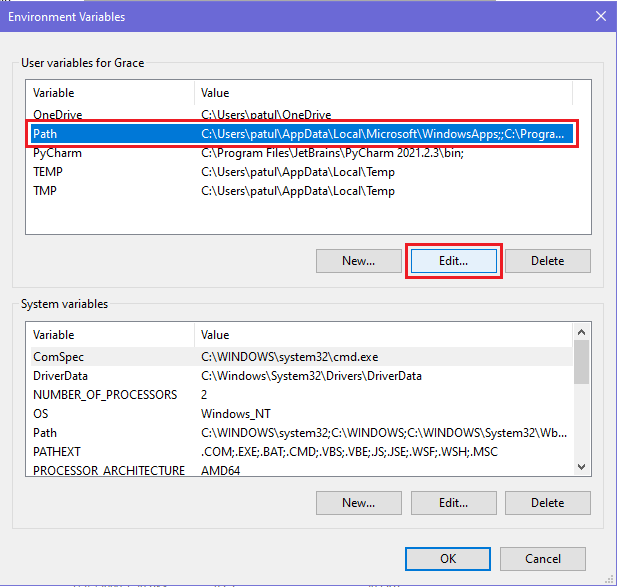
You must edit the PATH so the compiler will be recognized in cmd and text editors. Choose the PATH and click <Edit> to finish setting up the compiler.

Lastly, paste the copied PATH from the folders and click <OK>. Now you can re-check the compiler through the command line.
Step 3: Setting up the Editor
Configuring Sublime Text and CodeBlocks using the MinGW-w64 compiler for your C++ files is much simpler.
Sublime Text
Sublime Text includes an integrated build system, but the C/C++ builder does not operate with MinGW by default.
Instead, we will generate a new build file that uses the installed MinGW-w64 compiler.
To generate the build file, you need to copy this script paste it into Sublime Text Editor and save your file as .sublime-build in the package.
{
    "cmd": ["g++", "-o", "${file_path}/${file_base_name}.exe", "-static-libgcc", "-static-libstdc++", "*.cpp"],
    "file_regex": "^(..[^:]*):([0-9]+):?([0-9]+)?:? (.*)$",
    "working_dir": "${file_path}",
    "selector": "source.c, source.cpp, source.c++",
    "path": "C:/MinGW/bin",
    "shell": true,
    "variants": [
        {
            "name": "Run",
            "cmd": ["g++", "-o", "${file_path}/${file_base_name}.exe", "-static-libgcc", "-static-libstdc++", "*.cpp", "&", "${file_path}/${file_base_name}.exe"]
        }
    ]
}
The packages folder can be accessed by selecting “Preferences > Browse Packages…” or you can modify the path attribute to point to the correct folder containing your MinGW-w64 binaries.
This process should look like this:

This shows the .sublime-build file saved in the Sublime Packages.
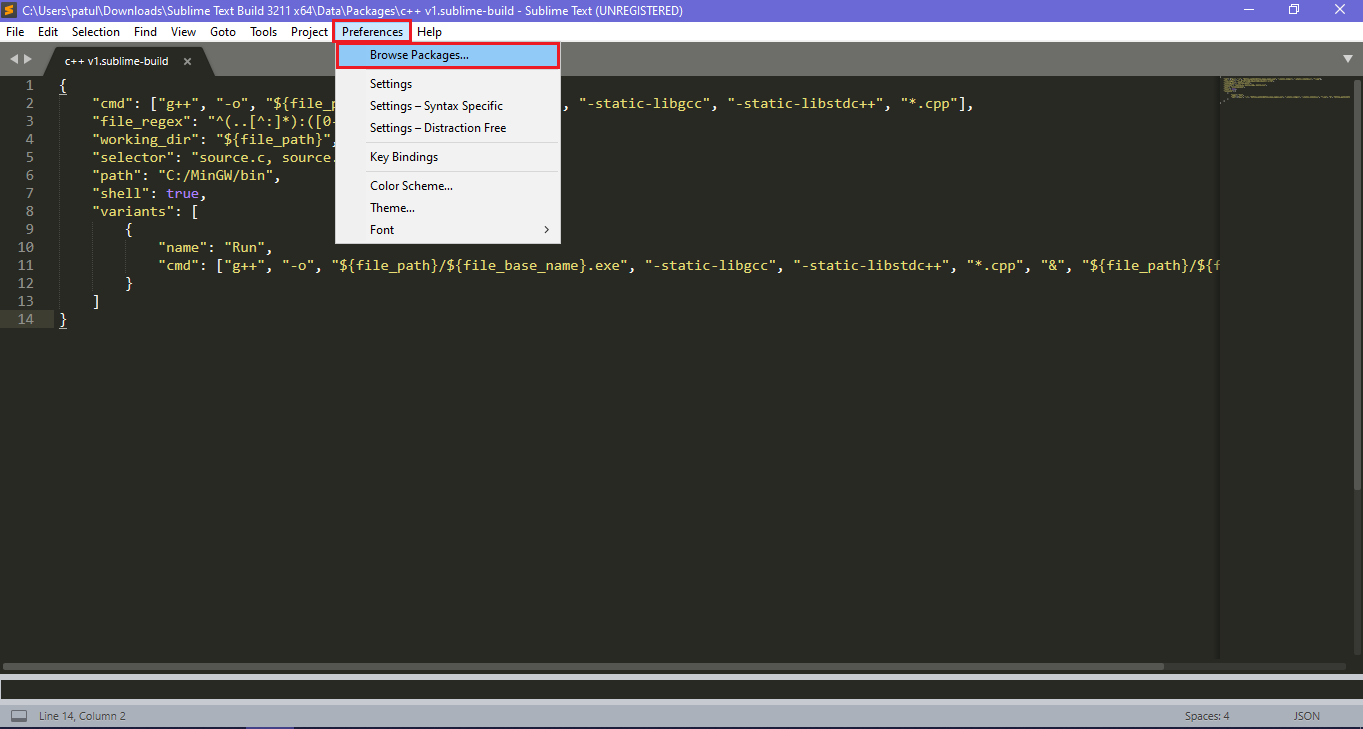
To check its file location, click Preferences and Browse Packages, and it will show the page like this:
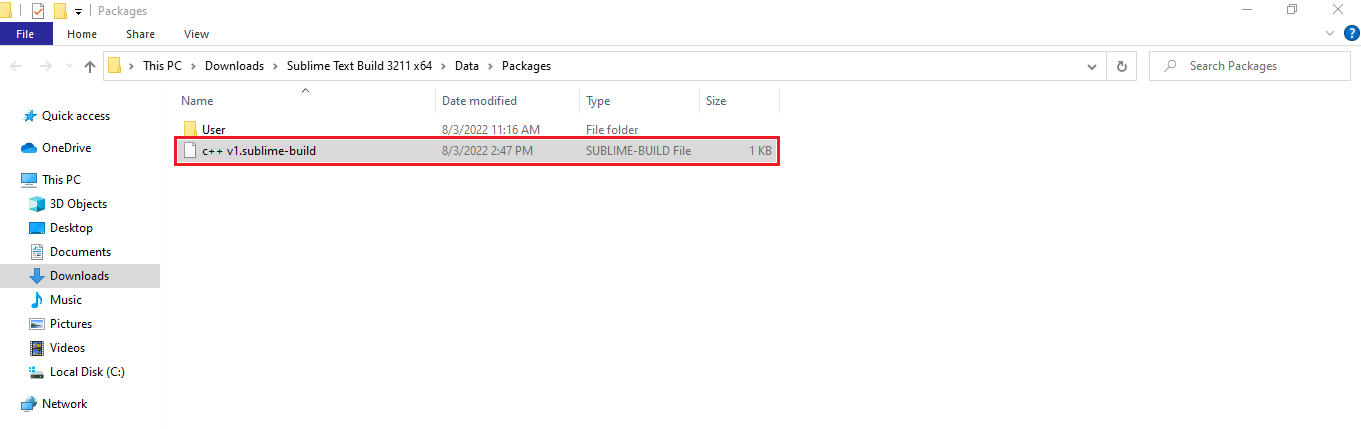
The file name of the build is “c++ v1.sublime-build”. And you’re through configuring Sublime!
You can now open a C++ file in Sublime Text and press Ctrl+B (or click “Tools > Build”) to compile it.
The output is an executable .exe file with the same name as the primary compiled .cpp file.
Even after compilation, you can instantly start the file by pressing Ctrl+Shift+B.
The output of your program will appear at the bottom window of Sublime Text.
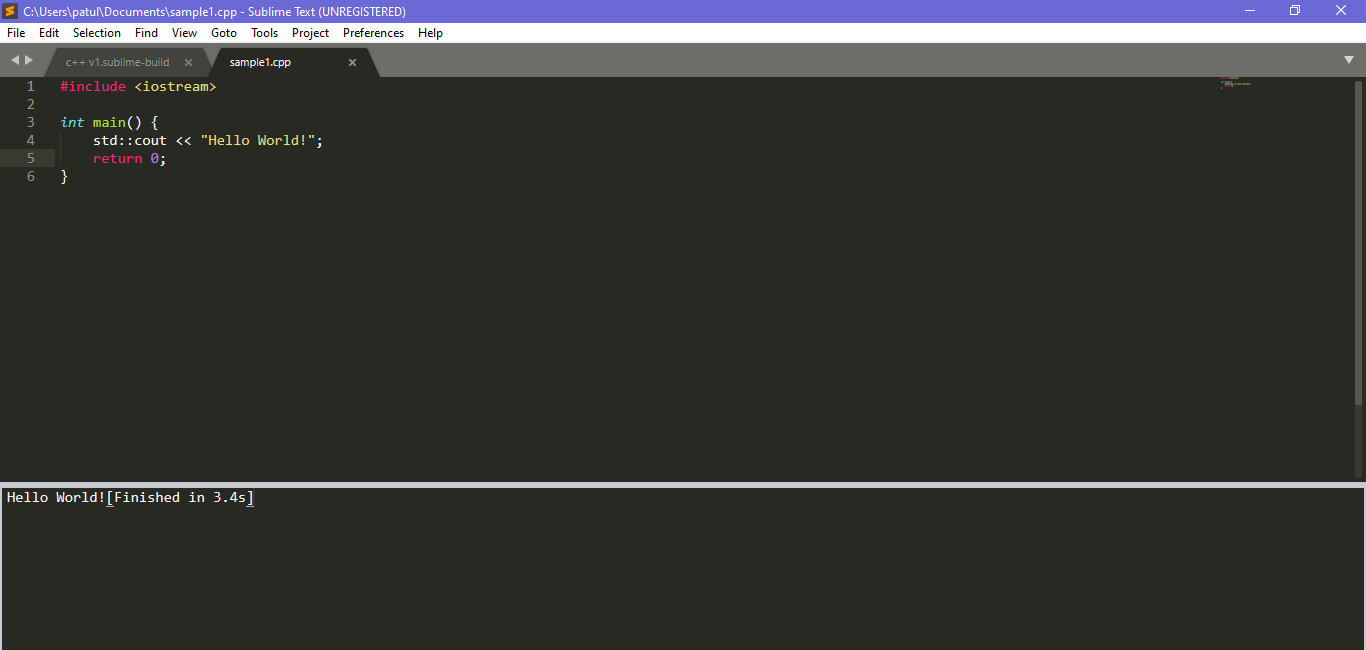
Note that this does not work for applications that require input (std::cin and the like); instead, you must run such programs from the command line or browsers.
This compiler also compiles other .cpp files in the same location as the main file, so it’s a good idea to organize your programs into distinct directories.
As a result of Windows’ inadequate support for wildcards in the shell, this script cannot access files in subfolders.
If you must organize files into subfolders, you must use the compiler manually and specify the files to compile by hand.
Step 4: Coding
If you have reached this stage, you should be ready to start coding!
You can browse more source codes online that interest you or create your line of codes. Either way, you will enjoy coding with the given C++ environment setup or IDEs.
It is ultimately up to you how you write your code. Simply continue to study programming, and C++ programming is an important talent in today’s software-centric society.
You may discover many opportunities in the programming industry, especially with C++ Language.
So start writing your C++ codes using this environment setup tutorial and boost up your skills in programming.
The presented tutorial will not only apply to Sublime but also to Code:: Blocks. The instructions are similar, only the procedure varies since they are different from each other.
Conclusion
The C++ Environment Setup Tutorial will help you adapt to the potential of C++ programming. Its environment allows you to explore more about the language.
Additionally, setting up the C++ environment lets you understand how the program works. Therefore, the IDEs presented were to help you discover your skills in C++ Programming.
Inquiries
If you have concerns about this tutorial, comment below. We will be glad to address your concerns and suggestions.

Mary Grace G. Patulada
Programmer & Technical Writer at PIES IT Solution
Mary Grace G. Patulada (pen name ‘Nym’) is a programmer and writer at PIES IT Solution with a BSIT background from Carlos Hilado Memorial State College, Binalbagan Campus. Authored 370+ UML diagram tutorials and capstone documentation guides at itsourcecode.com. Specializes in UML (class, use case, activity, sequence, component, deployment), DFD, and ER diagrams for BSIT capstone projects.
Expertise: UML Diagrams · DFD · ER Diagrams · Use Case Diagrams · Activity Diagrams · Capstone Documentation · PHP · View all posts by Mary Grace G. Patulada →