
Create a Dynamic Library Link (.dll) in VB.Net
In this tutorial of Create a DynamicLibrary Link (.dll) in VB.Net, you will learn how to create a dynamic library link using vb.net in Microsoft Visual Studio 2013. Let me explain to you first the advantages of dynamic library links.
Advantages:
- You can make your own modified sets of parameters and methods for you to do less coding and typing especially when you are used to do long codes.
- It will make you feel like an advanced VB.Net programmer when creating a dynamic library link using vb.net.
Here are the following steps to create your dynamic library link using vb.net:
- Open your Microsoft Visual Studio 2013 and click New Project, after clicking New Project, select from the Visual Basic from the Templates corner left tab then select Class Library. (see the image below).

2. After creating your new project, you can name the class as you like. Let’s make a sample code for our class library project.
Public Class Class1

Public Shared Function addValues(number1 As Integer, number2 As Integer)
Dim sum As Integer
sum = number1 + number2
Return sum
End Function

End Class
As you can see, we have a public function named addValues. This function will automatically sum the two integers depending on the user’s input.
3. Build your project and go to your Project Folder > Project Folder > bin > Debug. You can see that there’s a .dll file which came from our recently coded class library project (see the image below).

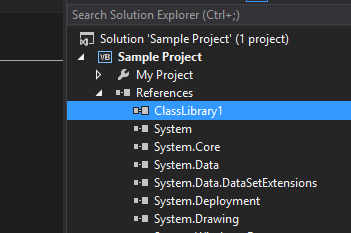
4. Now, let’s use our .dll file! Create a new Visual Basic project and go to reference located at the Solution Explorer of your project.
Then add reference and locate your created .dll file. After successfully adding your .dll file, you can see that at your references tab. (see the image below).
5. Now, import your .dll file on to your project by writing this at the top of your code sheet, Imports ClassLibrary1.Class1 (ClassLibrary1 is the name of our .dll project and Class1 is our class inside the .dll project.) After importing, you can now call your public sub inside that .dll file! We exampled the function in the textbox.
Imports ClassLibrary1.Class1

Public Class Form1

Private Sub Form1_Load(sender As Object, e As EventArgs) Handles Me.Load
TextBox1.Text = addValues(15, 20)
End Sub

End Class
While the form is loading, automatically the project will call the function and produce an output on our textbox! (Check the image below).
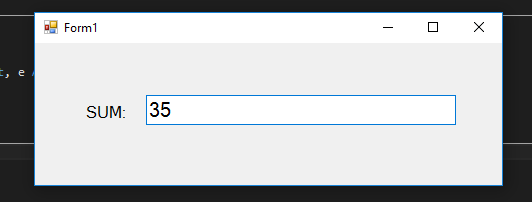
Success! You have created your own .dll file and it is easy to add two integers at the same time you can create your own line of codes depending on your convenience!
RAR Extraction Password:
Password: luffypirates
For questions or any other concerns, you can contact me through the following:
E-Mail: [email protected]
Facebook: facebook.com/kirk.lavapiez
Contact No.: +639771069640
To download the sample project with the line of codes, click here.
Ian Hero L. Lavapiez
BSIT Graduate
System Analyst and Developer
Related topic(s) that you may like: