
This Online Medical Management System in Django created based on python, Django, and MYSQL Database.
The Online Medical Store System is specially designed for online order of medicine.
It gives facility to customer to choose items they wish and place an order for home delivery.
Like every other e-commerce platform, allows customers of the website to temporarily store their chosen medicine or products in a cart for later checkout.
This Online Medical Management System in Django is an easy project for beginners to learn how to build a web-based python Django project.
We will provide you with the complete source code and database for the python project so that you can easily install it on your machine and learn how to program in Python Django.
To start creating an Online Medical Management System Project in Python Django makes sure that you have PyCharm Professional IDE Installed on your computer.
This Online Medical Management System Project in Django Framework includes a Download Source Code for free, just find the downloadable source code below and click download now.
| About Project | Project Details |
|---|---|
| Project Name | Online Medical Management System Project in Django |
| Python version (Recommended) | 3.8 Version |
| Programming Language Used | Python Django Language |
| Developer Name | itsourcecode.com |
| IDE Tool (Recommended) | Sublime, Visual Studio, PyCharm |
| Project Type | Web Application |
| Database | SQLite |
Admin Features
- Dashboard – For the admin dashboard, you will be able to all the basic access in the whole system. Such as a summary of products, orders, and categories.
- Manage Medicine- The admin has access to the products management information system. He can add, update and delete the medicine.
- Manage Categories – The page where the admin can add, edit and delete categories information.
- Manage Orders – As the main functions of the admin, the admin can accept or reject the order from the customers on a case-to-case basis and the list of customer orders is listed.
- Manage User– The admin can manage the user’s account. Admin can add, update and Block users in the system.
- Login and Logout – By default one of the security features of this system is the secure login and logout system.
Customer Features
- Login Page – Customer enter their website credentials on this page to gain access in order to log in.
- Register Page- The page where new customer created their login credentials for the website.
- Home Page- When customers visit the website, this is the system’s default page. This page shows the medicine for sale in the store.
- Medicine View Page – The page on which the medicine-specific information is shown, as well as the page on which the customer adds the product to his or her cart.
- Cart List Page- The page that lists the items that customers have chosen. This is the page where the customer can complete the order checkout process.
- My Order Page – The page that lists the customer’s orders.
Online Medical Management System Project in Django Steps on How to Create a Project
Time needed: 5 minutes
Here are the steps on how to create a Online Medical Management System Project in Django with Source Code.
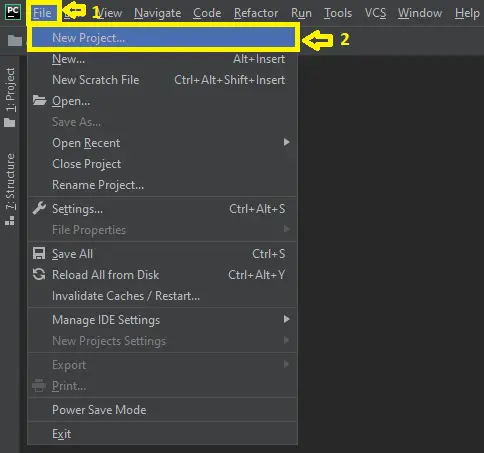
- Step 1: Open file.
First , open “pycharm professional” after that click “file” and click “new project”.

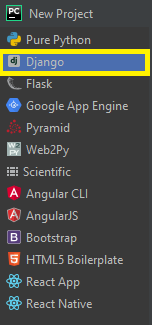
- Step 2: Choose Django.
Next, after click “new project“, choose “Django” and click.

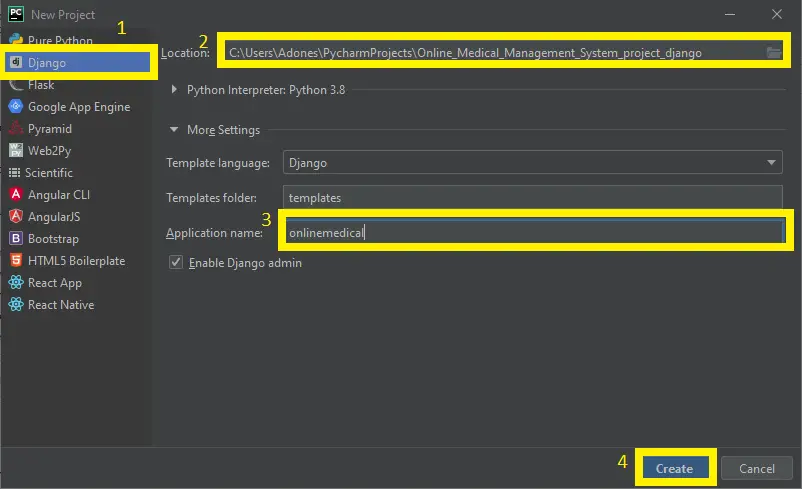
- Step 3: Select file location.
Then, select a file location wherever you want.

- Step 4: Create application name.
After that, name your application.

- Step 5: Click create.
Lastly, finish creating project by clicking “create” button.

- Step 6: Start Coding.
Finally, we will now start adding functionality to our Django Framework by adding some functional codes.
Functionality and Codes
- Create template for the order page
In this section, we will learn on how create a templates for the order page. To start with, add the following code in your order.html under the folder of orders/templates/orders.
{% extends 'User/Cust_master.html' %}

{% block title %}Checkout{% endblock %}

<!-- css -->
	{% load static %}
  <link href="{% static 'User/css/bootstrap.min.css' %}" rel="stylesheet" type="text/css">
  <link href="{% static 'User/font-awesome/css/font-awesome.min.css' %}" rel="stylesheet" type="text/css" />
  <link rel="stylesheet" type="text/css" href="{% static 'User/plugins/cubeportfolio/css/cubeportfolio.min.css' %}">
  <link href="{% static 'User/css/nivo-lightbox.css' %}" rel="stylesheet" />
  <link href="{% static 'User/css/nivo-lightbox-theme/default/default.css' %}" rel="stylesheet" type="text/css" />
  <link href="{% static 'User/css/owl.carousel.css' %}" rel="stylesheet" media="screen" />
  <link href="{% static 'User/css/owl.theme.css' %}" rel="stylesheet" media="screen" />
  <link href="{% static 'User/css/animate.css' %}" rel="stylesheet" />
  <link href="{% static 'User/css/style.css' %}" rel="stylesheet">

{% block body %}
 <div class="con_about" style="border:1px solid orange; padding-top:120px;">
        <div class="sub_about">
            <div id="about_header">
                <center><h1>Checkout</h1></center>
            </div>
            <center>
            <div class="about">
                <div class="about1">
                    <div class="form1" style="background-color:white;">
                        <form action="." method="post" class="order-form">
                            {% csrf_token %}
                            <table border="1" class="login" cellpadding="30" cellspacing="30">
                                <tr>
                                    <th colspan="2" align="center">
                                        {% if Error%}
                                            <b style="color: red; border: 1px solid gray;">
                                                {{ Error }}
                                            </b>
                                        {% elif messages %}
                                            {% for message in messages %}
                                                <b style="color: green; border: 1px solid gray;">
                                                    {{ message }}
                                                </b>{% endfor %}
                                        {% endif %}
                                   </th>
                                </tr>
                                <tr>
                                    <th>Firstname</th>
                                     <td style="border:1px solid gray;height:25px;">{{ form.first_name }}</td>
                                </tr>
                                <tr>
                                    <th>Lastname</th>
                                     <td style="border:1px solid gray;height:25px;">{{ form.last_name }}</td>
                                </tr>
                                <tr>
                                    <th>Email</th>
                                     <td style="border:1px solid gray;height:25px;">{{ form.email }}</td>
                                </tr>
                                <tr>
                                    <th>Mobile</th>
                                     <td style="border:1px solid gray;height:25px;">{{ form.mobile }}</td>
                                </tr>
                                <tr>
                                    <th>Address</th>
                                     <td style="border:1px solid gray;height:25px;">{{ form.address }}</td>
                                </tr>
                                <tr>
                                    <th>Postal Code</th>
                                     <td style="border:1px solid gray;height:25px;">{{ form.postal_code }}</td>
                                </tr>
                                 <tr>
                                    <th>City</th>
                                    <td style="border:1px solid gray;height:25px;">{{ form.city }}</td>
                                </tr>
                                <tr>
                                    <td colspan="2" align="center">
                                        <input type="submit" class="btn btn-danger" value="Place order" id="btn" style="width:200px;">
                                    </td>
                                </tr>
                            </table>
                        </form>
                    </div>
                </div>
                <div class="about1">
                     <div class="card" style="border:1px solid gray;">
                         <h3 style="border: none;outline: 0;padding: 12px;color: white;background-color: orange;text-align: center;width: 91%;font-size: 18px;">Your order</h3>
                          <br>
                          {% for item in cart %}
                            <h3>Items : {{ item.quantity }},{{ item.product.name }} <span>₱{{ item.price }}</span></h3><br>
                            <h3>{{ item.quantity }} x {{ item.product.name }} <span>{{ item.price }}</span></h3>
                          {% endfor %}
                          <br>
                          <h1>Total: ₱{{ cart.get_total_price }}</h1>
                           <br>
                    </div>
                </div>
                <div id="clear"></div>
            </div>
        </div>

        </center>
    </div>

{% endblock %}
Downloadable Source Code Below.
Anyway, if you want to level up your programming knowledge, especially python, try this new article I’ve made for you Best Python Projects with source code for Beginners.
But If you’re going to focus on web development using Django, you can download here from our list of Best Django Projects with source code based on real-world projects.
How To Run The Online Medical Management System Project in Django?
- Step 1: Extract/unzip the file
- Step 2: Go inside the project folder, open cmd, and type the following commands to install Django Framework and run the webserver:
- python manage.py migrate
- python manage.py runserver
- Step 3: Finally, open the browser and go to http://127.0.0.1:8000/
Summary
In summary, this Online Medical System Project in Django with Source Code can be useful to students or professional who wants to learn python programming language.
This project can also be modified to fit your personal requirements. Hope this project will help you to improve your skills. Happy Coding!
Inquiries
If you have any questions or suggestions about Online Medical Management System Project in Django with Source Code, please feel free to leave a comment below.