Limiting Data Selection Query in mySQL using VB.Net
Limiting Data Selection Query in mySQL using VB.Net.
In this tutorial, you will learn how to use LIMIT data selection in VB.Net.
Software tools used on this project are the following:
- Microsoft Visual Studio 2013
- XAMPP (for database)
- mySQL connector .NET
To start, create a new project and name it as you like.
Next, on your mySQL database, create a new database name “limit_database”. After creating your database, add this following SQL query to your database to insert a table with columns.
CREATE TABLE IF NOT EXISTS `limit_table` (
`ID` int(10) NOT NULL,
`Fullname` VARCHAR(50) NOT NULL,
`Address` VARCHAR(50) NOT NULL,
`Contact_No` VARCHAR(50) NOT NULL,
PRIMARY KEY (`ID`)
) ENGINE=MyISAM DEFAULT CHARSET=utf8;
Next, we are going to add values to our table.
INSERT INTO `limit_table`(`ID`,`Fullname`, `Address`, `Contact_No`)
VALUES
('001','Juan De la Cruz', 'Manila', '1234567890'),
('002','Sebastian De la Cruz','Manila','0987654321'),
('003','Pepeng De la Cruz','Manila','432534354'),
('004','Jose Rizal', 'Laguna', '3432324141'),
('005','Apolinario Mabini', 'Manila', '32131243232');
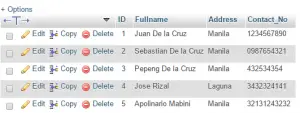
The output of your mySQL queries will look like this:

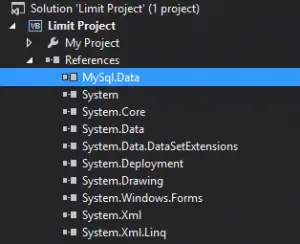
Then, we are going to add the mySQL connector .NET MySql.Data.dll to our reference. Its usual location is on “C:\Program Files (x86)\MySQL\MySQL Connector Net 6.9.9\Assemblies\v4.0” or depending on the installation extraction folder.

Next, we are going to add a DataGridView to our Form1 blank designer. Set the DataGridView’s AutoSizeColumnsMode to Fill to emphasize our data. Next, double click the form itself and add this code:
Imports MySql.Data.MySqlClient
Public Class Form1
Dim conn As MySqlConnection
Dim cmd As MySqlCommand
Dim dt As DataTable
Dim da As MySqlDataAdapter
Dim sql As String
Private Sub Form1_Load(sender As Object, e As EventArgs) Handles MyBase.Load
Try
conn = New MySqlConnection
conn.ConnectionString = "server=localhost; userid=root; password=; database=limit_database;"
conn.Open()
sql = "SELECT * FROM limit_table LIMIT 3;"
cmd = New MySqlCommand(sql, conn)
da = New MySqlDataAdapter
dt = New DataTable
da.SelectCommand = cmd
da.Fill(dt)
DataGridView1.DataSource = dt
Catch ex As MySqlException
MsgBox(ex.Message)
Finally
conn.Close()
cmd.Dispose()
End Try
End Sub
End Class
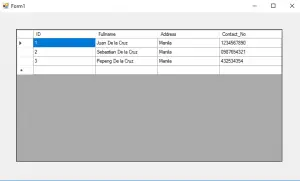
After inserting this line of code to your visual basic project, your output would be like this:

As you have noticed, we limit the retrieving of data to 3 row values. You can set your own LIMIT selection depending on your desired output.
You can also use the LIMIT keyword to initialize your system to where to start its retrieving of data and how many data should it fetch from the database. Try to add another number in your LIMIT query and check to see the results.
sql = "SELECT * FROM limit_table LIMIT 3, 2;"
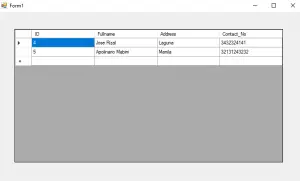
Here’s the output when you add a comma and a number on your LIMIT query.

Notice that the fetching of data starts at ID 4, it is because the mySQL count starts with 0.
So meaning, the first number in your LIMIT keyword leads to which the query should start fetching data. So, we have ID 1, 2, 3, 4 and 5 on our mySQL limit_table. Then, the mySQL reads it 0, 1, 2, 3, and 4. So, the mySQL fetching of data starts in ID 4.
This ends on our tutorial Limiting Data Selection Query in mySQL using VB.Net.
The next number indicates on how many data rows should the LIMIT query fetch. So based on the output picture, the query retrieve ID 4 and 5.
For questions or any other concerns or thesis/capstone creation with documentation, you can contact me through the following:
E-Mail: [email protected]
Facebook: facebook.com/kirk.lavapiez
Contact No.: +639771069640
Ian Hero L. Lavapiez
BSIT Graduate
System Analyst and Developer
Related topic(s) that you may like:

