The Campus Recruitment Management System Project in Django created based on Python, Django, and SQLITE3 Database.
The aim of the project is to make it easier for students in college and employees to register. Users have easy access to this, and the data can be accessed quickly.
Students will see the information of various registered firms, as well as the number of vacancies and their descriptions, on their dashboard when they first open the system. They will apply for the job after making sure they are qualified.
To start creating a Campus Recruitment Management System Project in Python Django, makes sure that you have PyCharm Professional IDE Installed in your computer.
This Campus Recruitment Management System Project in Django Framework, Also includes a Download Source Code for free, just find the downloadable source code below and click download now.
Checkout the link below for the other related articles.
- Placement Management System Project In PHP With Source Code
- Student Result Management System Project in Django
| About Project | Project Details |
|---|---|
| Project Name | Campus Recruitment Management System in Django |
| Python version (Recommended) | 3.8 Version |
| Programming Language Used | Python Django Language |
| Developer Name | itsourcecode.com |
| IDE Tool (Recommended) | Sublime, Visual Studio, PyCharm |
| Project Type | Web Application |
| Database | SQLite |
Admin Features
- Login Page – The page where the system administrator enters their system credentials in order to gain access to the system’s administrative side.
- Manage Applied Jobs- This is the page where an administrator can view who applied jobs in their company.
- Manage Company- This is the page where an administrator can add, update, and delete company information.
- Job Position Management – This is the page where an administrator can add, update, and delete job position information.
- Manage Student– This is the page where an administrator can add, update, view order and delete student information.
- Manage User– This is the page where an administrator can add, update, view order and delete user information.
- Change password – This is the page where an administrator can change their own password for the security of their account.
Company Features
- Register Page– The page where new user of company created their login credentials for the website.
- Login Page – The page where the system company enters their system credentials in order to gain access to the system’s company side.
- Post Vacancy – This is the page where the company may provide their contact information and post work openings by filling out the vacancy registration form.
- Update Vacancy – This is the page where the company can update their post work.
- Select Students – This is the page where the company can see the list of students who have applied as well as the students who are eligible.
- Delete Vacancy – This is the page where the company can delete their post work.
- Manage User – This is the page where an administrator can add, update, view order and delete user information.
Student Features
- Register Page– The page where new students created their login credentials for the website.
- Login Page – The page where the system student enters their system credentials in order to gain access to the system’s company side.
- View Profile – This is the page where the student can view their profile information
- Update Profile – This is the page where the student can update their profile information
- Apply Company – This is the page where the student can apply for the job by checking eligibility.
Campus Recruitment System Django Steps on How to Create a Project
Time needed: 5 minutes
Here are the steps on how to create a Campus Recruitment Management System project in Django with Source Code.
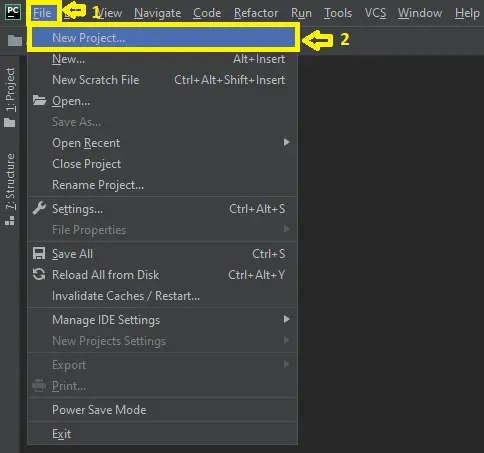
- Step 1: Open file.
First , open “pycharm professional” after that click “file” and click “new project”.

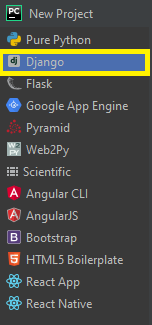
- Step 2: Choose Django.
Next, after click “new project“, choose “Django” and click.

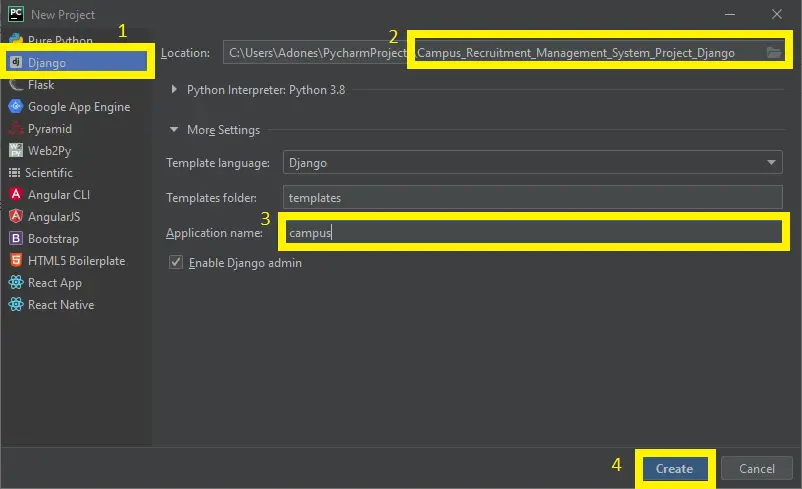
- Step 3: Select file location.
Then, select a file location wherever you want.

- Step 4: Create application name.
After that, name your application.

- Step 5: Click create.
Lastly, finish creating project by clicking “create” button.

- Step 6: Start Coding.
Finally, we will now start adding functionality to our Django Framework by adding some functional codes.
Functionality and Codes
- Create template for the student apply job
In this section, we will learn on how create a templates for the student apply job. To start with, add the following code in your navbar.html under the folder of campus/templates/campus.
{% extends "campus/base.html" %}

{% block body_block %}

      <div class="container">
        <div class="row">
          <div class="col-md-6 mx-auto text-center mb-5 section-heading">

            <br>
            <h2> APPLY FOR JOB!</h2>
          </div>
        </div>
      </div>
</div>
<div class="container">

  <div class="jumbotron">
      <h1>{{ s }}</h1>
      <form method="post">
           {% csrf_token %}

            MINIMUM SALARY:<input type="number" size="10" name="salary"  style="font-size: 1rem;font-family: Comic Sans MS, cursive, sans-serif">
            MAXIMUM BOND YEARS:<input type="number" size="10" name="years"  style="font-size: 1rem;font-family: Comic Sans MS, cursive, sans-serif">
            <input type="submit" class="btn btn-primary" value="SEARCH">
        </form>
        <br>
      <table border="1px" style="text-align: center;border-collapse: collapse;background-color:rgb(96, 224, 214);"width=100%">
          <tr >
              <th style="font-size:1.5rem;color: #123027cc">Company </th>
              <th style="font-size:1.5rem;color: #123027cc">Designation</th>
                   <th style="font-size:1.5rem;color: #123027cc">Salary</th>
              <th style="font-size:1.5rem;color: #123027cc">Bond years</th>
              <th style="font-size:1.5rem;color:rgb(44, 143, 5)">Apply</th>

          </tr>
          {%  for i in y %}
          <tr>
              <td>{{ i.company_name }}</td>
          <td>{{ i.designation }}</td>
          <td>{{ i.salary }}</td>
          <td>{{ i.bond_years }}</td>
              <td><a href="http://127.0.0.1:8000/student/student_login/applyjob/{{ i.job_id }}/" target="popup" onclick="window.open('http://127.0.0.1:8000/student/student_login/applyjob/{{ i.job_id }}/','popup','width=600,height=600'); return false;" >APPLY</a></td>
          </tr>
          {% endfor %}
      </table>


  </div>

</div>

{% endblock %}- Create template for the homepage
In this section, we will learn on how create a templates for the homepage. To start with, add the following code in your home.html under the folder of campus/templates/campus.
<!DOCTYPE html>
{% load static %}
<html lang="en">
<head>
<title>Campus Recruitment</title>
<meta charset="utf-8">
<meta name="viewport" content="width=device-width, initial-scale=1, shrink-to-fit=no">
<link href="https://fonts.googleapis.com/css?family=Amatic+SC:400,700|Work+Sans:300,400,700" rel="stylesheet">
<link rel="stylesheet" href="{% static 'campus/fonts/icomoon/style.css' %}">
<link rel="stylesheet" href="{% static 'campus/css/bootstrap.min.css' %}">
<link rel="stylesheet" href="{% static 'campus/css/magnific-popup.css' %}">
<link rel="stylesheet" href="{% static 'campus/css/jquery-ui.css' %}">
<link rel="stylesheet" href="{% static 'campus/css/owl.carousel.min.css' %}">
<link rel="stylesheet" href="{% static 'campus/css/owl.theme.default.min.css' %}">
<link rel="stylesheet" href="{% static 'campus/css/animate.css' %}">
<link rel="stylesheet" href="https://cdn.jsdelivr.net/npm/[email protected]/build/mediaelementplayer.min.css" >
<link rel="stylesheet" href="{% static 'campus/fonts/flaticon/font/flaticon.css' %}" >
<link rel="stylesheet" href="{% static 'campus/css/aos.css' %}">
<link rel="stylesheet" href="{% static 'campus/css/style.css' %}">
</head>
<body>
<div class="site-navbar-wrap bg-danger">
<div class="container">
<div class="site-navbar bg-dark">
<div class="py-1">
<div class="row align-items-center">
<div class="col-2">
<h2 class="brand"><a href="http://127.0.0.1:8000"><strong style="color:red;">COLLEGE CAMPUS RECRUITMENT</strong> </a></h2>
</div>
<div class="col-10">
<nav class="site-navigation text-right" role="navigation">
<div class="container">
<div class="d-inline-block d-lg-none ml-md-0 mr-auto py-3"><a href="#" class="site-menu-toggle js-menu-toggle text-blue"><span class="icon-menu h3"></span></a></div>
<ul class="site-menu js-clone-nav d-none d-lg-block">
{% if user.is_authenticated %}
<li>
<a href=" http://127.0.0.1:8000/company/company_login/">Company</a>
</li>
<li><a href="http://127.0.0.1:8000/student/student_login/">student</a></li>
{% else %}
<li><a href="http://127.0.0.1:8000/student/student_login/">Candidate Login</a></li>
<li>
<a href=" http://127.0.0.1:8000/company/company_login/">Company Login</a>
</li>
<li><a href="http://127.0.0.1:8000/admin">Admin</a></li>
{% endif %}
<li><a href="#">{% if user.is_authenticated %}
<a href="http://127.0.0.1:8000/logout/"> Hi {{ user.username }}! logout</a>
{% else %}
<p style="color:grey">You are not logged in</p>
{% endif %}</a></li>
</ul>
</div>
</nav>
</div>
</div>
</div>
</div>
</div>
</div>
<div style="height: 80px;"></div>
<div class="site-blocks-cover overlay" style="background-image: url({% static 'campus/images/bg.jpg'%})"; data-aos="fade" data-stellar-background-ratio="0.5">
</div>
<div class="site-section block-15">
<div class="container">
<div class="row">
<div class="col-md-6 mx-auto text-center mb-5 section-heading">
<h1>WELCOME TO THE CAMPUS RECRUITMENT</h1>
<br>
<h2>VISITING COMPANIES</h2>
</div>
</div>
</div>
</div>
<footer class="site-footer" style="background-color: darkblue;">
<div class="container">
<div class="row">
<div class="col-md-4">
<h3 class="footer-heading mb-4 text-white">About</h3>
<p>This Project is about Campus recruitment System where both IT companies as well as student can register themselves on the on the same platform to interact with each other.</p>
<p><a href="#" class="btn btn-primary pill text-white px-4">Read More</a></p>
</div>
<div class="col-md-6">
<div class="row">
<div class="col-md-6">
<h3 class="footer-heading mb-4 text-white">Quick Menu</h3>
<ul class="list-unstyled">
<li><a href="#">About</a></li>
<li><a href="http://127.0.0.1:8000/">Homepage</a></li>
<li><a href="#">Companies</a></li>
<li><a href="#">Jobs</a></li>
<li><a href="#">Contact us</a></li>
</ul>
</div>
<div class="col-md-6">
<h3 class="footer-heading mb-4 text-white">Categories</h3>
<ul class="list-unstyled">
<li><a href="#">Full Time</a></li>
<li><a href="#">Freelance</a></li>
<li><a href="#">Temporary</a></li>
<li><a href="#">Internship</a></li>
</ul>
</div>
</div>
</div>
<div class="col-md-2">
<div class="col-md-12"><h3 class="footer-heading mb-4 text-white">Social Icons</h3></div>
<div class="col-md-12">
<p>
<a href="https://www.facebook.com/tpc.iitbhu/" class="pb-2 pr-2 pl-0"><span class="icon-facebook"></span></a>
<a href="https://twitter.com/iitbhu_varanasi?lang=en" class="p-2"><span class="icon-twitter"></span></a>
<a href="https://www.instagram.com/technexiitbhu/?hl=en" class="p-2"><span class="icon-instagram"></span></a>
<a href="https://www.youtube.com/channel/UClQf58OQvm6OkGbQARqqhMg" class="p-2"><span class="icon-youtube"></span></a>
</p>
</div>
</div>
</div>
<div class="row pt-5 mt-5 text-center">
<div class="col-md-12">
<p>
Copyright © <script data-cfasync="false" src="/cdn-cgi/scripts/5c5dd728/cloudflare-static/email-decode.min.js"></script><script>document.write(new Date().getFullYear());</script> All Rights Reserved | Campus Recruitment Management System
</p>
</div>
</div>
</div>
</footer>
<script src="{% static "campus/js/jquery-3.3.1.min.js" %}"></script>
<script src="{% static "campus/js/jquery-migrate-3.0.1.min.js" %}"></script>
<script src="{% static "campus/js/jquery-ui.js" %}"></script>
<script src="{% static "campus/js/popper.min.js" %}"></script>
<script src="{% static "campus/js/bootstrap.min.js" %}"></script>
<script src="{% static "campus/js/owl.carousel.min.js" %}"></script>
<script src="{% static "campus/js/jquery.stellar.min.js" %}"></script>
<script src="{% static "campus/js/jquery.countdown.min.js" %}"></script>
<script src="{% static "campus/js/jquery.magnific-popup.min.js" %}"></script>
<script src="{% static "campus/js/bootstrap-datepicker.min.js" %}"></script>
<script src="{% static "campus/js/aos.js" %}"></script>
<script src="{% static "campus/js/mediaelement-and-player.min.js" %}"></script>
<script src="{% static "campus/js/main.js" %}"></script>
</body>
</html>
- Create template for the posted vacancies table
In this section, we will learn on how create a templates for the posted vacancies. To start with, add the following code in your viewpos.html under the folder of campus/templates/campus.
<!DOCTYPE html>
{%extends "campus/base.html"%}

{%block body_block%}
    <div class="container-fluid">

          <div class="row">
              <div class="col-md-6 mx-auto text-center mb-5 section-heading">

                <br><br>
                <h2>Posted Vacancies</h2>
              </div>
            </div>
          </div>
          <div class="container">
          <div class="jumbotron">
              <form method="post">
                  {% csrf_token %}
                 <table border="1px" style="text-align: center;border-collapse: collapse;background-color:blue;" width="100%"   >
                     <tr >
                         <th style="font-size:1.5rem;color: white">job id</th>
                         <th style="font-size:1.5rem;color: white">Designation</th>
                         <th style="font-size:1.5rem;color: white">Salary</th>
                         <th style="font-size:1.5rem;color: white">Bond_years</th>
                         <th style="font-size:1.5rem;color: white">IT</th>
                         <th style="font-size:1.5rem;color: white">Mech</th>
                         <th style="font-size:1.5rem;color: white">Civil</th>
                         <th style="font-size:1.5rem;color: white">Ece</th>
                         <th style="font-size:1.5rem;color: white">EEE</th>
                         <th style="font-size:1.5rem;color: white">CSE</th>
                         <th style="font-size:1.5rem;color: white">Chemical</th>


                     </tr>
                     {%  for i in y %}
                     <tr>
                     <td>{{ i.job_id }}</td>
                     <td>{{ i.designation }}</td>
                     <td>{{ i.salary }}</td>
                     <td>{{ i.bond_years }}</td>
                     <td>{{ i.information_technology }}</td>
                     <td>{{ i.mech }}</td>
                     <td>{{ i.civil }}</td>
                     <td>{{ i.ece }}</td>
                     <td>{{ i.eee }}</td>
                     <td>{{ i.cse }}</td>
                     <td>{{ i.chemical }}</td>
                     </tr>
                     {% endfor %}
                 </table>
                  </form>
              </div>
          </div>


      </div>


{%endblock%}
Downloadable Source Code Below.
Anyway, if you want to level up your programming knowledge, especially python, try this new article I’ve made for you Best Python Projects with source code for Beginners.
But If you’re going to focus on web development using Django, you can download here from our list of Best Django Projects with source code based on real-world projects.
How To Run The Campus Recruitment Management System in Django?
- Step 1: Extract/unzip the file
- Step 2: Go inside the project folder, open cmd and type the following commands to install Django Framework and run the webserver:
- python manage.py migrate
- python manage.py runserver
- Step 3: Finally, open the browser and go to http://127.0.0.1:8000/
Summary
In summary, the Campus Recruitment Management System in Django with Source Code can be useful to students or professional who wants to learn python programming language.
This project can also be modified to fit your personal requirements. Hope this project will help you to improve your skills. Happy Coding!
Inquiries
If you have any questions or suggestions about Campus Recruitment Management System in Django with Source Code, please feel free to leave a comment below.


I need a complete working this project plz
sir,
do we need to create any database for this project
yes
please help me update profile and apply job is not working index out of range is showing please help me . I have to submit this in my college.
same problem can u help me
What is the Error?