
A Progress Bar In PHP is a graphical control element that shows how far along a long computer process, like a download, file transfer, or installation, Sometimes the picture is accompanied by text that shows the progress as a percentage.
About The Project
The Progress Bar was developed using PHP, HTML, CSS, jQuery, AJAX and JavaScript. This Dynamic Progress Bar In PHP is use when we are uploading any file type in our system or websites.
In File Upload With Progress Bar In PHP we are going to make File Upload Progress Bar In PHP Example. In the example below, we have file input field and progress bar.
During the Upload With Progress Bar PHP, we are going to show the progress bar if it is done already. And, also, we have to use the jQuery and AJAX function to do this functionally.
In this tutorial you will learn on How To Make Progress Bar in an easy way and a short period of time. and also this tutorial is easy to understand the codes and process that are good for the beginners or the students.
So, lets start the tutorial..
To start executing this Simple Project makes sure that you have sublime or any platform of PHP and MySQL installed in your computer.
Project Information’s
| Project Name: | Dynamic Progress Bar In PHP With Source Code |
| Language/s Used: | PHP |
| PHP version (Recommended): | 5.6.3, 7.4.12 |
| Database: | MySQL |
| Type: | Website, Web Application |
| Developer: | IT SOURCECODE |
| Updates: | 0 |
Steps On How To Create The Progress Bar In PHP With Source Code
Time needed: 5 minutes
These are the steps on how to create Progress Bar In PHP With Source Code.
- Create folder.
First, create a folder from your “xampp” folder under “htdocs” folder and name it.

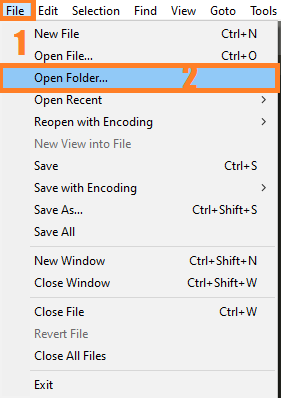
- Open folder.
Second, open “sublime text” and open the project folder you’ve created.
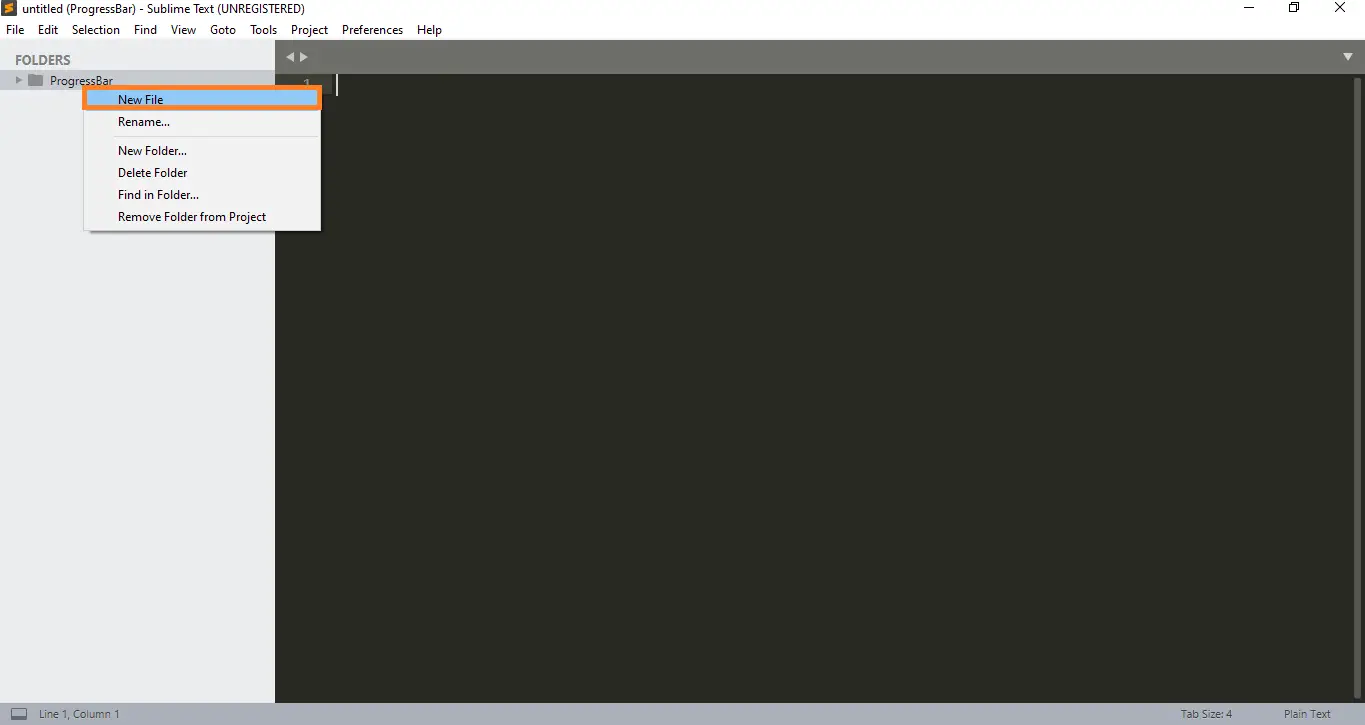
- Create a php file.
Third, create the php file under your project folder and name it into “index.php“.
- Paste the code given below.
Final, paste all the codes or the complete source code given below into your php file.
How To Create A Progress Bar In PHP?
HTML Form
– The code given below which is the html form of this simple project, you can also copy the codes given below and paste it into your file.
<center>
<form style="background-color: #B4FD0B" id="upload_container" action="upload.php" method="post">
<div>
<label>Upload Image File:</label>
<input name="userImage" id="userImage" type="file" class="demoInputBox" />
</div>
<br />
<div><input type="submit" id="btnSubmit" value="Submit" class="btnSubmit" /></div>
<div id="progress-div"><div id="progress-bar"></div></div>
<div id="targetLayer"></div>
</form>
<div id="loader-icon" style="display:none;"><img src="loading.gif" /></div>
</center>
jQuery Script
– The code given below which is the jQuery Script of this simple project, you can also copy the codes given below and paste it into your file.
<script src="js/code_js.js" type="text/javascript"></script>

<script src="js/code_js1.js" type="text/javascript"></script>

<script type="text/javascript">
$(document).ready(function() {
	 $('#upload_container').submit(function(e) {
		if($('#userImage').val()) {
			e.preventDefault();
			$('#loader-icon').show();
			$(this).ajaxSubmit({
				target:   '#targetLayer',
				beforeSubmit: function() {
				  $("#progress-bar").width('0%');
				},
				uploadProgress: function (event, position, total, percentComplete){
					$("#progress-bar").width(percentComplete + '%');
					$("#progress-bar").html('<div id="progress-status">' + percentComplete +' %</div>')
				},
				success:function (){
					$('#loader-icon').hide();
				},
				resetForm: true
			});
			return false;
		}
	});
});
</script>
CSS Style
– The code given below which is the CSS design of this simple project, you can also copy the codes given below and paste it into your file.
<style type="text/css">
#upload_container {
	border-top:#F0F0F0 2px solid;
	background:#FAF8F8;
	padding:10px;
	width:600px;
}
#upload_container label {
	margin:2px;
	font-size:1em;
	font-weight:bold;
	}
.demoInputBox {
	padding:5px;
	border:#F0F0F0 1px solid;
	border-radius:4px;
	background-color:#FFF;
	}
#progress-bar {
	background-color: skyblue;
	height:20px;color: #FFFFFF;
	width:0%;
	-webkit-transition: width .3s;
	-moz-transition: width .3s;
	transition: width .3s;
	}
.btnSubmit {
	background-color:azure;
	padding:10px 40px;
	color:blue;
	border:skyblue 1px solid;
	border-radius:4px;
	}
#progress-div {
	border:blue 2px solid;
	padding: 5px 0px;
	margin:30px 0px;
	border-radius:4px;
	text-align:center;
	}
#targetLayer {
	width:100%;
	text-align:center;
	}
#targetLayer img {
	border:red 2px solid;
	padding:8px;
	border-radius:8px;
	}

</style>
Progress Bar Complete Source Code
<!DOCTYPE html>

<html>

<head>

<title>
	File Upload With Progress Bar Using PHP
</title>

<style type="text/css">
#upload_container {
	border-top:#F0F0F0 2px solid;
	background:#FAF8F8;
	padding:10px;
	width:600px;
}
#upload_container label {
	margin:2px;
	font-size:1em;
	font-weight:bold;
	}
.demoInputBox {
	padding:5px;
	border:#F0F0F0 1px solid;
	border-radius:4px;
	background-color:#FFF;
	}
#progress-bar {
	background-color: skyblue;
	height:20px;color: #FFFFFF;
	width:0%;
	-webkit-transition: width .3s;
	-moz-transition: width .3s;
	transition: width .3s;
	}
.btnSubmit {
	background-color:azure;
	padding:10px 40px;
	color:blue;
	border:skyblue 1px solid;
	border-radius:4px;
	}
#progress-div {
	border:blue 2px solid;
	padding: 5px 0px;
	margin:30px 0px;
	border-radius:4px;
	text-align:center;
	}
#targetLayer {
	width:100%;
	text-align:center;
	}
#targetLayer img {
	border:red 2px solid;
	padding:8px;
	border-radius:8px;
	}

</style>

<script src="js/code_js.js" type="text/javascript"></script>

<script src="js/code_js1.js" type="text/javascript"></script>

<script type="text/javascript">
$(document).ready(function() {
	 $('#upload_container').submit(function(e) {
		if($('#userImage').val()) {
			e.preventDefault();
			$('#loader-icon').show();
			$(this).ajaxSubmit({
				target:   '#targetLayer',
				beforeSubmit: function() {
				  $("#progress-bar").width('0%');
				},
				uploadProgress: function (event, position, total, percentComplete){
					$("#progress-bar").width(percentComplete + '%');
					$("#progress-bar").html('<div id="progress-status">' + percentComplete +' %</div>')
				},
				success:function (){
					$('#loader-icon').hide();
				},
				resetForm: true
			});
			return false;
		}
	});
});
</script>

</head>

<body>

<center>
<form style="background-color: #B4FD0B" id="upload_container" action="upload.php" method="post">
<div>
<label>Upload Image File:</label>
<input name="userImage" id="userImage" type="file" class="demoInputBox" />
</div>
<br />
<div><input type="submit" id="btnSubmit" value="Submit" class="btnSubmit" /></div>
<div id="progress-div"><div id="progress-bar"></div></div>
<div id="targetLayer"></div>
</form>
<div id="loader-icon" style="display:none;"><img src="loading.gif" /></div>
</center>

</body>

</html>
Download Source Code below
Anyway, if you want to level up your programming knowledge, especially PHP, try this new article I’ve made for you Best PHP Projects With Source Code Free Download 2021.
Summary
This Simple Project With Source Code was developed using PHP, HTML, CSS, jQuery, AJAX and JavaScript. In this tutorial you will learn on How To Make Progress Bar in an easy way and a short period of time. and also this tutorial is easy to understand the codes and process that are good for the beginners or the students.
Inquiries
If you have any questions or suggestions about Progress Bar In PHP With Source Code , please feel free to leave a comment below.
you forgot the php file
what do you mean forgot the php file?