This Natural Disaster Management System Project in Django created based on python, Django, and SQLITE3 Database.
A disaster management system (DMS) is a database that collects and reports data about natural disasters.
In the event of a natural disaster, residents in the affected region can report the incidence.
This occurrence can be recorded in a database and reported to government officials so that proper accident prevention measures can be taken.
A Natural Disaster Management System in Django is an easy project for beginners to learn how to build a web-based python Django project.
We will provide you with the complete source code and database for the python project so that you can easily install it on your machine and learn how to program in Python Django.
To start creating a Natural Disaster Management System Project in Python Django, makes sure that you have PyCharm Professional IDE Installed in your computer.
This Natural Disaster Management System in Django Framework, Also includes a Download Source Code for free, just find the downloadable source code below and click download now.
| About Project | Project Details |
|---|---|
| Project Name | Natural Disaster Management System in Django |
| Python version (Recommended) | 3.8 Version |
| Programming Language Used | Python Django Language |
| Developer Name | itsourcecode.com |
| IDE Tool (Recommended) | Sublime, Visual Studio, PyCharm |
| Project Type | Web Application |
| Database | SQLite |
Admin Features
- Login Page – The page where the system administrator enters their system credentials in order to gain access to the system’s administrative side.
- New Earthquake Page-This is the page where an administrator can add a new earthquake.
- Earthquake List– The page with a list of earthquake that can be navigated to change or delete a earthquake.
- New Tsunami– The page to which an administrator can add new tsunami.
- Tsunami List– The page on which the list of tsunami can be viewed, modified, or deleted.
- New Volcanic Eruptions – The page to which an administrator can add new volcanic eruptions.
- Volcanic Eruptions List– The page on which the list of volcanic eruptions can be viewed, modified, or deleted.
- New User Page – The page where a new admin credentials are created by an admin.
- Users list – This is the page that lists and manages the added users.
Natural Disaster Management System in Django Steps on How to Create a Project
Time needed: 5 minutes
Here’s the step’s on how to create a Natural Disaster Management System Project in Django with Source Code.
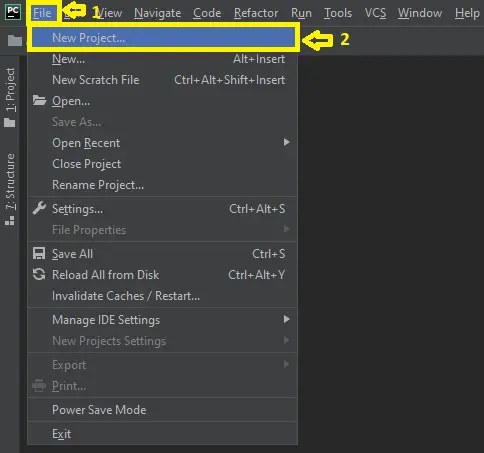
- Step 1: Open file.
First , open “pycharm professional” after that click “file” and click “new project“.
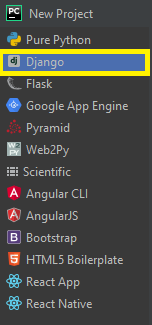
- Step 2: Choose Django.
Next, after click “new project“, choose “Django” and click.
- Step 3: Select file location.
Then, select a file location wherever you want.

- Step 4: Create application name.
After that, name your application.

- Step 5: Click create.
Lastly, finish creating project by clicking “create” button.

- Step 6: Start Coding.
Finally, we will now start adding functionality to our Django Framework by adding some functional codes.
Functionality and Codes
- Create template for the earthquake page
In this section, we will learn on how create a templates for the earthquake page. To start with, add the following code in your quake.html under the folder of /templates/.
<!DOCTYPE html>
<html lang="en">
<title>Home - Natural Disasters Database</title>
<meta charset="UTF-8">
<meta name="viewport" content="width=device-width, initial-scale=1">
<link rel="stylesheet" href="https://www.w3schools.com/w3css/4/w3.css">
<link rel="stylesheet" href="https://fonts.googleapis.com/css?family=Lato">
<link rel="stylesheet" href="https://fonts.googleapis.com/css?family=Montserrat">
<link rel="stylesheet" href="https://cdnjs.cloudflare.com/ajax/libs/font-awesome/4.7.0/css/font-awesome.min.css">
<style>
body,h1,h2,h3,h4,h5,h6 {font-family: "Lato", sans-serif}
.w3-bar,h1,button {font-family: "Montserrat", sans-serif}
.fa-anchor,.fa-coffee {font-size:200px}
</style>
<body>

<!-- Navbar -->
<div class="w3-top">
  <div class="w3-bar w3-black w3-card w3-left-align w3-large">
    <a class="w3-bar-item w3-button w3-hide-medium w3-hide-large w3-right w3-padding-large w3-hover-white w3-large w3-red" href="javascript:void(0);" onclick="myFunction()" title="Toggle Navigation Menu"><i class="fa fa-bars"></i></a>
    <a href="{% url 'home' %}" class="w3-bar-item w3-button w3-hide-small w3-padding-large w3-hover-white">Home</a>
    <a class="w3-bar-item w3-button w3-padding-large w3-white">Earthquake</a>
    <a href="{%url 'tsunami'%}" class="w3-bar-item w3-button w3-hide-small w3-padding-large w3-hover-white">Tsunami</a>
    <a href="{%url 'tornado'%}" class="w3-bar-item w3-button w3-hide-small w3-padding-large w3-hover-white">Tornado</a>
    <a href="{%url 'volcano'%}" class="w3-bar-item w3-button w3-hide-small w3-padding-large w3-hover-white">Volcanic Activity</a>
  </div>

  <!-- Navbar on small screens -->
  <div id="navDemo" class="w3-bar-block w3-white w3-hide w3-hide-large w3-hide-medium w3-large">
    <a href="#" class="w3-bar-item w3-button w3-padding-large">Earthquake</a>
    <a href="#" class="w3-bar-item w3-button w3-padding-large">Tsunami</a>
    <a href="#" class="w3-bar-item w3-button w3-padding-large">Tornado</a>
    <a href="#" class="w3-bar-item w3-button w3-padding-large">Volcanic Activity</a>
  </div>
</div>

<!-- Header -->
<header class="w3-container w3-grey w3-center" style="padding:128px 16px">
  <h1 class="w3-margin w3-jumbo">Earthquakes</h1>
  <p class="w3-xlarge">Natural Disasters Database</p>
</header>
<div class="w3-container">
  <h2>Earthquakes</h2>
  <table class="w3-table-all">
    <tr>
      <th>Earthquake_id</th>
      <th>Intensity</th>
      <th>Date</th>
      <th>Country</th>
      <th>Place</th>
      <th>Latitude</th>
      <th>Longitude</th>
    {% for quake in all_quakes %}
      <tr>
        <td>{{quake.earthquake_id}}</td>
        <td>{{quake.intensity}}</td>
        <td>{{quake.date}}</td>
        <td>{{quake.country}}</td>
        <td>{{quake.place}}</td>
        <td>{{quake.latitude}}</td>
        <td>{{quake.longitude}}</td>
      </tr>
    {% endfor %}

  </table>
</div>

<div class="w3-container">
  <h2>Damage caused by the quakes</h2>
  <table class="w3-table-all">
    <tr>
      <th>Earthquake_id</th>
      <th>Amount (in million)</th>
      <th>Deaths (in thousands)</th>
      <th>House_destroyed (in thousands)</th>
    </tr>
    {% for d in damage %}
      <tr>
        <td>{{d.earthquake_id}}</td>
        <td>{{d.amount}}</td>
        <td>{{d.deaths}}</td>
        <td>{{d.house_destroyed}}</td>
      </tr>
    {% endfor %}

  </table>
</div>

<div class="w3-container w3-black w3-center w3-opacity w3-padding-50">
    <h1 class="w3-margin w3-xlarge">Thanks for visiting the website</h1>
</div>

<!-- Footer -->
<footer class="w3-container w3-padding-40 w3-center w3-opacity">
  <div class="w3-xlarge w3-padding-20">
    <h1>A Database project </h1>
</footer>

<script>
// Used to toggle the menu on small screens when clicking on the menu button
function myFunction() {
  var x = document.getElementById("navDemo");
  if (x.className.indexOf("w3-show") == -1) {
    x.className += " w3-show";
  } else {
    x.className = x.className.replace(" w3-show", "");
  }
}
</script>

</body>
</html>
Downloadable Source Code Below.
Anyway, if you want to level up your programming knowledge, especially python, try this new article I’ve made for you Best Python Projects with source code for Beginners. But If you’re going to focus on web development using Django, you can download here from our list of Best Django Projects with source code based on real-world projects.
How To Run The Natural Disaster Management System in Django?
- Step 1: Extract/unzip the file
- Step 2: Go inside the project folder, open cmd and type the following commands to install Django Framework and run the webserver:
- pip install -r requirements.txt
- python manage.py migrate
- python manage.py runserver
- Step 3: Finally, open the browser and go to http://127.0.0.1:8000/
Summary
In summary, this Natural Disaster Management System in Django with Source Code can be useful to students or professional who wants to learn python programming language. This project can also be modified to fit your personal requirements. Hope this project will help you to improve your skills. Happy Coding!
- How To Make A Point Of Sale System In Python
- Best Python Projects for Beginners
- Python MySQL Connection: Simple Python Step by Step Guide
- Python PIP Command Set-up / Fix: Step by Step Guide
- Random Password Generator in Python Projects With Source Code
- Python Range Function|Range in Python Explained with Examples
- School Management System Project In Django With Source Code
- Django Login And Registration With Source Code
- CRUD App In Django With Source Code
- Drag And Drop JavaScript With Source Code
- Todo List App Django With Source Code
Inquiries
If you have any questions or suggestions about Natural Disaster Management System in Django with Source Code, please feel free to leave a comment below.
This instruction is unclear and does not work:
+++++++++
How To Run The Natural Disaster Management System in Django?
Step 1: Extract/unzip the file
Step 2: Go inside the project folder, open cmd and type the following commands to install Django Framework and run the webserver:
pip install -r requirements.txt
python manage.py migrate
python manage.py runserver
Step 3: Finally, open the browser and go to http://127.0.0.1:8000/
++++++++++
Please create a step by step screenshot so beginner can understand and execute