This Airport Management System in Django created based on python, Django, and MYSQL Database.
The Airport Management System is a simple project to facilitate Regular operation of an Airline Company and Deals with basic CRUD operation related to Adding/Updating Flights, Changing their Routes and their Live Status.
An Airport Management System in Django is an easy project for beginners to learn how to build a web-based python Django project.
We will provide you with the complete source code and database for the python project so that you can easily install it on your machine and learn how to program in Python Django.
To start creating a Airport Management System in Python Django, makes sure that you have PyCharm Professional IDE Installed in your computer.
This Airport Management System in Django Framework, Also includes a Download Source Code for free, just find the downloadable source code below and click download now.
Admin Feature
- Dashboard – For the admin dashboard, you will be able to all the basic access in the whole system. Such as live and schedule
- Create Schedule – This is the page where the admin can add schedule flight information.
- Update Schedule– The page where the admin can update schedule flight information.
- View Schedule – The page where the admin can view all schedule flight added.
- Manage Live Flight– The admin can manage the live flight such as live flight status and live passenger.
- Login and Logout – By default one of the security features of this system is the secure login and logout system.
| About Project | Project Details |
|---|---|
| Project Name | Airport Management System Project in Django |
| Python version (Recommended) | 3.8 Version |
| Programming Language Used | Python Django Language |
| Developer Name | itsourcecode.com |
| IDE Tool (Recommended) | Sublime, Visual Studio, PyCharm |
| Project Type | Web Application |
| Database | SQLite |
Airport Management System in Django Steps on How to Create a Project
Time needed: 5 minutes
Here’s the step’s on how to create a Airport Management System in Django with Source Code.
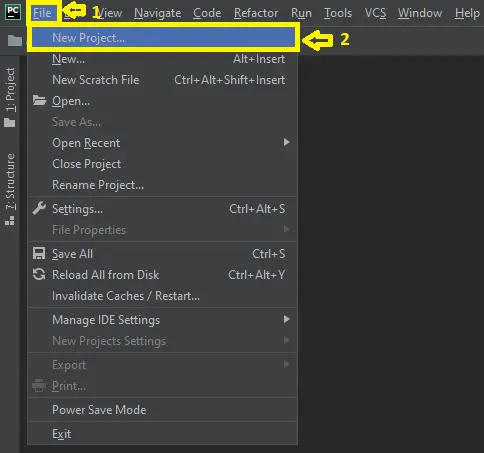
- Step 1: Open file.
First , open “pycharm professional” after that click “file” and click “new project“.
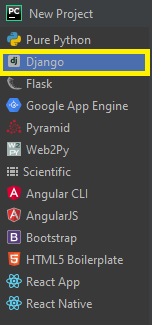
- Step 2: Choose Django.
Next, after click “new project“, choose “Django” and click.
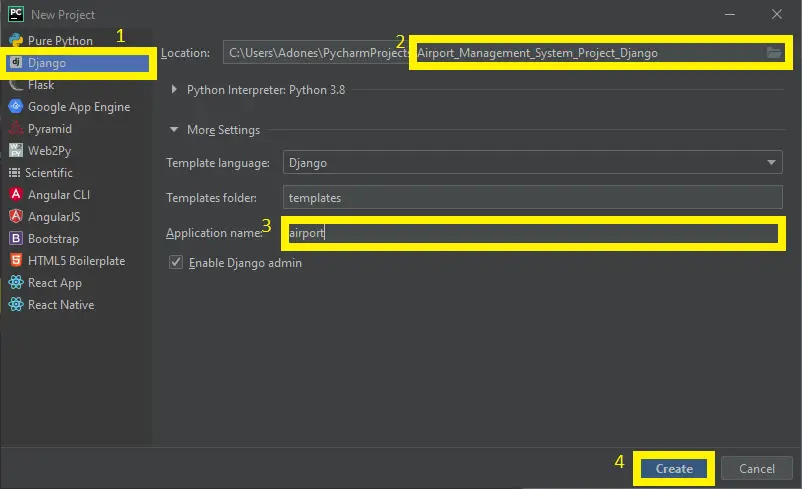
- Step 3: Select file location.
Then, select a file location wherever you want.

- Step 4: Create application name.
After that, name your application.

- Step 5: Click create.
Lastly, finish creating project by clicking “create” button.
- Step 6: Start Coding.
Finally, we will now start adding functionality to our Django Framework by adding some functional codes.
Functionality and Codes
- Create template for the schedule form
In this section, we will learn on how create a templates for the schedule form. To start with, add the following code in your createschedule.html under the folder of /templates/.
<!--
To change this template, choose Tools | Templates
and open the template in the editor.
-->
<!DOCTYPE html>
<html>
    <head>
        <title>The Airport | Create Schedule</title>
    <h2>Enter Flight details to create Schedule.</h2>
        <meta http-equiv="Content-Type" content="text/html; charset=UTF-8">
	<SCRIPT language="javascript">
	var x=0;
	var y=1;
	var p="s";
	function add() {

		x=x+y;
	    var element = document.createElement("input");
		element.setAttribute("type", "text");
		element.setAttribute("placeholder","NEW");
		element.setAttribute("name", "s"+x);
        var para= document.createElement("P");
        var t = document.createTextNode("Stop "+x+"");
		para.appendChild(t);
        var foo = document.getElementById("fooBar");
		foo.appendChild(para);
        foo.appendChild(element);

		var element1 = document.createElement("input");
		element1.setAttribute("type", "Time");
		element1.setAttribute("name", "a"+x);
        var para1= document.createElement("P");
        var t1 = document.createTextNode("Arrival "+x+"");
		para1.appendChild(t1);
        var foo = document.getElementById("fooBar");
		foo.appendChild(para1);
        foo.appendChild(element1);

        var element2 = document.createElement("input");
		element2.setAttribute("type", "Time");
		element2.setAttribute("name", "d"+x);
        var para2= document.createElement("P");
        var t2 = document.createTextNode("Departure "+x+"");
		para2.appendChild(t2);
        var foo = document.getElementById("fooBar");
		foo.appendChild(para2);
        foo.appendChild(element2);
        var c=document.getElementById("count");
        c.setAttribute("value",x);
		}
	</SCRIPT>
    </head>
    <body>
        <form>{% csrf_token %}

          <a href="/live/" class="btn btn-danger"><input type="button" name="live" value="Live"></a>
          <a href="/schedule/" class="btn btn-success"><input type="button" name="schedule" value="Schedule"></a>
          <a href="/airport/" class="btn btn-primary"><input type="button" name="airport" value="Airport"></a>
          <a href="/login/logout/" class="btn btn-warning"><input type="button" name="logout" value="Logout"></a>
    </form>
        <form action="createschedule.html" method="Post">{% csrf_token %}
            *Flight ID:<input type="text" name="flightid" required><br><br>

            <!--Date: <input type="Date" name="departuredate"><br><br>-->

            <input type="checkbox" name="sunday" value="sunday" >Sunday<br>
			<input type="checkbox" name="monday" value="monday">Monday<br>
			<input type="checkbox" name="tuesday" value="tuesday">Tuesday<br>
			<input type="checkbox" name="wednesday" value="wednesday">Wednesday<br>
			<input type="checkbox" name="thursday" value="thursday">Thursday<br>
			<input type="checkbox" name="friday" value="friday">Friday<br>
		    <input type="checkbox" name="saturday" value="saturday">Saturday<br><br>
            *Source City:<input type="text" name="source" required><br>
            *Destination City:<input type="text" name="destination" required><br><br>

            *Departure Time: <input type="Time" name="departures" required>
            *Arrival Time: <input type="Time" name="arrivald" required><br><br>

            <input type="button" value="Add Intermediate" onclick="add()"><br><br>
			<span id="fooBar"></span>
            <input type="hidden" name="count" value="0" id="count"/>
			<br><input type="submit" class="btn btn-success" value="Create Schedule">
        </form>
    </body>
</html>
- Create template for the update flight form
In this section, we will learn on how create a templates for the update flight form. To start with, add the following code in your flightupdate.html under the folder of /templates/.
<!DOCTYPE html>
<html>
    <head>
        <title>The Airport | Update Status</title>
    <h2> Enter the details for Updating Status</h2>
        <meta charset="UTF-8">
        <meta name="viewport" content="width=device-width, initial-scale=1.0">
    </head>
    <body>
        <form>{% csrf_token %}

          <a href="/live/"><input type="button" name="live" value="Live"></a>
          <a href="/schedule/"><input type="button" name="schedule" value="Schedule"></a>
          <a href="/airport/"><input type="button" name="airport" value="Airport"></a>
          <a href="/login/logout/"><input type="button" name="logout" value="Logout"></a>
    </form>
        <form action="flightupdate" method="post">{% csrf_token %}
            *Flight ID: <input type="text" name="flightid" required><br><br>

            *Current City: <input type="text" name="station" required><br><br>

            <input type="radio" name="ardep" value="arrived">Arrival<br>
            <input type="radio" name="ardep" value="departed">Departure<br>

            <input type="submit" value="Update Status">
        </form>
    </body>
</html>
- Create template for the delete flight form
In this section, we will learn on how create a templates for the delete flight form. To start with, add the following code in your removeflight.html under the folder of /templates/.
<!DOCTYPE html>
<html>
    <head>
        <title>The Airport | Search by ID</title>
    <h2>Enter Flight details to View Schedule.</h2>
        <meta http-equiv="Content-Type" content="text/html; charset=UTF-8">
    </head>
    <body>
        <form>{% csrf_token %}

          <a href="/live/"><input type="button" name="live" value="Live"></a>
          <a href="/schedule/"><input type="button" name="schedule" value="Schedule"></a>
          <a href="/airport/"><input type="button" name="airport" value="Airport"></a>
          <a href="/login/logout/"><input type="button" name="logout" value="Logout"></a>
    </form>
        <form action="remove.html" method="Post">{% csrf_token %}
       *Flight ID: <input type="text" name="flightid" required><br><br>
       <input type="submit" value="Submit">
            {% if messages %}
			{{messages}}
		{% endif %}
   </form>
    </body>
</html>
Downloadable Source Code Below.
Anyway, if you want to level up your programming knowledge, especially python, try this new article I’ve made for you Best Python Projects with source code for Beginners. But If you’re going to focus on web development using Django, you can download here from our list of Best Django Projects with source code based on real-world projects.
How To Run The Airport Management System in Django?
- Step 1: Extract/unzip the file
- Step 2: Go inside the project folder, open cmd and type the following commands to install Django Framework and run the webserver:
- python manage.py migrate
- python manage.py runserver
- Step 3: Finally, open the browser and go to http://127.0.0.1:8000/
Summary
In summary, this Airport Management System Project in Django with Source Code can be useful to students or professional who wants to learn python programming language. This project can also be modified to fit your personal requirements. Hope this project will help you to improve your skills. Happy Coding!
- How To Make A Point Of Sale System In Python
- Best Python Projects for Beginners
- Python MySQL Connection: Simple Python Step by Step Guide
- Python PIP Command Set-up / Fix: Step by Step Guide
- Random Password Generator in Python Projects With Source Code
- Python Range Function|Range in Python Explained with Examples
- School Management System Project In Django With Source Code
- Django Login And Registration With Source Code
- CRUD App In Django With Source Code
- Drag And Drop JavaScript With Source Code
- Todo List App Django With Source Code
Inquiries
If you have any questions or suggestions about Airport Management System in Django with Source Code, please feel free to leave a comment below.
failing to log in, i don’t know if you can help or point me to resources
What is the error?
not run code
Why is not running? What is the error?