
The Student Attendance Management System Project In Python was developed using Python OpenCV in Real-Time.
This Attendance Management System Project In Python provide a valuable attendance service for both teachers and students.
Reduce manual process errors by provide automated and a reliable attendance system uses face recognition technology.
A Attendance Management System Using Face Recognition Python is a simple python script that recognizes faces and mark attendance for the recognized faces in an excel sheet.
We seek to provide a valuable attendance service for both teachers and students.
Reduce manual process errors by provide automated and a reliable attendance system uses face recognition technology.
Project Information’s
| Project Name: | Student Attendance Management System Project In Python |
| Language/s Used: | Python OpenCV |
| Python version (Recommended): | 2.x or 3.x |
| Database: | None |
| Type: | Machine Learning |
| Developer: | IT SOURCECODE |
| Updates: | 0 |
Features
- Check Camera
- Capture Faces
- Train Faces
- Recognize Faces & Attendance
- Automatic Email
Student Attendance Management System Build With-
- Python 3.9
Module Used –
All The Module are Latest Version.
- OpenCV Contrib 4.0.1
- Pillow
- Numpy
- Pandas
- Shutil
- CSV
- yagmail
Face Recognition Algorithms –
- Haar Cascade
- LBPH (Local Binary Pattern Histogram)
About The Project
This Attendance Management System Using Face Recognition In Python also includes a downloadable Source Code for free, just find the downloadable source code below and click to start downloading.
By the way if you are new to python programming and you don’t know what would be the the Python IDE to use, I have here a list of Best Python IDE for Windows, Linux, Mac OS that will suit for you.
I also have here How to Download and Install Latest Version of Python on Windows.
To start creating a Student Attendance Management System Project In Python, make sure that you have installed Python 3.9 and PyCharm in your computer.
Prerequisites
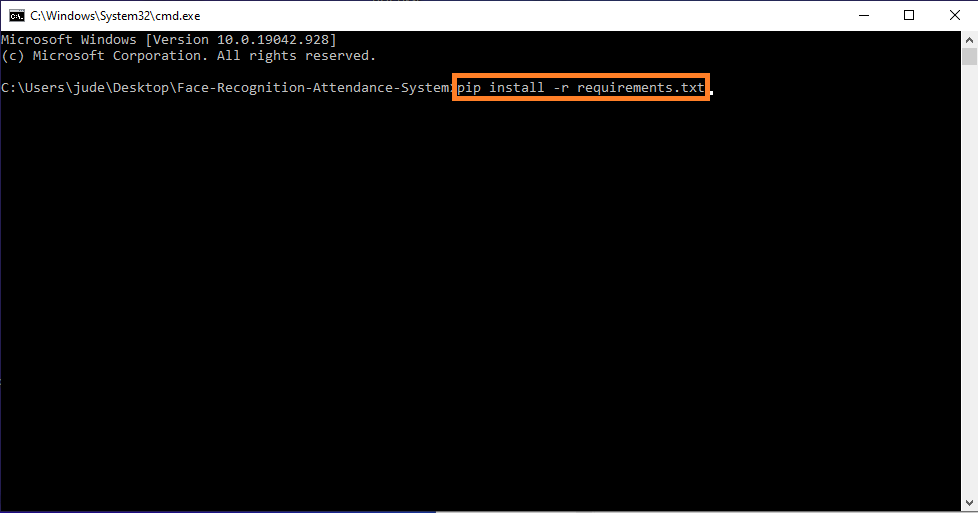
Before starting with this Python project with source code, you should be familiar with the computer vision library of Python that is OpenCV, Pillow, Pandas, Shutil, CSV and Numpy.
OpenCV, Pillow, Pandas, Shutil, CSV and Numpy are the Python packages that are necessary for this project in Python. To install them, simply run this pip command in your terminal:
pip install opencv-python
pip install pillow
pip install pandas
pip install numpy
Student Attendance Management System Project In Python : Steps on how to run the project
Time needed: 5 minutes
These are the steps on how to run Student Attendance Management System Project In Python
- Step 1: Download the given source code below.
First, download the given source code below and unzip the source code.

- Step 2: Import the project to your PyCharm IDE.
Next, import the source code you’ve download to your PyCharm IDE.
- Step 3: Install all the packages.
Next, Install all the requirements required for the system.
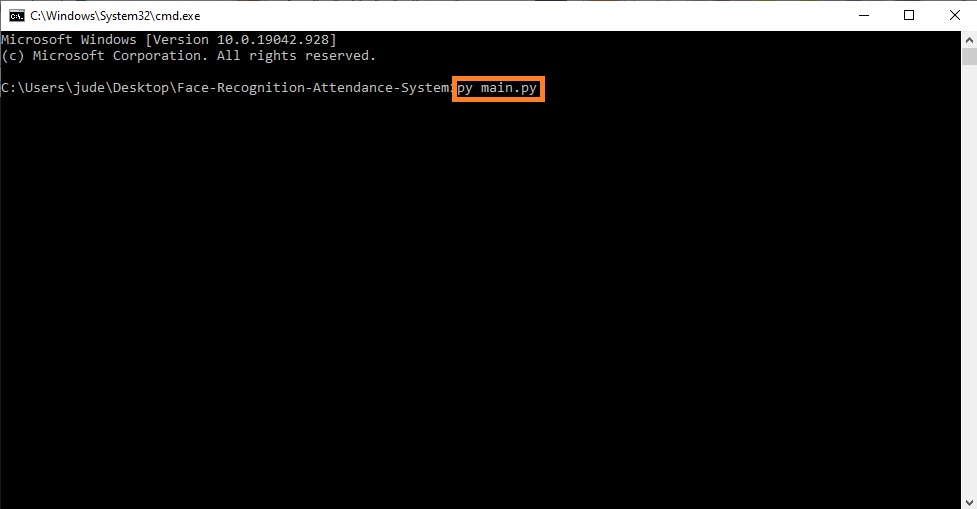
- Step 4: Run the project.
last, run the project with the command “py main.py”
Modules of Student Attendance Management System in Python
1. check_camera.py
def camer():
    import cv2

    # Load the cascade
    face_cascade = cv2.CascadeClassifier('haarcascade_frontalface_default.xml')

    # To capture video from webcam.
    cap = cv2.VideoCapture(0)

    while True:
        # Read the frame
        _, img = cap.read()

        # Convert to grayscale
        gray = cv2.cvtColor(img, cv2.COLOR_BGR2GRAY)

        # Detect the faces
        faces = face_cascade.detectMultiScale(gray, 1.3, 5, minSize=(30, 30),flags = cv2.CASCADE_SCALE_IMAGE)

        # Draw the rectangle around each face
        for (x, y, w, h) in faces:
            cv2.rectangle(img, (x, y), (x + w, y + h), (10,159,255), 2)


        # Display
        cv2.imshow('Webcam Check', img)

        # Stop if escape key is pressed
        if cv2.waitKey(1) & 0xFF == ord('q'):
            break

    # Release the VideoCapture object
    cap.release()
    cv2.destroyAllWindows()
2. Capture_Image.py
import csv

import cv2
import os


# counting the numbers


def is_number(s):
    try:
        float(s)
        return True
    except ValueError:
        pass

    try:
        import unicodedata
        unicodedata.numeric(s)
        return True
    except (TypeError, ValueError):
        pass

    return False


# Take image function

def takeImages():


    Id = input("Enter Your Id: ")
    name = input("Enter Your Name: ")

    if(is_number(Id) and name.isalpha()):
        cam = cv2.VideoCapture(0)
        harcascadePath = "haarcascade_frontalface_default.xml"
        detector = cv2.CascadeClassifier(harcascadePath)
        sampleNum = 0

        while(True):
            ret, img = cam.read()
            gray = cv2.cvtColor(img, cv2.COLOR_BGR2GRAY)
            faces = detector.detectMultiScale(gray, 1.3, 5, minSize=(30,30),flags = cv2.CASCADE_SCALE_IMAGE)
            for(x,y,w,h) in faces:
                cv2.rectangle(img, (x, y), (x+w, y+h), (10, 159, 255), 2)
                #incrementing sample number
                sampleNum = sampleNum+1
                #saving the captured face in the dataset folder TrainingImage
                cv2.imwrite("TrainingImage" + os.sep +name + "."+Id + '.' +
                            str(sampleNum) + ".jpg", gray[y:y+h, x:x+w])
                #display the frame
                cv2.imshow('frame', img)
            #wait for 100 miliseconds
            if cv2.waitKey(100) & 0xFF == ord('q'):
                break
            # break if the sample number is more than 100
            elif sampleNum > 100:
                break
        cam.release()
        cv2.destroyAllWindows()
        res = "Images Saved for ID : " + Id + " Name : " + name
        row = [Id, name]
        with open("StudentDetails"+os.sep+"StudentDetails.csv", 'a+') as csvFile:
            writer = csv.writer(csvFile)
            writer.writerow(row)
        csvFile.close()
    else:
        if(is_number(Id)):
            print("Enter Alphabetical Name")
        if(name.isalpha()):
            print("Enter Numeric ID")
3. Train_Image.py
import os
import time
import cv2
import numpy as np
from PIL import Image
from threading import Thread


# -------------- image labesl ------------------------

def getImagesAndLabels(path):
    # get the path of all the files in the folder
    imagePaths = [os.path.join(path, f) for f in os.listdir(path)]
    # print(imagePaths)

    # create empth face list
    faces = []
    # create empty ID list
    Ids = []
    # now looping through all the image paths and loading the Ids and the images
    for imagePath in imagePaths:
        # loading the image and converting it to gray scale
        pilImage = Image.open(imagePath).convert('L')
        # Now we are converting the PIL image into numpy array
        imageNp = np.array(pilImage, 'uint8')
        # getting the Id from the image
        Id = int(os.path.split(imagePath)[-1].split(".")[1])
        # extract the face from the training image sample
        faces.append(imageNp)
        Ids.append(Id)
    return faces, Ids


# ----------- train images function ---------------
def TrainImages():
    recognizer = cv2.face_LBPHFaceRecognizer.create()
    harcascadePath = "haarcascade_frontalface_default.xml"
    detector = cv2.CascadeClassifier(harcascadePath)
    faces, Id = getImagesAndLabels("TrainingImage")
    Thread(target = recognizer.train(faces, np.array(Id))).start()
    # Below line is optional for a visual counter effect
    Thread(target = counter_img("TrainingImage")).start()
    recognizer.save("TrainingImageLabel"+os.sep+"Trainner.yml")
    print("All Images")

# Optional, adds a counter for images trained (You can remove it)
def counter_img(path):
    imgcounter = 1
    imagePaths = [os.path.join(path, f) for f in os.listdir(path)]
    for imagePath in imagePaths:
        print(str(imgcounter) + " Images Trained", end="\r")
        time.sleep(0.008)
        imgcounter += 1
4. automail.py
import os
import yagmail

receiver = "[email protected]"  # receiver email address
body = "Attendence File"  # email body
filename = "Attendance"+os.sep+"Attendance_2019-08-29_13-09-07.csv"  # attach the file

# mail information
yag = yagmail.SMTP("[email protected]", "your_password")

# sent the mail
yag.send(
    to=receiver,
    subject="Attendance Report",  # email subject
    contents=body,  # email body
    attachments=filename,  # file attached
)
5. Recognize.py
import datetime
import os
import time

import cv2
import pandas as pd


#-------------------------
def recognize_attendence():
    recognizer = cv2.face.LBPHFaceRecognizer_create()  # cv2.createLBPHFaceRecognizer()
    recognizer.read("TrainingImageLabel"+os.sep+"Trainner.yml")
    harcascadePath = "haarcascade_frontalface_default.xml"
    faceCascade = cv2.CascadeClassifier(harcascadePath)
    df = pd.read_csv("StudentDetails"+os.sep+"StudentDetails.csv")
    font = cv2.FONT_HERSHEY_SIMPLEX
    col_names = ['Id', 'Name', 'Date', 'Time']
    attendance = pd.DataFrame(columns=col_names)

    # Initialize and start realtime video capture
    cam = cv2.VideoCapture(0, cv2.CAP_DSHOW)
    cam.set(3, 640)  # set video width
    cam.set(4, 480)  # set video height
    # Define min window size to be recognized as a face
    minW = 0.1 * cam.get(3)
    minH = 0.1 * cam.get(4)

    while True:
        ret, im = cam.read()
        gray = cv2.cvtColor(im, cv2.COLOR_BGR2GRAY)
        faces = faceCascade.detectMultiScale(gray, 1.2, 5,minSize = (int(minW), int(minH)),flags = cv2.CASCADE_SCALE_IMAGE)
        for(x, y, w, h) in faces:
            cv2.rectangle(im, (x, y), (x+w, y+h), (10, 159, 255), 2)
            Id, conf = recognizer.predict(gray[y:y+h, x:x+w])

            if conf < 100:

                aa = df.loc[df['Id'] == Id]['Name'].values
                confstr = "  {0}%".format(round(100 - conf))
                tt = str(Id)+"-"+aa


            else:
                Id = '  Unknown  '
                tt = str(Id)
                confstr = "  {0}%".format(round(100 - conf))

            if (100-conf) > 67:
                ts = time.time()
                date = datetime.datetime.fromtimestamp(ts).strftime('%Y-%m-%d')
                timeStamp = datetime.datetime.fromtimestamp(ts).strftime('%H:%M:%S')
                aa = str(aa)[2:-2]
                attendance.loc[len(attendance)] = [Id, aa, date, timeStamp]

            tt = str(tt)[2:-2]
            if(100-conf) > 67:
                tt = tt + " [Pass]"
                cv2.putText(im, str(tt), (x+5,y-5), font, 1, (255, 255, 255), 2)
            else:
                cv2.putText(im, str(tt), (x + 5, y - 5), font, 1, (255, 255, 255), 2)

            if (100-conf) > 67:
                cv2.putText(im, str(confstr), (x + 5, y + h - 5), font,1, (0, 255, 0),1 )
            elif (100-conf) > 50:
                cv2.putText(im, str(confstr), (x + 5, y + h - 5), font, 1, (0, 255, 255), 1)
            else:
                cv2.putText(im, str(confstr), (x + 5, y + h - 5), font, 1, (0, 0, 255), 1)


        attendance = attendance.drop_duplicates(subset=['Id'], keep='first')
        cv2.imshow('Attendance', im)
        if (cv2.waitKey(1) == ord('q')):
            break
    ts = time.time()
    date = datetime.datetime.fromtimestamp(ts).strftime('%Y-%m-%d')
    timeStamp = datetime.datetime.fromtimestamp(ts).strftime('%H:%M:%S')
    Hour, Minute, Second = timeStamp.split(":")
    fileName = "Attendance"+os.sep+"Attendance_"+date+"_"+Hour+"-"+Minute+"-"+Second+".csv"
    attendance.to_csv(fileName, index=False)
    print("Attendance Successful")
    cam.release()
    cv2.destroyAllWindows()
6. main.py
import os  # accessing the os functions
import check_camera
import Capture_Image
import Train_Image
import Recognize


# creating the title bar function

def title_bar():
    os.system('cls')  # for windows

    # title of the program

    print("\t**********************************************")
    print("\t***** Face Recognition Attendance System *****")
    print("\t**********************************************")


# creating the user main menu function

def mainMenu():
    title_bar()
    print()
    print(10 * "*", "WELCOME MENU", 10 * "*")
    print("[1] Check Camera")
    print("[2] Capture Faces")
    print("[3] Train Images")
    print("[4] Recognize & Attendance")
    print("[5] Auto Mail")
    print("[6] Quit")

    while True:
        try:
            choice = int(input("Enter Choice: "))

            if choice == 1:
                checkCamera()
                break
            elif choice == 2:
                CaptureFaces()
                break
            elif choice == 3:
                Trainimages()
                break
            elif choice == 4:
                RecognizeFaces()
                break
            elif choice == 5:
                os.system("py automail.py")
                break
                mainMenu()
            elif choice == 6:
                print("Thank You")
                break
            else:
                print("Invalid Choice. Enter 1-4")
                mainMenu()
        except ValueError:
            print("Invalid Choice. Enter 1-4\n Try Again")
    exit


# ---------------------------------------------------------
# calling the camera test function from check camera.py file

def checkCamera():
    check_camera.camer()
    key = input("Enter any key to return main menu")
    mainMenu()


# --------------------------------------------------------------
# calling the take image function form capture image.py file

def CaptureFaces():
    Capture_Image.takeImages()
    key = input("Enter any key to return main menu")
    mainMenu()


# -----------------------------------------------------------------
# calling the train images from train_images.py file

def Trainimages():
    Train_Image.TrainImages()
    key = input("Enter any key to return main menu")
    mainMenu()


# --------------------------------------------------------------------
# calling the recognize_attendance from recognize.py file

def RecognizeFaces():
    Recognize.recognize_attendence()
    key = input("Enter any key to return main menu")
    mainMenu()


# ---------------main driver ------------------
mainMenu()
Download Source Code below
Conclusion
Therefore, for this Project In Python Using OpenCV We seek to provide a valuable attendance service for both teachers and students. Reduce manual process errors by provide automated and a reliable attendance system uses face recognition technology.
Inquiries
If you have any questions or suggestions about Real-Time Student Attendance Management System Project In Python, please feel free to leave a comment below.
There is an erroe in the code …..! I am trying to run code but the following error is occurring :
File “C:\Users\Nikhil Desai\OneDrive\Desktop\Face-Recognition-Attendance-System\FRAS\main.py”, line 101, in
mainMenu()
File “C:\Users\Nikhil Desai\OneDrive\Desktop\Face-Recognition-Attendance-System\FRAS\main.py”, line 44, in mainMenu
Trainimages()
File “C:\Users\Nikhil Desai\OneDrive\Desktop\Face-Recognition-Attendance-System\FRAS\main.py”, line 86, in Trainimages
Train_Image.TrainImages()
File “C:\Users\Nikhil Desai\OneDrive\Desktop\Face-Recognition-Attendance-System\FRAS\Train_Image.py”, line 37, in TrainImages
recognizer = cv2.face.LBPHFaceRecognizer_create()
^^^^^^^^
AttributeError: module ‘cv2’ has no attribute ‘face’
Please help me to solve this problem as soon as possible
Copy paste this into the google: AttributeError: module ‘cv2’ has no attribute ‘face’
it will provide you the solution.
how can i implement this in django? is there a solution to convert this python file to django?
You may visit these attendance management system in Django
https://itsourcecode.com/free-projects/python-projects/attendance-management-system-django-with-source-code/
hello sir if you create a detail vedio on this that how if other use this which changes is must to change it and use easy.when I use this I am facing problem many problem.
please can I get a video of it
So far our video is no longer available.