
Medical Store Management System Project in Python with Source Code
The Medical Store Management System Project in Python is created using Python programming language. The Medical Store Management System consists of a Python Script (main.py) and a database file.
This Python project with source code for the Medical Store Management System is primarily based on Tkinter. This system has a graphical user interface applied by using the Python programming language and SQLite3.
This Project System for Medical Store Management has an easy-to-use interface and is built with respected customer service to allow stock maintenance, database access, and electronic documentation for billing purposes.
The program also encourages consumer computing discounts, and frequent revenue, and identifies measures to avoid possible loss of revenue.
This system platform is best for educational purposes or can be used to simplify the manual maintenance process of records and cash flows by a wide range of retail and wholesale outlets. It’s more versatile and saves you time and money.
The Medical Store Management System measures and shows the overall daily sales and also tells the items about the expiry of the coming week.
In this tutorial, I will educate you on how to establish a Medical Store System, this tutorial consists of the downloadable Medical Store Management System Project in Python where in you alter it to fit your requirements.
Before you start to create a Medical Store Management System Project in Python, make sure you have PyCharm IDE installed in your computer.
By the way, if you are new to Python programming and don’t know what Python IDE to use, I have here a list of the Best Python IDE for Windows, Linux, Mac OS that will suit you.
I also have here How to Download and Install Latest Version of Python on Windows.
Medical Store Management System Project in Python Steps on How to Create a Project
Time needed: 5 minutes
Here are the Steps on How to Create a Medical Store Management System Project in Python with Source Code
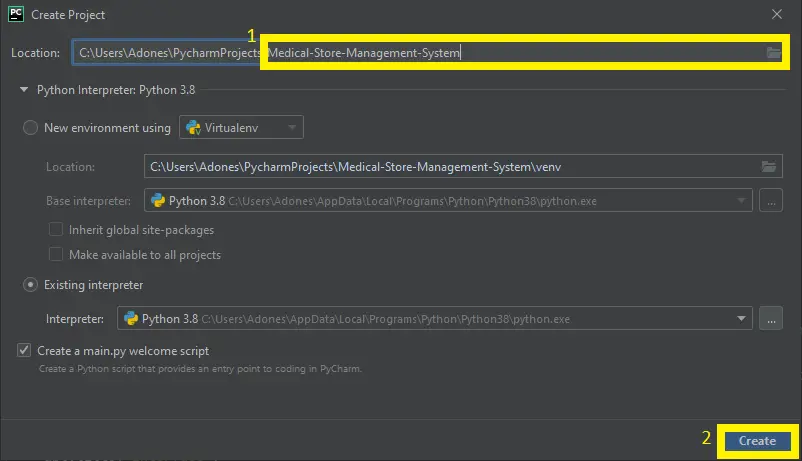
- Step 1: Create a Project Name.
First, open the PyCharm IDE click “File” select “New Project” and then create a project name after that click the “Create” button.
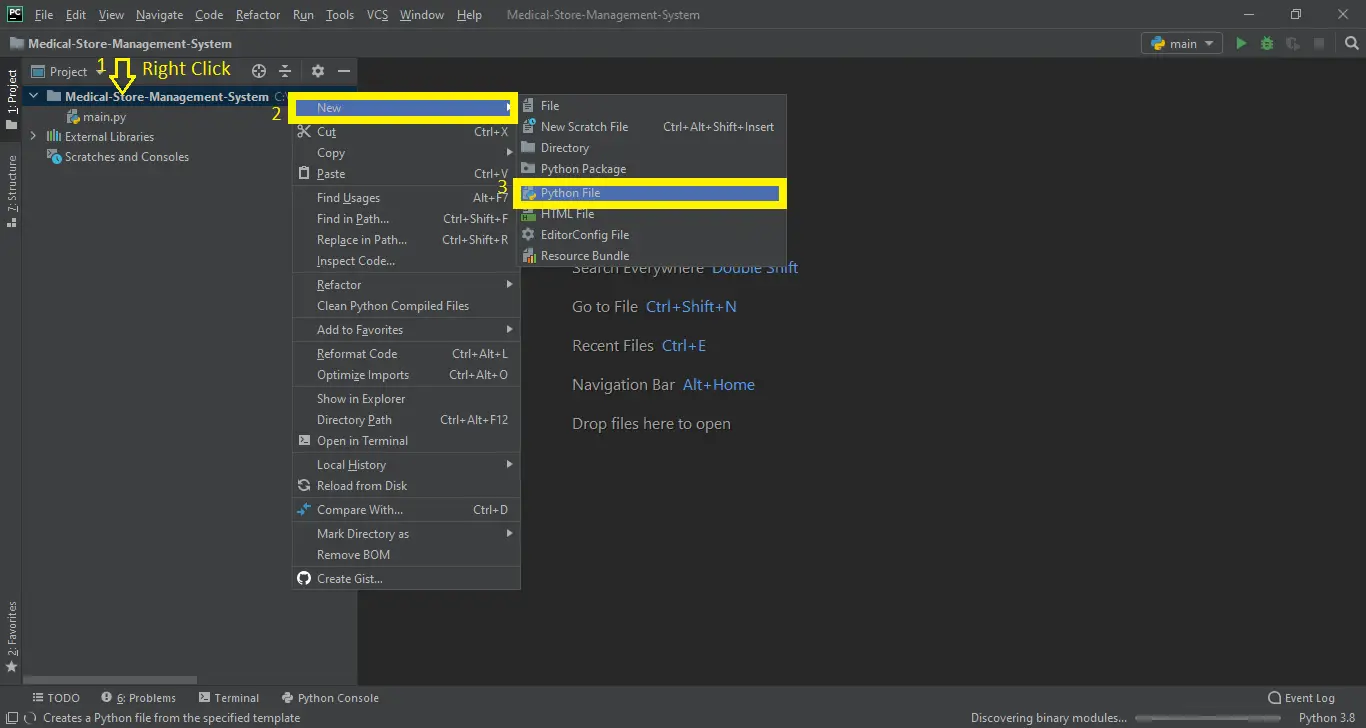
- Step 2: Create a Python File.
Next, after creating a project name, “right” click the project name and the click “New” after that choose “Python File“.
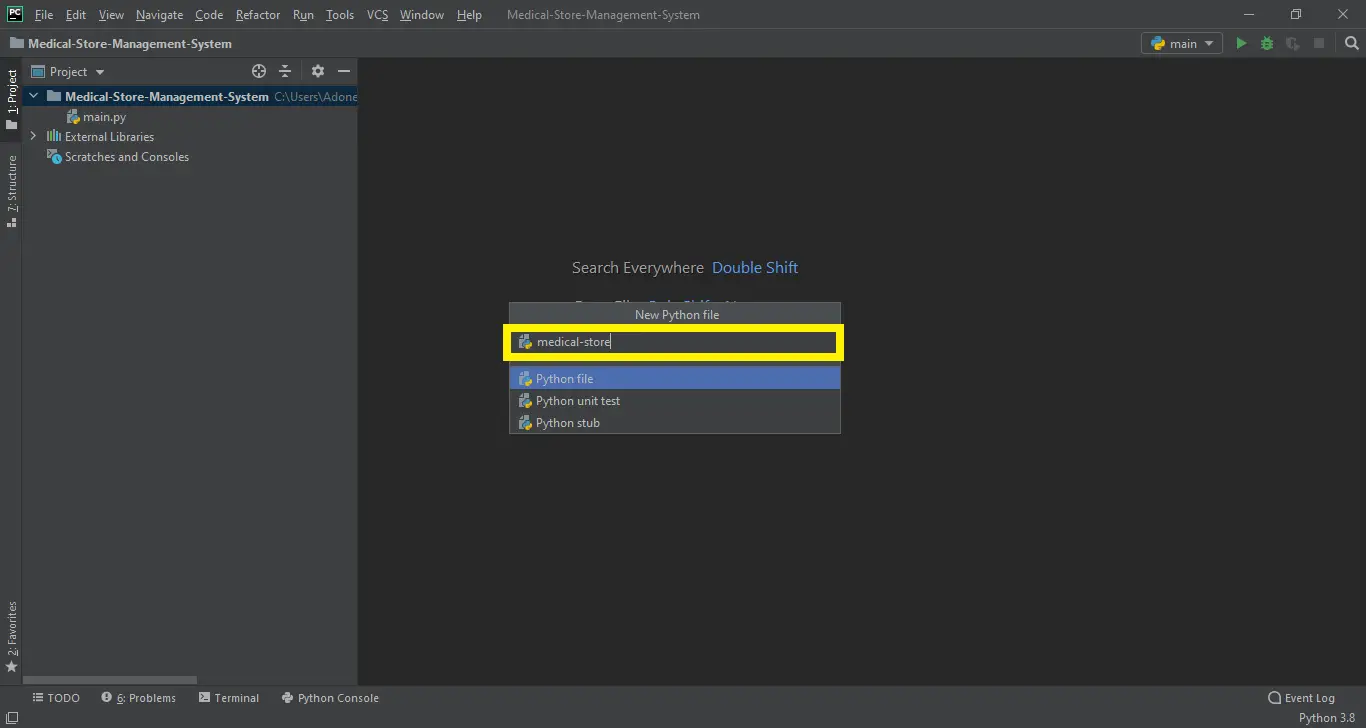
- Step 3: Name the Python File.
Last, choose the Python File name of the file “Medical-Store-Management-System” and then click “Enter“.
- Step 4: The actual code
Finally, you can start coding, you are free to copy the code that being provided below.
Code for the Admin main module in the Medical Store Management System Project in Python
In this module displayed the Admin main module of the system that can control all the modules of the system.
def open_win(): #OPENS MAIN MENU----------------------------------------------------------------------------MAIN MENU
    global apt, flag
    flag='apt'
    apt=Tk()
    apt.title("Interface")
    Label(apt, text="EVANZ MEDICAL STORE COMPANY").grid(row=0,column=0,columnspan=3)
    Label(apt, text='*'*80).grid(row=1,column=0,columnspan=3)
    Label(apt, text='-'*80).grid(row=3,column=0,columnspan=3)

    Label(apt, text="Stock Maintenance",  bg='green', fg='white').grid(row=2,column=0)
    Button(apt,text='New V.C.', width=25, bg='green', fg='white', command=val_cus).grid(row=4,column=0)
    Button(apt,text='Add product to Stock', bg='green', fg='white', width=25,command=stock).grid(row=5,column=0)
    Button(apt,text='Delete product from Stock', bg='red', fg='white', width=25, command=delete_stock).grid(row=6,column=0)


    Label(apt, text="Access Database",  bg='blue', fg='white').grid(row=2,column=1)
    Button(apt,text='Modify',width=15,  bg='blue', fg='white', command=modify).grid(row=4,column=1)
    Button(apt,text='Search', width=15,  bg='blue', fg='white', command=search).grid(row=5,column=1)
    Button(apt,text='Expiry Check',  bg='red', fg='white', width=15, command=exp_date).grid(row=6,column=1)

    Label(apt, text="Handle Cash Flows", bg='skyblue', fg='black').grid(row=2,column=2)
    Button(apt,text="Check Today's Revenue", bg='skyblue', fg='black', width=20,command=show_rev).grid(row=5,column=2)
    Button(apt,text='Billing', width=20, bg='skyblue', fg='black', command=billing).grid(row=4,column=2)
    Button(apt,text='Logout', bg='red', fg='white', width=20, command=again).grid(row=6, column=2)
    apt.mainloop()
Code for the add customer in Medical Store Management System Project in Python.
The code is given below, which is for adding new valued customers.
def val_cus():  #to enter new valued customer-----------------------------------------------------------NEW VALUED CUSTOMER
    global val, flag, dbt, name_vc, add_vc, cur, c, vc_id
    apt.destroy()
    cur.execute("select * from cus")
    flag='val'
    val=Tk()
    Label(val, bg='blue', fg='white',text="****ENTER VALUED CUSTOMER DETAILS****").grid(row=0,column=0,columnspan=3)
    Label(val,text="-"*60).grid(row=1,column=0,columnspan=3)
    Label(val,text="Name: ").grid(row=2,column=0)
    name_vc=Entry(val)
    name_vc.grid(row=2, column=1)
    Label(val,text="Address: ").grid(row=3,column=0)
    add_vc=Entry(val)
    add_vc.grid(row=3, column=1)
    Label(val,text="Value Id: ").grid(row=4,column=0)
    vc_id=Entry(val)
    vc_id.grid(row=4, column=1)
    Button(val,text='Submit',bg='blue', fg='white',command=val_get).grid(row=5, column=1)
    Button(val,text='Main Menu', bg='green', fg='white',command=main_menu).grid(row=5, column=2)
    Label(val,text='-'*60).grid(row=6,column=0,columnspan=3)
    val.mainloop()
Code for the add product in the Medical Store Management System Project in Python.
In the code given below, which is for adding a new product.
def stock():    #add to stock window------------------------------------------------------------------------ADD TO STOCK
    global cur, c, columns, accept, flag, sto, apt
    apt.destroy()
    flag='sto'
    accept=['']*10
    sto=Tk()
    sto.title('STOCK ENTRY')
    Label(sto,text='ENTER NEW PRODUCT DATA TO THE STOCK').grid(row=0,column=0,columnspan=2)
    Label(sto,text='-'*50).grid(row=1,column=0,columnspan=2)
    for i in range(1,len(columns)):
        Label(sto,width=15,text=' '*(14-len(str(columns[i])))+str(columns[i])+':').grid(row=i+2,column=0)
        accept[i]=Entry(sto)
        accept[i].grid(row=i+2, column=1)
    Button(sto,width=15,text='Submit', bg='blue', fg='white',command=submit).grid(row=12,column=1)
    Label(sto,text='-'*165).grid(row=13,column=0,columnspan=7)
    Button(sto,width=15,text='Reset', bg='red', fg='white',command=reset).grid(row=12,column=0)
    Button(sto,width=15,text='Refresh stock',bg='skyblue', fg='black',command=ref).grid(row=12,column=4)
    for i in range(1,6):
        Label(sto,text=columns[i]).grid(row=14,column=i-1)
    Label(sto,text='Exp           Rack   Manufacturer                      ').grid(row=14,column=5)
    Button(sto,width=10,text='Main Menu', bg='green', fg='white',command=main_menu).grid(row=12,column=5)
    ref()
    sto.mainloop()
Code for the deleted product in the Medical Store Management System Project in Python
In the code given below, which is for the function of delete product.
def delete_stock(): #OPENS DELETE WINDOW----------------------------------------------------DELETES A PARTICULAR STOCK ITEM
    global cur, c, flag, lb1, d
    apt.destroy()
    flag='d'
    d=Tk()
    d.title("Delete a product from Stock")
    Label(d,text='Enter Product to delete:').grid(row=0,column=0)
    Label(d,text='',width=30,bg='white').grid(row=0,column=1)
    Label(d,text='Product').grid(row=2,column=0)
    Label(d,text='Qty.  Exp.dt.     Cost                           ').grid(row=2,column=1)
    ren()
    b=Button(d,width=20,text='Delete', bg='red', fg='white',command=delt).grid(row=0,column=3)
    b=Button(d,width=20,text='Main Menu', bg='green', fg='white',command=main_menu).grid(row=5,column=3)
    d.mainloop()
Code for checking expired medicine in Medical Store Management System Project in Python.
The code given below is for the function of checking expired medicine.
def exp_date(): # expiry window open-----------------------------------------------------------------------------EXPIRY
    global exp, s,c, cur, flag, apt, flags
    apt.destroy()
    flag='exp'
    from datetime import date
    now=time.localtime()
    n=[]
    cur.execute("select *from med")
    for i in cur:
        n.append(i[1])
    c.commit()
    exp=Tk()
    exp.title('EXPIRY CHECK')
    Label(exp,text='Today : '+str(now[2])+'/'+str(now[1])+'/'+str(now[0])).grid(row=0, column=0, columnspan=3)
    Label(exp,text='Selling Expired Medicines and Drugs is Illegal').grid(row=1, column=0,columnspan=3)
    Label(exp,text='-'*80).grid(row=2, column=0,columnspan=3)
    s=Spinbox(exp,values=n)
    s.grid(row=3, column=0)
    Button(exp,text='Check Expiry date', bg='red', fg='white', command=s_exp).grid(row=3, column=1)
    Label(exp,text='-'*80).grid(row=4, column=0,columnspan=3)
    if flags=='apt1':
        Button(exp,text='Main Menu', bg='green', fg='white', command=main_cus).grid(row=5, column=2)
    else:
        Button(exp,width=20,text='Check Products expiring', bg='red', fg='white', command=exp_dt).grid(row=5, column=0)
        Button(exp,text='Main Menu', bg='green', fg='white', command=main_menu).grid(row=5, column=2)
    exp.mainloop()
Code for the Revenue in Medical Store Management System Project in Python
In the code given below, which is for the function of total revenue.
def show_rev(): # opens revenue window-----------------------------------------------------------------------TOTAL REVENUE
    global c, cur, flag,rev
    apt.destroy()
    cb=('cus_name','cus_add','items','Total_cost','bill_dt','bill_no','bill','val_id')
    flag='rev'
    rev=Tk()
    total=0.0
    today=str(time.localtime()[2])+'/'+str(time.localtime()[1])+'/'+str(time.localtime()[0])
    Label(rev,text='Today: '+today).grid(row=0,column=0)
    cur.execute('select * from bills')
    for i in cur:
        if i[4]==today:
            total+=float(i[3])
    print (total)
    Label(rev,width=22,text='Total revenue: PHP '+str(total), bg='blue',fg='white').grid(row=1,column=0)
    cx=0
    vsb=Scrollbar(orient='vertical')
    lb1=Listbox(rev,width=25, yscrollcommand=vsb.set)
    vsb.grid(row=2,column=1,sticky=N+S)
    lb1.grid(row=2,column=0)
    vsb.config( command = lb1.yview )
    cur.execute("select * from bills")
    for i in cur:
        if i[4]==today:
            cx+=1
            lb1.insert(cx,'Bill No.: '+str(i[5])+'    : PHP '+str(i[3]))
    c.commit()
    Button(rev,text='Main Menu',bg='green', fg='white',command=main_menu).grid(row=15,column=0)
    rev.mainloop()
Code for the billing in the Medical Store Management System Project in Python.
The code given below is for the function of a customer to pay a bill for their purchase of a medicine.
def billing(): # to create bills for customer-------------------------------------------------------------BILLING system
    global c, cur, apt, flag, t, name, name1, add, st, names, qty, sl, qtys, vc_id, n, namee, lb1
    t=0
    vc_id=''
    names=[]
    qty=[]
    sl=[]
    n=[]
    qtys=['']*10
    cur.execute("select *from med")
    for i in cur:
        n.append(i[1])
    c.commit()
    if flag=='st':
        st.destroy()
    else:
        apt.destroy()
    flag='st'
    st=Tk()
    st.title('BILLING SYSTEM')
    Label(st,text='-'*48+'BILLING SYSTEM'+'-'*49).grid(row=0,column=0,columnspan=7)
    Label(st,text='Enter Name: ').grid(row=1,column=0)
    name1=Entry(st)
    name1.grid(row=1, column=1)
    Label(st,text='Enter Address: ').grid(row=2,column=0)
    add=Entry(st)
    add.grid(row=2, column=1)
    Label(st,text="Value Id (if available)").grid(row=3, column=0)
    vc_id=Entry(st)
    vc_id.grid(row=3, column=1)
    Button(st,text='Check V.C.', bg='green', fg='white', command=blue).grid(row=4, column=0)
    Label(st,text='-'*115).grid(row=6, column=0,columnspan=7)
    Label(st,text='SELECT PRODUCT',width=25,relief='ridge').grid(row=7, column=0)
    Label(st,text=' RACK  QTY LEFT     COST          ',width=25,relief='ridge').grid(row=7, column=1)
    Button(st,text='Add to bill', bg='blue', fg='white', width=15,command=append2bill).grid(row=8, column=6)
    Label(st,text='QUANTITY',width=20,relief='ridge').grid(row=7, column=5)
    qtys=Entry(st)
    qtys.grid(row=8,column=5)
    refresh()
    Button(st,width=15,text='Main Menu', bg='green', fg='white', command=main_menu).grid(row=1,column=6)
    Button(st,width=15,text='Refresh Stock',bg='skyblue', fg='black', command=refresh).grid(row=3,column=6)
    Button(st,width=15,text='Reset Bill', bg='red', fg='white', command=billing).grid(row=4,column=6)
    Button(st,width=15,text='Print Bill', bg='orange', fg='white', command=print_bill).grid(row=5,column=6)
    Button(st,width=15,text='Save Bill', bg='blue', fg='white', command=make_bill).grid(row=7,column=6)

    st.mainloop()
Downloadable Source Code
Anyway, if you want to level up your programming knowledge, especially Python, try this new article I’ve made for you Best Python Projects with source code for Beginners.
But If you’re going to focus on web development using Django, you can download here from our list of Best Django Projects with source code based on real-world projects.
How To Run The Medical Store Management System Project in Python with Source Code?
To run this project, you must have installed a Pycharm on your PC (for Windows). This Medical Store Management System Project in Python with Source Code is free to download and use for educational purposes only!
After downloading the project you must follow the steps below:
1st Step: Unzip the file or Extract the file
2nd Step: Double-click the main.py
3rd Step: Project is ready to run
Admin Login:
- Username: admin
- Password: admin
Customer Login:
- Username: customer
- Password: customer
Conclusion
This Medical Store Management System Project in Python with Source Code is the way to enhance and broaden our competencies and logic ideas which is essential in training in the Python programming language which is maximum well-known and most usable programming language in lots of companies.
The Medical Store Management System Project in Python is an easy GUI primarily based application that is very smooth to recognize and use. It makes use of the Tkinter module for the GUI.
Related Article Below
- Hotel Management System Project in Python With Source Code
- Student Management System Project in Python with Source Code
- How To Make A Point Of Sale System In Python
- Best Python Projects for Beginners
- Python MySQL Connection: Simple Python Step-by-Step Guide
Inquiries
If you have any questions or suggestions about the Medical Store Management System Project in Python with Source Code, please feel free to leave a comment below.