
In JavaScript, Text Editor is a simple web-based code editor which provide a real-time editing on web, you can used any browsers such as (Google Chrome, Brave, Mozilla Firefox, and Internet Explorer).
Furthermore, this JavaScript Editor is one of the best projects that was developed because it provides an open source code which means that you can edit the entire code based on what you like and make it more unique JavaScript Code Editor.
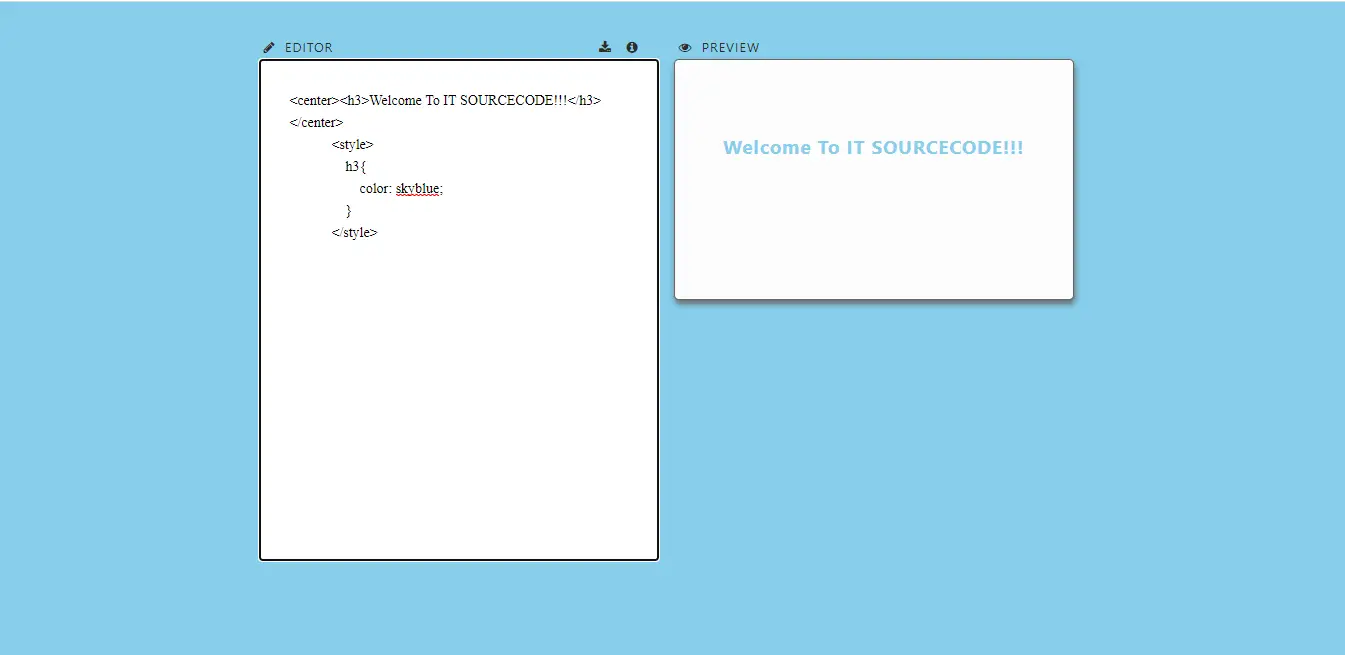
This web applications is a straightforward HTML markup previewer. That allows users to view the editor content or editing page on your browser when you start the project, where you can input words on one side of the page. At the same time, look at the results on the other side.
What is Text Editor?
The Text Editor in JavaScript is a web applications created on JavaScript, HTML, and CSS for a better user interfaces. This project serve as a learning curve or guide if you want to create your own one of a kind online Text Editor.
In addition, HTML Editor In JavaScript is divided into two sections where user can type any term on the left side of the editor page, and the modifications will appear automatically on the right side for better user experience.
You can also make changes on the left side of the page and immediately view the results on the right side.
I have here a suggested list of Best JavaScript Projects with Source Code Free to download and I’m sure this can help you to improve your skills in JavaScript programming and web development as a whole.
Project details and technology:
| ABOUT PROJECT | PROJECT DETAILS |
|---|---|
| Project Name : | Text Editor In JavaScript |
| Project Platform : | JavaScript |
| Programming Language Used: | JavaScript, HTML, and CSS |
| Developer Name : | itsourcecode.com |
| IDE Tool (Recommended): | Sublime |
| Project Type : | Web Application |
| Database: | None |
| Upload Date: | 9/25/2022 |
Project Output:
Text Editor In JavaScript With Source Code : Steps on how to create the project
Time needed: 5 minutes
These are the steps on how to create Text Editor In JavaScript With Source Code
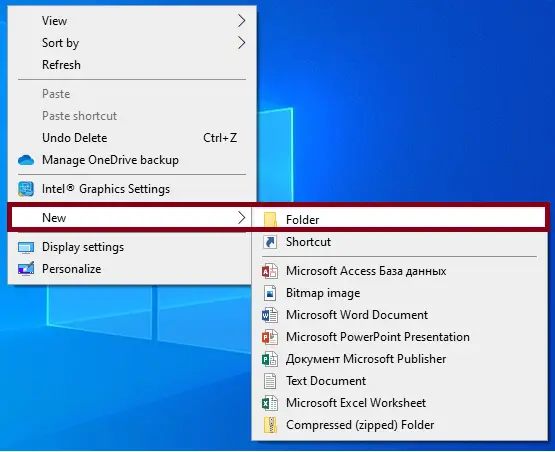
- Step 1: Create a folder.
First, create a folder and named it.
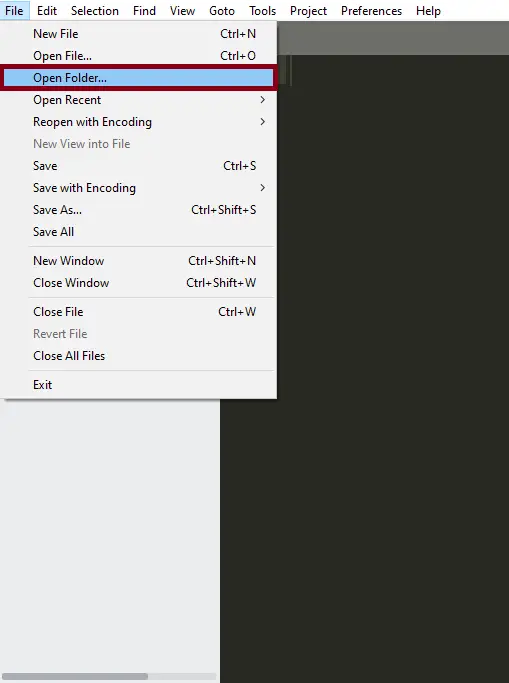
- Step 2: Open the folder in “Sublime Text”.
Second ,after creating a folder, open it in “sublime text“.
- Step 3: Create a html file.
Third, create a “html” file and save it as “index.html“

The code given below is for the html module
<head>
<meta charset="UTF-8">
<meta name="viewport" content="width=device-width, initial-scale=1">
<meta name="description" content="My little editor: a simple HTML previewer"/>
<link rel="stylesheet" href="https://cdnjs.cloudflare.com/ajax/libs/font-awesome/4.7.0/css/font-awesome.min.css">
<title>Text Editor (IT SOURCECODE)</title>
</head>
<header>
<h1>Text Editor (IT SOURCECODE)</h1>
<!-- rich text editing, rich text editor, plain text -->
</header> <hr>
<main>
<div class="container">
<div class="toolbar-wrapper" id="tool-bar">
<ul class="toolbar">
<li><button id="bold" class="tool"><b> B </b></button></li>
<li><button id="ital" class="tool"><em> i </em></button></li>
<li><button id="under" class="tool"><u> U </u></button></li>
<li><button id="hili" class="tool"><mark> h </mark></button></li>
<li><button id="strike" class="tool"><s> s </s></button></li>
<!-- <li><button id="" class="tool"> ? </button></li>
<li><button id="" class="tool"> ? </button></li>
<li><button id="" class="tool"> ? </button></li>
<li><button id="" class="tool"> ? </button></li>
<li><button id="" class="tool"> ? </button></li>
<li><button id="" class="tool"> ? </button></li>
<li><button id="" class="tool"> ? </button></li>
<li><button id="" class="tool"> ? </button></li>
<li><button id="" class="tool"> ? </button></li>
<li><button id="" class="tool"> ? </button></li>
<li><button id="" class="tool"> ? </button></li>
<li><button id="" class="tool"> ? </button></li> -->
</ul>
</div>
<div class="form-item">
<div class="editor-wrapper">
<label class="text-options">
<span class="text-label">
<i id="" class="fa fa-pencil" aria-hidden="true"></i>
Editor
</span>
<div>
<i class="fa fa-download" aria-hidden="true"></i>
<i class="fa fa-info-circle" aria-hidden="true"></i>
</div>
</label>
<textarea type="text"
name="submitted-post"
id="submittedPost"
placeholder="Write something here..."
rows="20"
cols="40"
maxlength="1500"
autofocus="true"
required="required"
><center><h3>Welcome To IT SOURCECODE!!!</h3></center>
<style>
h3{
color: skyblue;
}
</style>
</textarea>
</div>
<div class="preview-wrapper">
<!-- <span class="description">Preview</span> -->
<label>
<i class="fa fa-eye" aria-hidden="true"></i>
Preview</label>
<div id="preview">
<p id="preview-item" class="preview-inner"></p>
</div>
</div>
<form id="userSubmission" class="submit-form">
<fieldset>
<!-- <legend>Contribute</legend> -->
<label class="profile-item">First name: </label>
<input name="submitted-fname"
id="submittedFname"
placeholder="first"
autocomplete="First Name"
type="text"
size="18">
<label class="profile-item">Last name:</label>
<input name="submitted-lname"
id="submittedLname"
placeholder="last"
autocomplete="Last Name"
type="text"
size="18">
<label class="profile-item">Email address:</label>
<input name="submitted-email"
id="submittedEmail"
type="email"
autocomplete="off"
placeholder="[email protected]">
<label class="profile-item">Username:</label>
<input name="submitted-username"
id="submittedUsername"
placeholder="4 to 8 characters"
autocomplete="firstInitalLastName"
type="text"
required="required"
minlength="4"
maxlength="8"
size="10">
<label class="profile-item">Date published:</label>
<input name="pub-date"
id="pubDate"
type="date"
autocomplete="on">
<button class="submit-bt" type="submit">Submit</button>
<!-- <label class="notepad">Post:</label> -->
<!-- wysiwyg editor -->
</fieldset>
</form>
</div>
</div>
</main>
In this module which is the html module of the simple project.
The code given below is for the css module
<style>
    * { box-sizing: border-box; }

html {
    font-family: system-ui, "Segoe UI", Roboto, Helvetica, Arial, sans-serif, "Apple Color Emoji", "Segoe UI Emoji", "Segoe UI Symbol";
    font-size: 1rem;
    background: skyblue;
    color: rgb(44,44,35);
}

body { margin: 0;
background-color: skyblue;
 }

.container {

    max-width: 1500px;
    padding: 0 15px;
    margin-left: auto;
    margin-right: auto;
    /* overflow: hidden; */
}

header {
    display: flex;
    flex-flow: column wrap;
    align-items: center;
    justify-content: flex-start;
    width: 100%;
    padding: 0 15px 0 0;
    margin: 0 ;
}

h1 {
    line-height: 1.2;
    margin: 100px 0 50px 30px;
    padding: 0;
}

.formDesc {
    /* display: block; */
    font-size: .8em;
    color: rgb(44,44,35);
    letter-spacing: 1px;
    padding: 15px 15px  0 0 ;
    /* width: 25%; */
    margin: 0 15px 0 30px ;
}

@media only screen and (min-width: 700px) {


}


@media only screen and (min-width: 1200px) {
    body { margin: 0 25%; }


}

h2 { line-height: 1.3; }
h3 { line-height: 1.4; }
h4 { line-height: 1.5; }
h5 { line-height: 1.6; }
p, ul, ol, li, a, table, span { line-height: 1.6; }

form {
    background: #efefef;
    border: .5px solid #666;
    border-radius: .3em;
    margin: 0 30px 30px 0;
    display: none;
}

.form-item {
    display: flex;
    flex-flow: row nowrap;
    /* flex: 1 1 0 auto; */
    justify-content: center;
    align-content: center;
}

label,legend {
    display: block;
    text-transform: uppercase;
    font-size: .8em;
    color: rgb(44,44,35);
    letter-spacing: 1px;
}

/* legend {
    border: 2.5px solid white;
    padding: 5px 15px;
    font-size: 1em;
} */

input {
    font-family: inherit;
    display: inline;
    padding: 10px;
    margin: 15px 15px 30px 15px;
    border: .5px solid #666;
    border-radius: .3em;
    width: 90%;
  }

  .submit-bt {
      text-transform: uppercase;
      letter-spacing: 1px;
      padding: 10px;
        margin: 15px 15px 30px 15px;
        border: .5px solid #666;
        border-radius: .3em;
      background-color: #444;
      color: #efefef;
        box-shadow: 1px 1px 1px #444;
  }

  fieldset {
      margin: 0;
      padding: 60px;
      border: 2px solid #efefef;
      border-radius: .3em;
  }

  textarea {
      line-height: 1.6;
        border: .5px solid #666;
        border-radius: .3em;
        overflow: auto;
        resize: none;
        width: 100%;
        padding: 30px;
        font-family: Menlo;
        font-size: 14px;
  }

  textarea::placeholder {
    color: #666;
    font-family: Menlo, system-ui,Consolas, "Segoe UI", Roboto, Helvetica, Arial, sans-serif, "Apple Color Emoji", "Segoe UI Emoji", "Segoe UI Symbol";
  }

hr {
    border: none;
    border-bottom: .5px solid rgb(44,44,35);
    margin: 30px auto;

}

#preview {
    font-family: inherit;
    letter-spacing: 1px;
    padding: 30px;
    line-height: 1.6;
    border: .5px solid #666;
    border-radius: .3em;
    overflow: auto;
    background: #fcfcfc;
    box-shadow: 1px 4px 6px #666;
    white-space: pre-line;
}

.editor-wrapper,
.preview-wrapper {
    margin: 15px 15px 15px 0;
    min-height: 800px;
    min-width: 400px;
    max-width: 100%;
}

.preview-wrapper {
    height: 900px;
}

.toolbar {
    list-style-type: none;
    margin: 50px 0;
    padding: 0;
    width: 100%;
    display: flex;
    flex-flow: row wrap;
    justify-content: center;
    align-content: flex-start;
}

.tool  {
    font-size: 1em;
    margin: 5px ;
    background: #f7ff9d;
    color: rgb(44,44,35);
    text-transform: lowercase;
    letter-spacing: 1px;
      padding: 5px;
        border: .5px solid #666;
        border-radius: .15em;
}

.tool:hover {
    box-shadow: 1px 2px 6px rgb(44,44,35);
}

.tool:active {
    background-color: rgb(44,44,35);
    color:#f7ff9d;
}

.tool:focus {
    background: blue;
}


mark {
    border: .5px solid #d7ea00;
}

.text-options {
    width: 100%;
    margin: 0 ;
    padding: 0 15px 0 0 ;
    display: flex;
    flex-flow: row nowrap;
    justify-content: space-between;
   align-items: center;
}

.text-label {
    /* justify-self: flex-start; */
    margin: 0;
    padding: 0;
}


.fa {
    align-self: stretch;
    color: rgb(44,44,35);
    font-style: normal;
    padding: 5px;
    margin: 0 ;


}
</style>
In this module which is the css module of the simple project.
The code given below is for the JavaScript module
<script>
    'use strict';

// let rawContent = prompt("Please enter some text", "Peach and sesame crumble");

// document.getElementById('contentWrapper').innerHTML = rawContent;


let userPost = document.getElementById('submittedPost');
let userFname = document.getElementById('submittedFname');
let userLname = document.getElementById('submittedLname');
let userEmail = document.getElementById('submittedEmail');
let username = document.getElementById('submittedUsername');
let publishDate = document.getElementById('pubDate');
let preview = document.getElementById('preview-item');

document.addEventListener('keyup', printSync);

function printSync(e) {
    if (e.keyCode >= 3 || e.keyCode <= 12 ||
        e.keyCode >= 16 || e.keyCode <= 20 ||
        e.keyCode == 32 ||
        e.keyCode >= 46 || e.code <= 90 ||
        e.keyCode >= 96 || e.keyCode <= 111 ||
        e.keyCode >= 160 || e.keyCode <= 171 ||
        (e.keyCode == 16 && e.keyCode <= 171)) {
        // preview.textContent = `${submittedPost.value}`;
        preview.innerHTML = submittedPost.value;

    } return;
}


let boldButton = document.getElementById('bold');
boldButton.onclick = () => {
    if (submittedPost.selectionStart != submittedPost.selectionEnd) {

        let selected = submittedPost.value.slice(submittedPost.selectionStart, submittedPost.selectionEnd);

        submittedPost.setRangeText(`<strong>${selected}</strong>`);

        preview.innerHTML = `${submittedPost.value}`;
    } return;
}


let italButton = document.getElementById('ital');
italButton.onclick = () => {
    if (submittedPost.selectionStart != submittedPost.selectionEnd) {

        let selected = submittedPost.value.slice(submittedPost.selectionStart, submittedPost.selectionEnd);

        submittedPost.setRangeText(`<em>${selected}</em>`);
        preview.innerHTML = `${submittedPost.value}`;
    } return;
}

let underButton = document.getElementById('under');
underButton.onclick = () => {
    if (submittedPost.selectionStart != submittedPost.selectionEnd) {

        let selected = submittedPost.value.slice(submittedPost.selectionStart, submittedPost.selectionEnd);

        submittedPost.setRangeText(`<u>${selected}</u>`);
        preview.innerHTML = `${submittedPost.value}`;
    } return;
}

let hiliButton = document.getElementById('hili');
hiliButton.onclick = () => {
    if (submittedPost.selectionStart != submittedPost.selectionEnd) {

        let selected = submittedPost.value.slice(submittedPost.selectionStart, submittedPost.selectionEnd);

        submittedPost.setRangeText(`<mark>${selected}</mark>`);
        preview.innerHTML = `${submittedPost.value}`;
    } return;
}

let strikeButton = document.getElementById('strike');
strikeButton.onclick = () => {
    if (submittedPost.selectionStart != submittedPost.selectionEnd) {

        let selected = submittedPost.value.slice(submittedPost.selectionStart, submittedPost.selectionEnd);

        submittedPost.setRangeText(`<s>${selected}</s>`);
        preview.innerHTML = `${submittedPost.value}`;
    } return;
}


</script>
In this module which is the JavaScript module of the simple project.
Downloadable Source Code
Summary
If you want to enhance you programming skills on web you can explore more on these site we provide a 100 percent of free source code with a lot of programming languages such as Python, PHP, and Java.
Related Articles
Inquiries
If you have any questions or suggestions about Text Editor In JavaScript, please feel free to leave a comment below.